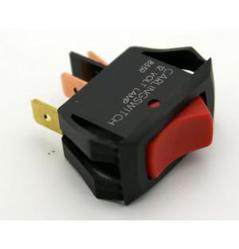
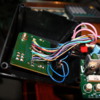
Stan, Assuming those are the same LED holders they used. They would lock from the back. The first piece would be inserted in the front panel with the LED installed. Then the ring would be locked from the back.


This would verify my conclusion that most/or all of the devices were installed on the cover. Then the PCB board was aligned with the devices and soldered.


So, if the switch is unsoldered from the circuit board. There might be a chance to remove the switch via the top by destroying it...See posters lock picture on previous post.


If you get the switch out. A toggle switch that was depth appropriate might work.


Thomas, I don't know if all this talk of de-soldering multiple parts is scaring you off, but I agree with Shawn about how they assembled this.  If you have a moment try a small mirror to see if you can look at the hidden side of the circuit board.  If the board is tan/brown colored (as opposed to green as on the exposed side) with no printed-wires, then it is a so-called single-sided circuit board.  This will make it so much easier to de-solder the LEDs. 


ogr ebay rocker switch

An earlier post suggested measuring exterior switch dimensions.  I suggest you measure the distance between the board and the control panel and of the spacing/dimensions of the two soldered switch tabs in the upper left of my photo.  For example, here's a rocker switch on eBay (2 for 99 cents free shipping) that handles 10 Amps which ought to be enough!  It has 2 tabs with dimensions per the drawing.  The point is it might make a better case for attempting to remove the board if you knew ahead of time you had a replacement switch that would fit.  Though I don't know if you will easily find other than the universal "1" "0" labeling vs. the "ON" "OFF" style used on the original switch.


Attachments

Images (1)
  • ogr ebay rocker switch

Stan,


I will need to purchase some of the de-soldering material from RadioShack this week in order to get through any more progress fixing this in the methods recently described. I'm a little more concerned damaging the board accidentally.


However, some say I should NOT buy external switches from RadioShack, but there aren't really any other places I can think of that will offer something better other than Greenbrook.

If you cannot find a replacement switch, do what Don and Fred suggested a while ago. Solder a heavy gauge jumper across the terminals of the power switch. This effectively shorts out and by-passes the switch. Then install an inline switch in the power cord that plugs into the box. Your local big box home improvement store should have something in their electrical department.


Chris

LVHR

Originally Posted by lehighline:

If you cannot find a replacement switch, do what Don and Fred suggested a while ago. Solder a heavy gauge jumper across the terminals of the power switch. This effectively shorts out and by-passes the switch. Then install an inline switch in the power cord that plugs into the box. Your local big box home improvement store should have something in their electrical department.


Chris

LVHR

NOW, I remember......(It's been several years) That's exactly what I did!!! I confirmed this by going downstairs and looking!!! DUHHHHH


FREDSTRAINS

Last edited by Fredstrains

Clearly option "B" of bypassing the internal switch as Fredstrains did is by far the easiest.


Option "C" only makes sense if you can find a replacement switch that exactly fits...or fits with minimal modification of the panel such as a slightly mounting hole.  To that end, the next step is still to make the switch dimension measurements...size of the mounting hole, distance to the board, size of terminals and distance between them, etc..


ogr desolder 1

I fully understand your concern about de-soldering and potentially damaging the board.  Again, I'd take a peek on the hidden side of the board to confirm it has solder joints and printed-wires on only one side.  If it's not, I wouldn't recommend option "C".  Here's an example of the desired single-sided board.  The hidden side is brown/tan (vs. green) and there's no solder joints holding the legs/leads of the components. 


In case it's not clear, what you're trying to do with the braid is soak up the solder so the legs of the component are loose in the hole.  In photo below I used braid to do so on a two-legged component.  It's hard to see but the legs are loose in the hole on the left and can be separated from the board as shown on the right.  This took about 30 seconds (I actually have a video of this if you're interested).  I looked at the RS braid on their website and several users gave it negative rating claiming it does not have a flux coating; you can buy braid with flux on it but apparently not at RS. RS sells rosin paste flux but it's expensive (more than the braid).  If you know someone who solders a lot they should have a jar of rosin flux - for this job you'd need less than a teaspoon.  Most paste flux will leave the brown residue shown which can be cleaned up with, say, a cotton swab and some alcohol.


ogr desolder 2


Attachments

Images (2)
  • ogr desolder 2
  • ogr desolder 1

One thing I've learned over the years! Take your time and do it right. This bridge is a wonderful collectable..made 1 year. I would take my time and try to get a switch to replace the bad one. There are others out there that have this bridge. I assume they will eventually have the same issue. While your box is open...we can help you in trying to repair it the right way. If we can determine a way to get the BAD switch out from the top after desoldering. Then a suitable replacement for the switch is ascertained.

This will help us all out that own the bridge.

Jim,

Glad it worked out for you. My Bridge has been working like that for quite a number of years. My only problem was when I moved and built a new Layout (much smaller) I didn't have enough Straight Track before my Bridge and because of the "Swing Out" of my Lionel BigBoy, it hit the first Girder of the Bridge. I had to cut the Girder to allow for that. NO ONE told me there were wires coming down thru the Girder. Needles to say I cut thru all of them with my Dremel. Had to remove the Bridge and repair the Wires. WHAT A JOB!!! BEWARE!!!!


Fred

Fred


Thanks for the heads up on the wires located in the bridge. What a mess you must have had. Very tedious job , I am sure.


My bridge is doing just fine. I sure did not want to decoder that rocker switch on the control box. Finding a replacement that would fit exactly is a long shot. I put an external switch on the low voltage side of the transformer and mounted the switch on my control panel.  All is well.

This is a older topic that's been bugging me. I have one of these beast sitting in the box, I think there is a easy to remove the power switch Intact. So, a suitable replacement can be found.


I'm sure the components were inserted in the case. (LEDS and switch's)

The PCB board then laid over the top of the components electrical leads and soldered.  So, one would assume unsoldering all of the components leads. Then lifting the circuit board away from the case. Is the only way to remove the switch.


But, there may be another way.


1) Notice, the standard rocker switch in the first picture. Pressure tabs on each side of

    the switch that snap/lock into the case.


    54-083-300x313

54-083-300x313


2) Now, look at the picture of the underside of the circuit board. Notice, there is plenty

    of room between the PCB Board and the bottom side of the case. Bend a small 

    piece of metal at a right angle to use as a tool for the on/off switch removal.


    Insert the tool between the PCB board and the rear side of the upper case. Release

    the clip on one side of the switch. Then the other...


   Just a thought?


IMG_3360%255B1%255D

Attachments

Images (2)
  • Switch: Typical rocker switch
  • IMG_3360%255B1%255D
Last edited by shawn

Even if that worked (which I doubt) the new switch would have to match exactly the contact area of the old switch. And it most likely would not. I had the same issue with my bridge and I merely jumped the old switch on the circuit board and created an external toggle switch and placed it on my panel. much easer fix and no chance of damage to existing control box.

 Originally Posted by Jim Stefl:

Even if that worked (which I doubt) the new switch would have to match exactly the contact area of the old switch. And it most likely would not. I had the same issue with my bridge and I merely jumped the old switch on the circuit board and created an external toggle switch and placed it on my panel. much easer fix and no chance of damage to existing control box.

That's not true. Those switches are very common. You could also cut the switch terminals down Then solder wires and com underneath the board to the top.


Soes anyone have the numbers and markings on the switch

Originally Posted by shawn:
 Originally Posted by Jim Stefl:

Even if that worked (which I doubt) the new switch would have to match exactly the contact area of the old switch. And it most likely would not. I had the same issue with my bridge and I merely jumped the old switch on the circuit board and created an external toggle switch and placed it on my panel. much easer fix and no chance of damage to existing control box.

That's not true. Those switches are very common. You could also cut the switch terminals down Then solder wires and com underneath the board to the top.


Does anyone have the numbers and markings on the switch...when, I do mine I will show you.


As I read the exit polling data, the voters are saying the winner is to simply solder 2 wires out to an external bypass switch.  Done in 5 minutes. The risk of messing something up on an irreplaceable circuit board outweighs the benefit of replacing the switch.


Separately, if you believe there's enough room to fit a tool to release those pressure tabs, then it seems there's room insert a dental mirror tool as I showed earlier to peer at the sides of the switch with bright light to read any numbers on the switch. If this yielded a part number that could be cross-referenced, it would make a better case to make your release tool and unsolder the switch tabs.


Stan, I agree for expedience at getting the accessory going. The bypass switch is the way to fly. But, some of us don't like repair a hole in a muffler with tape. It's the old You do it your way, I'll do it mine". I believe in taking my time and FIXING things in the the "BEST" possible manner to keep some state of originality.


Oh, By the way Stan. Take your exit polling data and put it were the sun doesn't shine.

What the hell is your problem? I'm just trying to look for a non-half *** way of fixing

mine.  


Last edited by shawn

Add Reply

Post

OGR Publishing, Inc., 1310 Eastside Centre Ct, Suite 6, Mountain Home, AR 72653
800-980-OGRR (6477)
www.ogaugerr.com

×
×
×
×
Link copied to your clipboard.
×
×