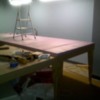
I have been reading here for a while. My intention is for my kid to get his setup off the carpet and continue using his imagination. He is 5. We have collected a lot in a short time of track and engine, cars. All used/great bargains. I have the skills to build him a table/layout. But I also want to see it finished. I like things completed somewhat. I am convinced we do not want a town or intrinsically detailed finished product. Paint and some rocks/mountains/ trees would be all we would ever do. I was also pretty firm on wanting 048 turns or larger. We currently run a large 072 oval on carpet. The 3 long spurs that we have are nice to use as a yard. We have an old T1 chessie that requires 042 turns. I wanted operations, coal loader, water tower etc. to keep a purpose. If one of you could, that would be helpful. we have a large space to work with but my budget only allows so much. Bottom photo is what we have. Any input?
Replies sorted oldest to newest
If it were me, I'd build what I want instead of buying something. My first layout (I was maybe 8 or 9) when I was a kid was a lot smaller than yours, but I built it--it was mine. Building a layout from scratch teaches some important lessons that carry throughout life: patience, delayed gratification, electrical, mechanical etc. Sure, any layout is fun as the finished product, but I think both you and your son will get much more out of the hobby if you build a layout together the way you want it. Even if you have to start smaller than what you really want, the good news about that is you have room to expand as budget allows.
Yes; definitely - - build the layout.
And in the process, you'll make mistakes, which are the best teachers. (Just don't make the same mistake twice.)
Alex
Build! Build it together.
Your son's desires are a lot simpler than you think. A green painted flat topped table meets his (and your) needs today. Tomorrow you can added something new. This will teach your son the skills he needs to enjoy the hobby.
Jan
I would suggest getting a O-gauge layout software program. Designing your own various layout plans is (now) a major portion of the enjoyment of model railroading. When you have designed about 5 or so layouts that are possible for your space, analyze the pro's and con's of the layouts. Pick one out and build the support system for the track.
Get enough track down to run a train as soon as possible. Build from there, making changes that seem right as you work with what you have down. Add scenery, and make track changes that may arise, if any do. Have fun. Nothing has to be permanent. Your son is growing and his likes and dislikes will change as he matures. Allow for changes.
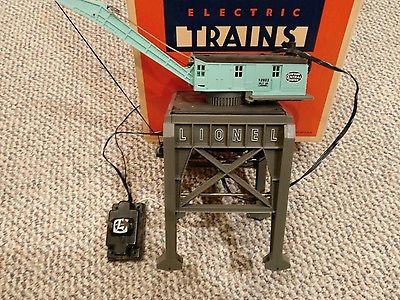
 I see too many boxcars. At the age of five a fleet of flatcars and gondola to put things in are the key to kid fun. And a minimum of two sidings, at different areas. The coal loader will rapidly become boring. As will most accessories, with the exception of a remote controlled crane to load and unload. A crane never gets boring. And promotes development of a child's dexterity.
I also like the robotic arm, which could be another accessory to load and unload cargo. They are relatively inexpensive.
Attachments
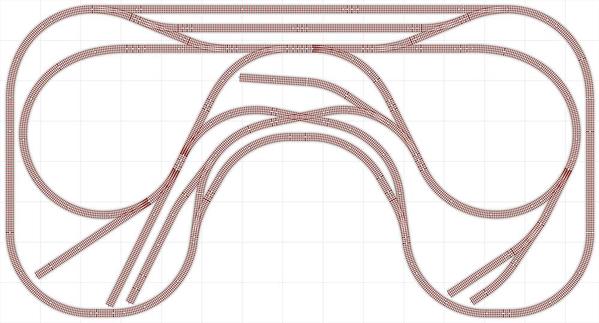
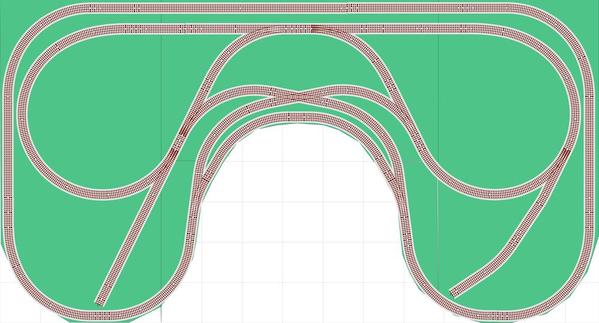
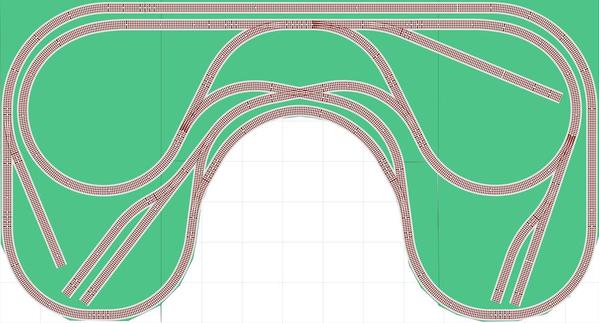
Perhaps something along these lines: This was created using AnyRail layout design software. It is 8' X 14'10". The AnyRail file is attached below. This is minimum O-48 curves and turnouts (Fastrack). This configuration gives you TWO main lines to run separately, OR the 22.5 degree crossing twice-around run as you indicated. It includes a passing track, and some ideas about siding positions. Trains can be reversed in the two reverse loops.
Attachments
JH,
Hi! I can be resourceful and found the deal. The appeal for me is the 4' x 4' sections that are pre-built with leveling feet.
If you spaced out the 5 sections and used 3/4" 7-ply decking you could support close to what you have on the floor.
The trestle bents are nice as well as the GG track on them.
The seller thinks too much of his track. "There's over $600 in track and switches"
Offer $200 for the sectional tables, copy one at home for a total of six and design your own plan and create the deck shaped to your layout. Perhaps add a little more to the offer for the 2" foam. That can always be used for terrain building.
Buy the layout building material. The seller should be happy to reclaim the space and can liquidate the rest.
What's your floor layout size? Can you stay with O72?
Attachments
If you don't care about the passing track, this arrangement has longer spurs for industry, and the option to put a spur in one or both of the reverse loops. In both versions, the cross-overs are made with O-60 turnouts.
Attachments
Jhagewood posted:I have been reading here for a while. My intention is for my kid to get his setup off the carpet and continue using his imagination. He is 5. We have collected a lot in a short time of track and engine, cars. All used/great bargains. I have the skills to build him a table/layout. But I also want to see it finished. I like things completed somewhat. I am convinced we do not want a town or intrinsically detailed finished product. Paint and some rocks/mountains/ trees would be all we would ever do. I was also pretty firm on wanting 048 turns or larger. We currently run a large 072 oval on carpet. The 3 long spurs that we have are nice to use as a yard. We have an old T1 chessie that requires 042 turns. I found a used layout for sale but it was built with 036. Its 85% complete for what we would do to it. Buying it seems like a great idea from a completion/ also financial standpoint. Plus he would get to finish mountains/ plaster, paint, and some landscape. However I wanted operations, coal loader, water tower etc. to keep a purpose. This one seems limited on that. I also tried redesigning it on scram with 048 turns and didn't have much luck. I believe the 22.5 crossing would be impossible with 048. Which is ok, but I couldn't complete the layout on scarm. If one of you could, that would be helpful. Also any input on not purchasing a layout with 036 turns designed as the one in the picture.. we have a large space to work with but my budget only allows so much. Bottom photo is what we have. Any input?
well i think it depends how much room you have. if u have alot of room then yes make a layout.
but if its limited keep the carpet and put buildings and trees and mountains.
For a table-top with Fastrack, I would use 2" 4X8 sheets of foam, cut as shown. With Woodland Scenics grass mats on top. The combination of the foam table top plus the grass mats (which have a rubber-like substrate) helps a lot with the Fastrack noise, so that it is not a problem for me: normal conversation volume level is understandable.
For power, if running command control, one power source can supply the entire layout. For conventional, I would insulate the connections between the return-loop inner route; and the rest of the layout powered together. So that would be two transformers.
Run two power taps for each layout route, placed at the middle of each loop (minimum of four power connection points overall). For power, two Lionel CW-80s would be adequate, for a total of 160 watts (approximately). For two transformers, plug both into the same power strip with an on-off switch; then you can connect the common (black) power taps together to supply the outside rails. The red (hot) (middle rail) are then insulated at the breaks between the reverse-loop to reverse-loop route, and the longer outside route. Trains can cross over the power blocks without problem.
Lionel's 1 3/8 fitter track connections between the turnouts have a convenient wire spanning the two middle rails, which can be removed to make the 1 3/8 fitter tracks insulating the two power districts.
Attachments
In my opinion, your plan is way too complicated for an 8 year old first time builder. Keep it a lot simpler, let him create some easy stuff. On a table top, he can always change things up later on.
I like your idea of the remote control crane, that would add some fun!
Definitely build it. Your son is not too young to learn about construction, electricity and creative artistry. It is absolutely fantastic bonding time and you two will be inseparable constantly talking about the layout and ideas.
Don't think of this as a project that is completed in all of the logical steps until then end. It might seem over whelming and you might get very frustrated trying to complete one of the steps all at once. Work out of order so you can learn all of the building skills at once and improve all of them as you go.
Get your basic table or frame built and wired to get a train running first. Then only work on small sections on the layout at a time doing various tasks from building, wiring, scenery, laying track, or whatever you want. Build it in stages and constantly improve as you go from section to section.
Variety of work is what makes this fun. I can walk into my basement layout today and choose to do a variety of things depending on what I feel like doing. Construction, Wiring, Ballast, Scenery, switch panels or just run trains.
This hobby is really a whole lot more than watching a train go in circles. If you buy a completed layout for your son to play with I predict he will be board and done with the hobby before age 10.
Using Fastrack, you can build the layout in phases (which also keeps the cost down, as turnouts are a major expense). You might start with this layout, where two operators can run without switching (great when running trains with a youngster). Don't screw the track down (it will not shift or move), then you can add additional when you are ready.
Attachments
Five year olds like to (1) run trains FAST. Thus at least one oval with maximum curves. (2) they also like to race two trains. Thus a double track oval. They like to make structures out of plastic blocks or lego, so one area should be flat and clear. Buy plenty of blocks. Another five year old treat is pushing toy cars around. They LOVE this activity. So you need a painted highway next to the edge that the child can reach and a variety of painted routes and a fleet of a half dozen of identical trucks or buses. They don't have to be scale. It is nice to have the layout close to the floor. Maybe twelve inch legs, and sturdy enough for them to get on the board. My layout at age five was on twelve inch legs. It was two foot away from the wall so I could walk around it. Painted roads and features so when they play on the board they can not break things. Low yard signals of the lionel type.. The changing colors as the train go by are interesting to a child. Also think exploding boxcar and missile launch car. This should be a play layout. Finally, think a large oval and a switch leading to the inside. You lay no track here, but have a box with four manual switches and lots of tubular track (cheap). Easy to put together. The child will change this area, with various combinations of track and switches. This track will NOT be tacked down. Forget scale and trees and detailed modeling. Changing the interior track layout sidings by the child will have play value. Think about a long runway for planes painted on with a sturdy metal fighter the child can imagine rolling down the painted runway and making it zoom in his hands! Another great five-year old activity. And a military area filled with toy soldiers and vehicles. How about a theme of a military railroad serving an airfield ?Remember for a five year old you are constructing a "play" activity. There should be no sharp corners. Round the four ninety degree angles at the corners of the board. Think "menards". They have six packs of flatcars with tanks for example, or helicopters. They have the best selection of five-years old play stuff of anyone at reasonable prices. The low yard signals of the type shown are five year old proof when they go on the board. Buy several. Cutting to the chase I vote no on buying a finished layout. It's a boring layout for a five year old. All you need is 3/4 plywood. I recommend five by nine. Forget about the foam top. They won't be running enough to worry about noise. In four years build a conventional layout. Your initial carpet layout with sidings was excellent for a five year old. When you paint roads you do the edges and let him paint in between.
Attachments
An optimized plan with the 22.5 degree crossing and O-48 minimum everywhere. It includes a twice-around route, two return loops, and two independent routes. O-60 where possible on the outer route route including O-60 easements. Some ideas for spurs, with Fastrack lighted bumpers. I have attached the AnyRail file.
Attachments
Jhagewood posted:We have an old T1 chessie that requires 042 turns. I found a used layout for sale but it was built with 036.
I own an old Chessie T1 (6-18011) and it navigates O36 curves. Remember, O36 didn't exist back then. Since the manufacturers list the minimum curve on what track they produce, sometimes you can get away with a slightly tighter curve than the spec. Examples are MTH O54 minimum on Lionel O48, anything spec'd for O42 on O36, etc. The key is to test it. And just because my T1 works on O36, doesn't mean yours would. Wheel gauges on O gauge are not an exact thing. Again, you have to test it.
With that said, IMHO trains look better on wider curves. The Chessie T1 looks out of place on O36 curves (honestly O42 as well). If you are space constrained, don't be afraid to use easements. I built a 4x8 holiday layout and used O72 curves leading into O36 curves. The trains motion looked much better.
Building vs buying is really only a choice you can make. I have always built my layouts but I suppose if I found one for sale that fit the bill, I would consider buying it. You can also save time if you use something like Mianne Benchwork to build the "bones" of your layout.
Good luck and happy railroading!
Tony
I agree with Tony's comments about wider diameter curves looking better. So I was curious as to what this might look like with a minimum diameter of O-60 for the outer perimeter route, which will run O-54 locomotives. Since you have been running O-72 on the carpet, this O-60 minimum might be more satisfying. So this version is 8 X 16. Jhagewood, do you have room for this, you did not specify what area you had in mind?
Attachments
Tommy posted:
I see too many boxcars. At the age of five a fleet of flatcars and gondola to put things in are the key to kid fun. And a minimum of two sidings, at different areas. The coal loader will rapidly become boring. As will most accessories, with the exception of a remote controlled crane to load and unload. A crane never gets boring. And promotes development of a child's dexterity.
I also like the robotic arm, which could be another accessory to load and unload cargo. They are relatively inexpensive.
Funny that you mentioned that! He already owned one before RR started and we have about 13 gondolas they are a kids best friend. Flat cars are kinda short only have about 6. I need a scale size crane for the layout. His tower crane is a little bit much. But it does clean up derailments. He is a little Different he doesn't like to run them fast at all ZERo. I will sometimes I was probably more responsible for what speed lessons we have learned. And weeding out couplings that unlock under heavy loads is something nobody here mentioned But I have it fixed now.
Attachments
Tommy posted:
I see too many boxcars. At the age of five a fleet of flatcars and gondola to put things in are the key to kid fun. And a minimum of two sidings, at different areas. The coal loader will rapidly become boring. As will most accessories, with the exception of a remote controlled crane to load and unload. A crane never gets boring. And promotes development of a child's dexterity.
I also like the robotic arm, which could be another accessory to load and unload cargo. They are relatively inexpensive.
Ken-Oscale posted:I agree with Tony's comments about wider diameter curves looking better. So I was curious as to what this might look like with a minimum diameter of O-60 for the outer perimeter route, which will run O-54 locomotives. Since you have been running O-72 on the carpet, this O-60 minimum might be more satisfying. So this version is 8 X 16. Jhagewood, do you have room for this, you did not specify what area you had in mind?
Well the answer is Yes and No. We have a Basement with a finished room about 17X20. But I wont fill up that space. Thanks for the Drawing. I have been playing in Scarm, I will try to post some idea and await some feedback. I kinda had my mind set on 060 turns on about a 5'10'' wide table X 12ft long (the length could grow some).
Tony I tried the Chessie in 036 it does go around but the loco is bucking up and down on the drive wheels. I tell ya it will go threw a 3/4 length 036 turn no problem. ( a 036 switch with the 1/4 insert removed). but I don't want to run it on a table with 036 and a child at the controls. Its not like new but it is very strong and one our favorites!
Scarm layout idea. With room to grow off that 048 return loop. Already decided a Menards Light and power plant would go at the bottom spur. and I can design a pit bellow to drop coal out of the dumping cars. Integrate a crane some where too.
Attachments
Attachments
When working with the O-60 Fastrack turnouts, you need to include the 1-3/8 fitter pieces with roadbed on one side only. Otherwise, you have to trim the roadbed either on the turnout or an adjoining track. Here is the plan with 1-3/8 fitters. And I eliminated the O-48 S-curve where two O-48s came together in opposite curve directions - likely to cause problems. I adjusted for track centers between adjacent track sections, the minimum now is 4.27" between the yard ladder and the O-48 reverse loop.
Attachments
This version is now minimum O-48 everywhere after replacing the O-36. The left-side spur or right-side spur could accommodate the Menard's Power Plant with greater clearance for the building itself. Perhaps the right-side spur would be better with room for additional coal cars beyond the power plant which would be placed across the straight section.
Attachments
JH,
Are you using existing inventory for track or purchasing some new track? I ask, because I have always felt that buying O72 switches was worth the small difference, especially when you have the space. Then, you know any engine that you purchase or have will travel through.
The O72 switches will sell easily if you go to a different track system or stop playing with trains.
It looks like you want to use a 12'L x 5'6"W table.
The larger the curves are good. If the O60 or 66" wide table is what fits in your room, that's ok. Most scale size engines and cars can navigate that diameter.
The tower crane is cool. I have had the Playschool "Cranky the Crane" on my grandson's layout since is was 2, now 5 1/2 years old. it's G scale size, but we don't care.
I would suggest to only add sidings that you need. Save on switch count and leave space for buildings and scenery or toys.
The reversing loop looks good in concept, but, to change direction again, one would have to back through it. Not a problem. Just pointing it out. It would seem that you should add a siding to back into from the opposite direction to create a reason to have change the direction of the train. Move the loop closer to the end and reposition the siding from that end.
The other item to address is to get the Starter simulator add-on for SCARM. It will permit running a train to decide if you like a plan operationally. Menu bar>Extensions>Browse for Extensions.
Current Carpet layout is 16'X 072 oval. I already have 4 060 switches. I am almost 100% sure I will never spend the $$ on a scale size big boy or challenger. (That would require the 072). Plus I really hate to cram a 7' wide table in that room. It does have to serve other purposes. I completely see your point on the reverse loop, we had one previously. But after you bringing it up, I think this one might be better served if I flip it. The spurs are for operation. Coal loader on the right at the end of the yard. Power plant on the left bottom spur. Ken, I used the 036 turns just to back (3) cars beyond the service point/accessory. I thought it would help from an operational perspective. I had no plans to drive Locomotives in there. I guess those can be changed at any point. I also plan to change what we have on carpet to match final layout design & run it for a while. We don't run many passenger trains, actually zero. We live in the south= almost no passenger service. He see's mostly freight service and that's what he likes to play with. I like the 2" foam board for table top. I was thinking the grass mat is pretty messy and read about staining Kids hands at every visit?? I was just planning on painting the pink foam top. I know dents will reveal pink, so grass mat would better serve in that respect. Also cant Thank You all enough for the help & input!!!
Remember the idea is to have fun, for both of you. Forget about the prefab layout, too much, too soon. Go to a thrift store or a big box store and buy 4 or 5 cheap end tables. You know the type with a drawer in it where you place on the end of a sofa and put a lamp on. Buy two 4 x 8 sheets of playwood from the home center. Sand and round the edges as someone else stated. Use 2" wood screws to attach the boards to the end tables. The drawers in the end tables can be for extra play toys and figures. Forget about the idea of using a computer to create a track plan. Buy a bunch of track, even if it is cheap used track off of the 'bay. Put it out on the table and let your son arrange it into a layout of his liking with a little guidance from you. This teaches good special reasoning and is part of the fun. For buildings, never throw away anything, not that cereal box, not that Amazon box, not the box your last 30 pack of brew came in. Let your son spary the buildings whatever color he wants. You can print out some pictures of real buildings from the interent and let him choose what he likes. Once the track is running you can let him put the buildings where he wants, affixed to the table with small Velcro strips so that they can be moved when he wants. Once that is in place give him rolls of grass or sand mats to cut up and make the playsets he wants, space ports, military batte grounds, city boulevards, sprawling farms, etc. THen let him introduce his other toys into "his world". Don't get upset if he takes liberty with "scales". His 12" inch stuffed panda bear is equally at home next to a scale Hudson as anything. Remember have fun, and don't be afraid to include other family members.
JH, the woodland scenics grass mats are not messy in the least. I have been using them for 10+ years, and they do not shed, and they certainly do not stain your hands or anything else. Perhaps the old-style paper mats with stained sawdust would do that, these Woodland Scenics mats are a couple levels of quality above. You might take a look next time you are at a hobby store, they usually have smaller pieces pre-cut, which are unpackaged and you can touch and feel them.
I "get" what you mean about using the O-36 just to extend for more cars, that makes perfect sense.
I also live in the south (north of Atlanta) and do not see any passenger trains. I do see CSX and NS. On the CSX line which runs through my town of Cartersville, we see run-through power including UP and BNSF, I even saw a CP loco run through. Coal trains, intermodal, autocarriers, tank trains, even "juice" trains from Florida, and some mixed freight - lots of variety, and pretty busy - especially at night - I can hear the trains from a couple miles away![]() .
.
If you are looking at additional power down-the-road, I am very impressed with LionChief plus and the remote control. In fact, that is all that I am buying for the last few years.
JH, For interest, and curiosity, here is a plan that uses your 22.5 degree crossing with 5.5' in width. The length is 15'1". The Menard's power plant is on the left, with O-36 curving around to handle a cut of coal cars. O-48 minimum otherwise. The coal loader can go on the spur to the right.
Attachments
I will stick the woodlands scenic grass then. Do you just spray adhesive and lay it down? Seams stay down pretty good? We are in Nashville east of town. Csx and a local short line is majority of the traffic here. We have mainly used TMCC engines now and a couple of Premier MTH. I was hoping to Get a used CABL and base, eventually. The MTh remote commander ($60) looks perfect for our needs. I do see a lionchief + steamer in the future, but that could be a long way out. I went and measured the room again last night. Its very hard to make a decision. I was trying to justify just using the 072 turns already paid for and expanding the table 6'10'' in width and 14' in length. I just cant decide.
JH, for tacking down the Woodlands Scenic grass mats, I have tried a variety of glues and spray glues, they are pretty heavy stock and lay flat without curling up. On my next layout I may not glue the mats over the entire surface, when I (eventually) screw down the track it holds the grass mats in place. I suggest running glue around the outside border, a couple of inches width, I will probably do that again.
Wider diameter is better, but it makes reaching the interior more difficult, you may have to plan for how you will access. If you have 360 degree access then O-72 is certainly better. If your layout will be a table up against the wall or in a corner, you will have to think about access holes or being able to walk on the layout, or better - have the table on rollers so you can pull it out to get to the back.
This is my final plan, I hope 15'3''X6'8" 072 turns with a 048 figure 8. I was planning on 1x3 wood for framing on 16" centers. Is it necessary to have supports on 16" center running in both directions? (with a 2" foam top). Also screws or nail gun? with a 1x3 screws are going to split some wood. I do prefer them though.
Attachments
If you are using foam as a surface, I would go ahead and run the supports both ways at 16" OC. The nail gun will be tricky to get the nails not to go all the way through the foam. Screws are better, but I would drill pilot holes through the foam and into the 1x3s. Why not use a foam compatible adhesive along with just enough screws to hold the foam in place while the glue sets up ?
Another method of doing it without adhesive would be to use boiler or fender washers under the screw head. You will be able to sink the screw/washer combination just deep enough so that the top of the screw/washer will be flush with the surface of the foam. If you go this route, pick a washer with a hole size that is just a wee bit smaller than the screw head. If you want to be like me and get anal countersink the washer hole a tiny bit so the screw head sits perfectly flush with the washer.
I should have been clear, I meant screws for the wood framing, but a friend has all the latest pocket hole jigs and highly recommending it. Probably will go that route.
Ken-Oscale I had some more questions Can I email you? or mine is Jeffrey. hagewood @ Doerfer.com
No spaces Thanks
different direction - the smaller size table - sidings are in little man's reach - a seven inch high sturdy stool to stand on helps, too. table at 24" -30" high
Requires cutting the roadbed on the O60 curves adjoin the O60 switches to fit in. The O60 is the oddball of FasTrack.
Made space for two action accessories. may need activator track for a dump car.
Hand of God can turn engine around.
The gray carpet tiles would make a nice top and quiet the FasTrack some.
Attachments
I have some gravel mat I got from Scenic Express (forum sponsor). I believe it was made by Heki.


