Congratulations on the mountain, streak, and pond scene!! There will make it even better. I look forward to seeing the Nighthawks building. I first became aware of the painting long ago as I read John Armstrong's article of his Nighthawks building. Then I got to see it on his layout almost 30 years ago.
Thanks everyone!
It was Armstrong's model that inspired me. I saw pictures of it on John Scaice's layout who bought all of Armstrong's stuff. I have the coffee urns which are resin castings from Westport Model Works. Now all I have to do is build a cafe around them. Easy Peasy!
Remember dear readers, there's a lot of stuff to be built before Nighthawks so be patient.
Waiting is quite alright! Rome wasn't built in a day
Don't look now, but this railroad is going to take almost as long as it took to build Rome, or at least a Gothic Cathedral. We built two new suspension bridges in Louisville in a lot less time.
Myles,
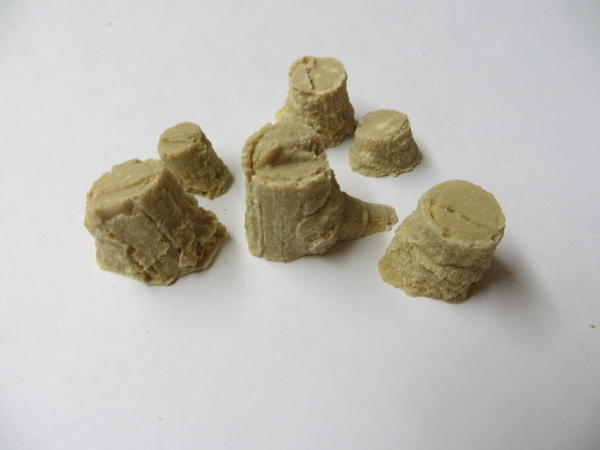
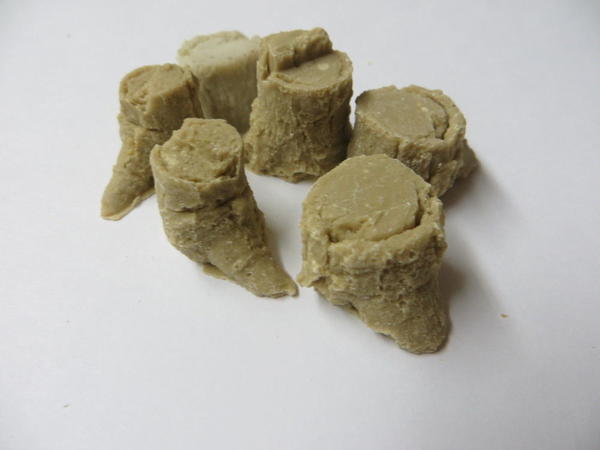
The mountain looks great! Don't forget when you start adding the trees and bushes, we also have tree stumps that you can mix into the scene. Attached are a couple pictures and link if interested.
http://www.scalecitydesigns.co...e+stumps&search=
Attachments
Good looking stumps!
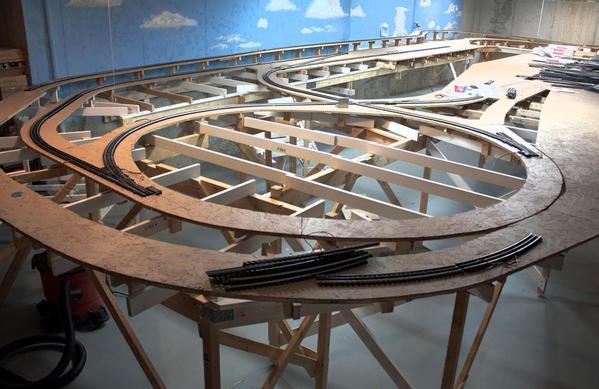
With the mountain completion it's time for a comparison shot showing what happens with almost four years of effort. This was literally four years ago on December 24, 2012. I was assembling all the track in preparation to trace its outline on the OSB in order to properly glue down the Flexibed.
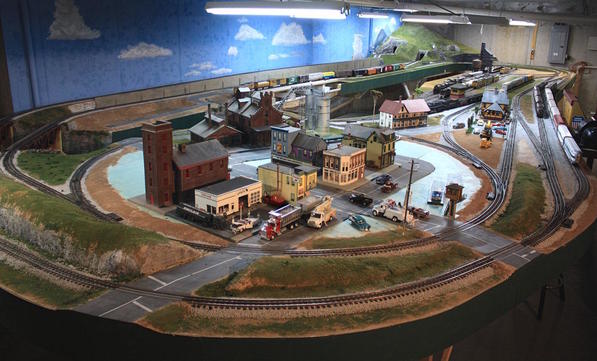
And here is is on December 22, 2016. I'd hate to think how much more I would have had to do if I wasn't working on it almost every week day being retired.
There's still a lot to do, but the big, heavy lifting is done...whew! Just in time too since I'm not getting any younger. The chemical plant will go along the back and the rick house will go on the bare 'land' behind the fire house. The engine house is designed and will also be built in 2017. That leaves Night Hawks Cafe in the place where the empty corner store is sitting on main street. I have open land in the back on the swing door. I'm thinking of some woodlands with a cabin in it. In front of the the cabin, sitting under a tree, will be a guy with a guitar "Strumming to the rhythm that the drivers made." The name on the door will be Johnnie B. Goode. That leaves some more yard buildings and things to fill the green space in front of the town. I may have a park in the front so the buildings won't hide the sight lines and then some buildings on the side. Then I have to put in the telephone poles, street signs, parking meters, some crossing gates, signals, etc, etc. As the famous Willie Wonka said, "So little to do and so much time... no, no the other way around".
Attachments
Wow! Didn't realize I've been following your build so long! Thanks for the memories!
Time flies when you're having fun. I find it inconceivable that so much time has elapsed ("you keep using that word. I not sure it means what you think it means" - The Spaniard, Princess Bride),
I explained something to my wife the other day; I was trying to help her understand just what drives my obsession with building the layout. What she can't realize is when I was building my 13 X 4' O'gauge railroad when I was 13 in 1958, in my mind I was building what I now have. In other words, I am realizing a dream I've had for most of my life and was unable to realize until I was old enough, had enough discretionary income, and the time to make it happen. I would pour over my 1950s Model Railroading magazines and Lionel catalogs and imagine having that in my basement. It took another 42 years for it to start materializing. But it wasn't until we moved to Louisville, in this house with its basement and being fully retired that this model railroad had a chance of being created.
Our daughter treated my wife and I to a holiday lunch at one of Louisville's many up-and-coming restaurants, Butchertown Grocery, so we didn't get home until after three and I didn't get too much work time, but what time I had I made good use of it.
I first had to vertically realign the inner loop track on the gate's hinge side where it meets the new switch on the fixed platform. I woke thinking of all the ways to do this since the gate track needed to rise about a 1/16". I was thinking about relieving the risers underneath to jack the gate side's sub-roadbed OSB a bit, but worried that this might be harder than usual since it's now locked in place with more structure and plaster. I thought about lowering the fixed side using the same method, but again, all that plaster would make it difficult. Then I chose "Achem's Razor" The simplest solution was to use a putty knife to open a space between the Flexibed and the OSB and slip in two piece of cardboard that raised the track the correct amount. Didn't even need any glue. Problem solved. After I did this I decided to run the trains and make a movie.
https://www.youtube.com/watch?v=sEL3T_16G18
I also wanted to finally get my favorite steam engine of all time running, my 3rd Rail Pennsy T-1 Demonstrator which was having some troubles. First I installed a new BCR to replace the now-discharged battery. I put it on the outer loop and it kept derailing as it crossed that same gate junction as I had just fixed on the inner loop. At first I thought the lead truck was too light and wasn't tracking properly so I stuck a self-adhesive 1/2 oz. weight on its bottom. This didn't work completely. It took the truck off the engine to see if the attachment bar was bent since it seemed to be tilted, but it was okay. Then I noticed that this track was also just a little bit high, about 1/2 the amount of the inner loop, so I didn't waste a moment, got the putty knife and inserted just one piece of cardboard. The truck then tracked perfectly, which led to the final problem. The tender was uncoupling from the baggage car as it was leaving the far portal. The coupler alignment was a bit off, but not easy to fix. What solved this problem was a couple of strategically placed orthodontic rubber bands (left over from my kid's braces). As you'll see in the movie, this engine now ran great and is back in the stable after a long stint as a shelf queen. I'll just have to remember to remove the bands when I want to couple up the Santa Fe F-3s.
So this is the last post until after New Years (unless I answer posts on the iPhone) so here's wishing all y'all a Merry Christmas; Happy Hanukkah; and happy, healthy, safe and wonderful New Year.
Attachments
The video is great! As I said elsewhere, it is great to inaugurate the tunnels with the El Capitan and the Allegheny!!
Merry Christmas and Happy Hanukkah too!!
It's no secret that I am among the many modelers that have been and continue to be inspired by your dedication to follow through on your layout and your creativity. Always enjoy checking out your current work. Congrats.
I was just thinking a couple days ago, that Trainman said he wouldn't be back until after New Years! I thought he would check in before this though.
I hope you are okay, Myles!
I'm am fine...thank you for asking. And I'm glad that I'm still inspiring. That makes me feel very good.
I sent updated drawings to Andre at River Leaf to cut the Bernheim Distillery for Heaven Hill's Evan Williams Bourbon Experience. After conversations with Andre, we decided to go with 1/4" MDF instead of the 3/16" Masonite. This required lots of changes, wall lengths, floors, roofs, trusses. I'm going to do that project next since Heaven Hill has already paid for the cutting. Meanwhile, I'm working on the TBM Avenger model which is a nice filler in the interim. Here's a taste... it's not trains, but it's still models.
I made an open access panel to show off the details in the firewall area which would be hidden when the model was finished based on the instruction.
The seat belts are photo etched included with the kit.
Attachments
Glad to hear from you and you were in touch with Andre on the new plans.
the Avenger looks great! I was just reading about George H W Bush flying a TBF Avenger. Is the TBM Avenger much different ?
??? Don't look at me for answers, I built more ships, & tanks ![]()
Some hot rods survived my teens, but all else was destroyed in firecracker battles over the years. Later I built a few more military models, but mostly hot rods and VWs. My trains are more of a haphazard collection with some modeling thrown in when the mood strikes me. Here is my last plane. Built to keep the monkey busy...and to keep Kong busy too. It sees layout time, so does Kong, and thats my Gramps jumping out of a perfectly good airplane...Cur Rah Heeeeeeeeeee... loved trains too...
On cars I'd add wires, fuel & brake lines, paint the speedo, locks, etc. The detail takes up a whole lot of time, and some gets buried, never to be seen again, lol. I've got about a dozen in a showcase, but it's buried right now.
One of my borders models cars. I got him hooked into weathering after he watched me dunking RR things in washes and smearing and spattering paint around on foam.
He is really into rust textures now. The 70s FORD is his first attempt, complete with rotted cab mounts. Look close at the fender tops of the rat truck below for rust & flake texture. It's everywhere. He frequents a couple of modeling sites and shows me the better RR efforts there all the time.
My pulp paper tunnel, left unfocused, is his favorite photo background.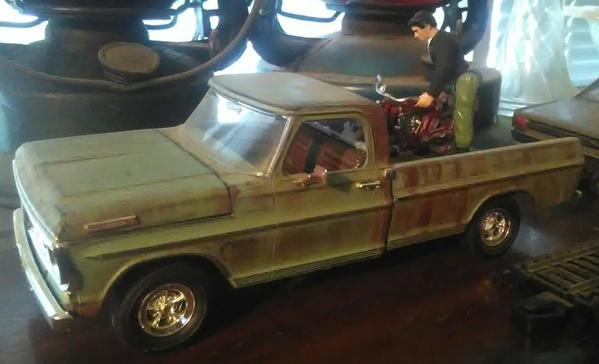
My last models two were for the layout. Simple models done simply though. No brake lines.....
This is bleached with Photoshop to replicate one of my old ones pretty closely. It had such good paint that I left it yellow in the long run, and just detailed little things to match the white one. (The yellow one I had was slow & junky, lol. The white one ate horse meat. (beat mustangs)
It used to really frustrate me that models were mostly 1:24 or 1:72 and were not made in 1:48 when they were made an in between size.
I should dig at the showcase.
Attachments
Great Pictures!! Don't feel bad, I destroyed a few things also when I was younger! But then again didn't we all?
Trainman2001 posted:I'm am fine...thank you for asking. And I'm glad that I'm still inspiring. That makes me feel very good.
I sent updated drawings to Andre at River Leaf to cut the Bernheim Distillery for Heaven Hill's Evan Williams Bourbon Experience. After conversations with Andre, we decided to go with 1/4" MDF instead of the 3/16" Masonite. This required lots of changes, wall lengths, floors, roofs, trusses. I'm going to do that project next since Heaven Hill has already paid for the cutting. Meanwhile, I'm working on the TBM Avenger model which is a nice filler in the interim. Here's a taste... it's not trains, but it's still models.
I made an open access panel to show off the details in the firewall area which would be hidden when the model was finished based on the instruction.
The seat belts are photo etched included with the kit.
Thanks for share the TBF build. My father was a TBF-1 tail gunner on Guadalcanal. After the war, he returned home and ended up working for the Chesapeake & Ohio railroad.
TBF was built by Grumman and the TBM was contracted to GM Eastern Aircraft Plant to build. Only minor differences exist that only a model builder would notice. The biggest difference is the full shield between the rear engine area and the engine. On the TBF is just a small disc, whereas on the TBM has a fully-formed streamlined enclosure. In the picture it's that blue shield you see. That piece is not on the TBF. When the cowl is on along with the cowl flaps you won't see this piece. There are some other minor differences which are not as noticeable.
I was interrupted writing the post to Mark's question and missed the neat pics of the car models. I don't which is harder to achieve: really good rusty subjects or pristine high-gloss finishes.
As a kid I built a model a week for years (or so it seemed). When the shelves in my room got filled, the great culling would take place as planes went out the window in flames, blown up by firecrackers or just summarily dumped to make room for newer and cooler stuff. It's easy to get into that kind of routine.
When I look at sites such as Old Models.com I can't believe how many kits between 1956 and 1961 I built. My mom always knew what I was up to. And apparently inhaling all those glue fumes didn't do any permanent damage.... or did it?
I think you increased your creative outlook anyhow, lol.
That later non-toxic stuff never worked as well anyhow.
I think the kid shows promise anyhow. You know photos are harsh. He still needs to use less glue, but has made huge leaps in quality overall.
The rust scale was one of three kinds of salts, and/or baking soda. The flaked salt areas look best to me. There are various experiments seen on the brown truck.
Trainman2001 posted:TBF was built by Grumman and the TBM was contracted to GM Eastern Aircraft Plant to build. Only minor differences exist that only a model builder would notice. The biggest difference is the full shield between the rear engine area and the engine. On the TBF is just a small disc, whereas on the TBM has a fully-formed streamlined enclosure. In the picture it's that blue shield you see. That piece is not on the TBF. When the cowl is on along with the cowl flaps you won't see this piece. There are some other minor differences which are not as noticeable.
I don't follow airplanes much, but the name Avenger certainly caught my eye. Now I know they were made by two different companies and have minor differences. That adds to my knowledge base. Another coincidence happened when I read an account my uncle wrote about a relative who dictated his experiences on the carrier San Joaquin. Bush Senior was on a sister carrier, so our relative's account added information. Three separate information sources in two weeks about something I knew nothing about prior. Maybe I will remember some of it! ![]()
Just stick with me Mark. I am a fountain of miscellaneous and often useless information. If it has wheels, gears, engines, etc., I probably know something about it. Don't ask me about sports or legitimate theater, but just about everything else I know something. I am the living example of the pure "generalist". I know less and less about more and more until I know absolutely nothing about everything. That compares to the pure specialist who knows more and more about less and less until you know everything about nothing.
Ha ha! I love it!!!
Don't panic, it's mostly harmless, and not entirely unlike other situa_ions a towel could clean up fas_. I thought deep and on _hat and have only one relivan_ conclusion...42! (... and it's missing teas!)
(Google "42" and read wikipedia if you must, it's semi-obscure, but a fav.& not TOO bad as a movie either if the excessive paperwork bothers you. ![]() )
)
Funny!
Just checking in... working on the TBM waiting for Andre to finish cutting the next distillery. We're doing this one in 1/4" MDF instead of 3/16" Masonite. It's smooth on both sides so he's able to cut bricks on the backsides so I'll have engraved bricks on some of the exposed rear (or front) surfaces without having to use additional laser cut ply pieces. Less piece count means faster assembly. But... changing the wall thickness caused changes in floors, walls, roofs and trusses. In other words, almost everything. I also adjusted the window sizes so they'll be a tighter fit in the window openings reducing the need for backing pieces. Again, lowered parts count.
I checked the overall sizes of the Plastruct Chemical plant and it will go where I first thought, in the last open woodwork area on the front edge of the back portion of the layout. I may pipe the plant's in and out piping over the tracks so the car loading facility will be facing the viewer with the track between the refinery and loading facility. It will reduce the overall width needed by about 6".
This means that the Howard Grain Elevator (B.T.S.) will go between the tracks on the back of the layout.
Sent another article to RMC yesterday on building the mountain. The editor isn't sure if he'll use it since the structures articles are more interesting, but he's going to take a look at it. My publication date for the distillery article was to be next month, but it's being moved out one month and will be at least two issues due to length and number of images. If he rejects the mountain article I may offer to other publications.
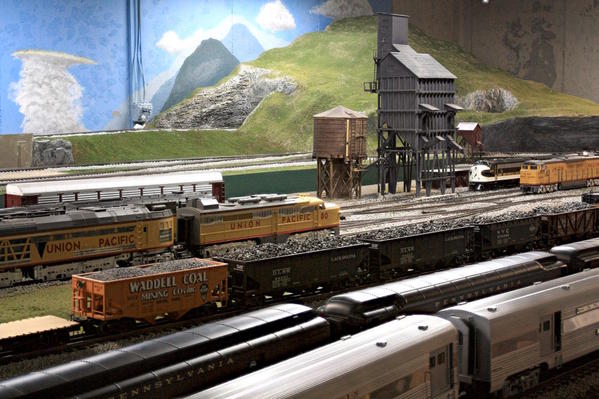
Took another picture of the mountain looking across the layout using the photo stacking software to give very large depth-of-field.
Attachments
Bought something today. The other day I saw a late-model MTH Santa-Fe Super-Dome car. I don't have any dome car in my Santa Fe consist so I've been using an older MTH Rock Island Golden Rocket Super-Dome. I don't think either of those railroads actually had super domes since I think the only one that did was the Great Northern. Santa Fe used the normal dome car made by Budd. However, that car is not available as a separate car. It's part of an MTH passenger set and I don't know who likes to break them up.
Anyway, this car was perfect! I believe it was unused, but didn't seem to have any box. The list price in MTH's catalog is $100. The sticker said $60. Not bad... I saw two other MTH Super-Domes in boxes with different road names. One was tagged $55, and the other $50. So I said, since this one is without a box and you have another for $50. I'll give you $50 for it. Deal!
I now have a fully stainless steel El Capitan. The Rock Island car will be sidelined.
This car has nice sprung, equalized trucks. Which is a later model changed for MTH. The door also opens. Is there a brake cylinder missing? Yes... there is since I see one of the right hand truck. I wonder if they're available from MTH as parts or do I have to machine one.
Here's the Rock Island Car.
The Rock's trucks are solid castings. I really like sprung truck.
This weekend is a "Great Train Show" in Louisville this weekend. I'm going. Whether it's with any grandsons is up for grabs since they're getting older and don't have much free time. However, a fellow I'm mentoring has a nice young son who is into trains and we've gone together last year. We're probably going again this year. It's not a big show and has a lot of non-O'gauge trains. But I like to go anyway.
Attachments
That perfect car had a brake cylinder missing off one of the trucks. I went back to the train store and they're seeing what they could do about it. MTH lists the entire truck on their parts list, so they're going to see if they can get just the cylinder. If they have to buy an entire truck, I might split the difference with them.
Today, the new Bernheim Distillery laser cut parts arrived from River Leaf Models.
I had one piece that I had reversed and had the bricks engraved on the wrong side which Andre is going to re-cut for me. I can already tell that this "kit" is going to be much easier and faster to build. Several changes made this happen. I switched from 3/16" Masonite to 1/4" MDF. The Masonite is only smooth on one side and therefore, if any brick engraving is needed on the other side, it had to be added as engraved ply overlays. With the MDF, I drew and Andre cut bricks on both sides for areas around parapets and back side of the clerestory wall.
This image shows the reverse side engraving on the transverse wall saving having to glue engraved appliqués to create the illusion.
I adjusted the window frame cut size so I won't need a backing piece to hold them in. On the prototype, I drew the windows at the exact same size as the opening. But the laser beam has some width so the hole gets a few thou bigger, and the cut window a few thou smaller, so the end result is about .005 to .007 gap so the windows are loose.
Since, I documented the prototype build in great, gory detail, I will refrain from posting on this new build unless there's something of interest that is new. One will be painting and grouting all the engraved brick areas while they're unassembled and in the flat. It really facilitates removing the excess group with a razor blade when you don't have to scrap into inside corners and hold a very substantial building at odd angles. I also got the window lintels engraved into the body instead of adding them as separate parts. Many building's lintel brick work is not in relief. I am still doing the sills as a add ons.
I thought my article on this project would appear in this issue of Railroad Model Craftsman, but I found out that it was moved out one month due to its size. It will be at least 2 parts and maybe more. I submitted another article on building the boiler house, which is in the queue, and recently sent another on building the great cardboard mountain. They're not sure if they'll use it since they lean towards structures and more precision projects. If they can't use it, I may sent to OGRR and see if they'd like it. RCM is doing well under its new leadership. They have over 800 articles now in the queue.
Andre and I talked a bit more about making the distillery into a master-level kit. I'm about 1/2 through writing the instructions just in case we do offer it. Instructions will be very complete and transmitted as a PDF. included in the kit will be some cursory information. We haven't decided on price point or how we split any proceeds. You know...business stuff.
I'm finishing up the cutting drawings on the Night Hawks Cafe which will also be brick and laser cut. Again, if it builds nicely, it could also be a very interesting and fun kit. I have a refinery to build and an engine house as well. 2017 is just about booked out.
Attachments
Great photo of the mountain overlooking the tracks and trains. Layouts are never really finished are they?
Your improvements on the 'kit' certainly sound great indeed! Bricks engraved on both sides! Andre can do just about anything!! ![]() Updates when you run into something new or notable makes a lot of sense. I'm thinking building models is more fun than writing! I'm glad to read about your articles. I think you really have something good to offer a much wider audience!!
Updates when you run into something new or notable makes a lot of sense. I'm thinking building models is more fun than writing! I'm glad to read about your articles. I think you really have something good to offer a much wider audience!!
645,
Welcome to the Trainman2001 Club!! You commented; now you are hooked!!
Yes, welcome to the club... and yes, you are now hooked.
I didn't know that Santa Fe had the "Big Domes" and it makes me happy that the train is still prototypically correct.
I started sorting all the parts for the new build and of course I found errors that I caused when converting from the .155" Masonite to the .255" MDF. I thought I caught all the interactions, but missed the tabs on the mid wall engaging the base board thereby raising the wall the .100". I was able to trim it off by hand and then changed the master drawing for any future cuttings.
The other was a part that ended up too short. It was the front left side wall. I can't stretch stuff so that piece will need to be recut. I spent time fitting all the pieces together to find just these kinds of problems before painting the panels.
I made the problem worse when I noticed the tab only projecting halfway through the front piece. I errantly thought that they weren't deep enough, not that the piece overall length was too short by the .100", so I measured and cut the slots deeper thereby making the tabs the right length, but the overall length now too short. I could have left it alone since there's a trim piece that covers the slots anyway, and the shorter tabs would have been hidden.
This is exactly what I was worried about when I had to change so many dimensions because of the that .100". The lesson is clear. The laser is stupid and cuts every line you draw, right or wrong. It does this with great precision (notice I didn't say accuracy), as the window opening are the same within .001". It also reinforces the point that once you have an accurate set of drawings, the machine will reproduce this over and over again. There are no tools or fixtures to wear out. As long as the machine is in good condition, each project will be the same as the next. So... if Andre and I do decide to make the distillery available as a kit, if we make one or 1,000 the only actual cost is materials, packing and shipping. Even the instructions will be made available on line so there are no printing, handling or mailing costs once the master is produced.
Attachments
I'm sure you will make everything work! YOU always do. and I like the way you think about the future!
I can't imagine not having anything in the hopper to think about doing. My dad at my age already stopped growing, learning, doing. My mom had a heart attack about my age and my dad became very obsessed with her health and didn't care for himself as he should have (she outlived him by five years). My sister contends his dementia was generated by boredom and elevated blood pressure which he wasn't managing. That is not how I see my future. One cannot control what breaks down as we age... my ruptured biceps is a perfect example, but we can control what we choose to do, think and dream about. Having a model railroad that takes years to design, build and modify is great for that purpose. I'm also setting a goal of being alive and lucid when Elon Musk or someone else gets to Mars. I figure that's a good target. I should be in my mid-80s, so barring catastrophe (like falling down the cellar steps and smashing into the concrete wall that lies at the end) or a serious illness, it is a reasonable age to reach. After that, it's anybody's guess...![]()
Andre will recut the parts on Monday so I'll have them next week to begin work. Meanwhile, I'm going to fill the time continuing the Avenger build.
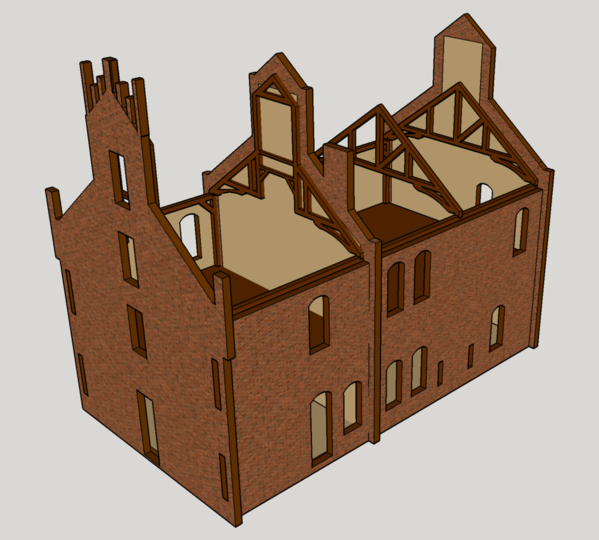
While waiting for the parts, I've been keeping busy at night working on SketchUp drawing things that can be used in an eventual instruction manual for the Bernheim Distillery Model if Andre and I decide there's enough interest to go ahead with the project and offer it as a kit.
Having all the laser cutting drawings facilitates drawing accurate 3D images for an excellent instruction set for the model. In fact, it could be the best instruction set for a craftsman kit ever... sounds like the President. Many craftsman kits run the gamut regarding instructions, from nothing but paragraphs of prose which requires a great imagination to build the kit, to reasonable instructions which show parts relationships. We've already made the decision that the full instructions will be downloaded from a web site, so having it in color with many pages will not add to cost of the kit, and will greatly benefit the buyer. Included in the kit will be a condensed version to get the builder started.
Here's two to the drawings.
So stay tuned...
Attachments
Construction is fully underway on Bernheim Distillery II. The changing of the material thickness not only changed the obvious stuff like floors, walls and roofs. Those are the things that I changed before Andre cut it. Well... it was far more than that. All of the trim pieces were affected too. I managed to do workarounds for most of it, and then went back to the drawings and probably made another 50 adjustments. If there's any chance of offering this as a kit, it can't have all the custom-crafting I've been doing to get it together.
One of the changes I made since the first one was to eliminate the tab joints for the roof gables. Instead, I set the belt sander to 45° and sand the bevel. Using some corner clamps made a nice joint especially since I specifically designed the pieces so the brick work lines up at the corner.
The lower front lip also have to be shaped to settle nicely onto the roof. For the large gable, I decided to remove the tab that tied it too the roof. It was more trouble than it was worth and I'm engraving an line on the roof to show where to glue the assembly. You can't misalign it since the angled portion sits on the roof peak. The tabs on the little gable work okay so I'm leaving them.
I also tried something new by engraving the longitudinal brick lines emanating from the overlaid windowsills. This will be a nice effect giving more depth to the walls.
The corner castles needed more engineering and I've redesigned them a bit for any future work. Again, I'm relying on miter joints to give good joints with the bricks in corners. I'm even going to use this on the vertical parts on the assembled unit on the left.
Until next time.
Attachments
Looks like a great start! The extra work you put into it really shows, such as the window bricks. As if I didn't have enough to read on here now I have this to fallow again. You rock!
Sorry about making you read more, but it does make me happy.
I was going to put on the second coat today and found out that the other bottle of Model Flex Pennsy Oxide Red was effectively empty and therefore no painting. The only place I know where to buy this is Walther's. Therefore, I built up the main roof using the small trusses I designed after the first build to provide support while gluing up off of the model's main trusses. These worked well. In the first build, I had to hand make those truss wedges otherwise, I simply couldn't get the roof together off the model.
What didn't work was the notches in the roof which I closed up with some 1/8 Masonite so the roofing material wouldn't fall into the gap. I also fixed a booboo that I made when I inadvertently ground the tapered edge on the wrong side of the big gable front on one side. I made a bit of a mess which I also filled. The flashing will come up this high and hide all of this so it won't affect the final job. I found more parts that were impacted by the switch from 3/16" to 1/4". This time it was the clerestory sides that were .200" too long. Too long is easily fixed with saws. Too short means more crafting which takes much longer. Again, I'll adapt the drawings to correct.
I start gluing with Aleen's and then before it dries hit it with CA. The CA cures immediately and holds everything together until the PVA dries. This works pretty well and solves the problem of holding where I can't get clamps to work. This brick work will be painted next along with the main house.
Attachments
Thanks for the update, and Yes I am still reading! I just love the work you do!![]()
I'm with Mike; I'm still reading too! Please keep typing!! ![]()
As planned, haven't been posting all the construction pics since it's a repeat of last time, but let me just say that going from 3/16" to 1/4" has been a real pain in the butt. Everything and I mean everything was affected. Not just the usual suspects (floors, roof and walls that fell between end walls), but all the trim pieces that covered any end grain areas which were now a 1/16" wider. Some of the changes I was able to work around while others required some recutting. I've probably made 50 changes to the drawings. I was able to fix some of the stuff with some intensive crafting, but if this is ever going to be a kit, it's got to go together without expecting the builder to scratch build things to correct design errors.
But progress is being made. Today I got all the kitchen crenelations fitted in preparation for painting the whole deal and doing the grouting. I was originally going to grout while still in the flat, but Andre told me that paint would interfere with the glue strength with the MDF. The windows are all glued up and painted waiting for glazing (0.010" clear styrene).
It will be a nice job, and if I were to make a 3rd one, it would even go together better. Practice makes perfect... well not perfect, just better.
The Bernheim Distillery article in RMC is delayed a couple of months. The editor needed help sorting out the zillions of pictures I sent along with the manuscript so he asked me to create two-parts and select no more than 20 pics per article. I made the changes and sent it back. The first part discusses how to take a photo and turn it into a set of laser cutting instructions. The second part covers building the pilot model.
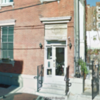
While all this was going on, I started another design project. I saw a picture in the Sunday, on-line New York Times travel section. It was an article about what to do in the Bronx and showed this picture of the Bronx Documentary Center. I loved the classic style. I did some research and found that it was built in 1871 by a German immigrant when the Bronx was transitioning from farmland to city. It's a combination of Italian and 2nd Empire styling with the slate mansard roof and the ornate corbels and fan lintels over the windows. It was decaying, but was purchased in for $1 in 2008 by a conservancy group. It is now the home of the Bronx Documentary Center, an art gallery.
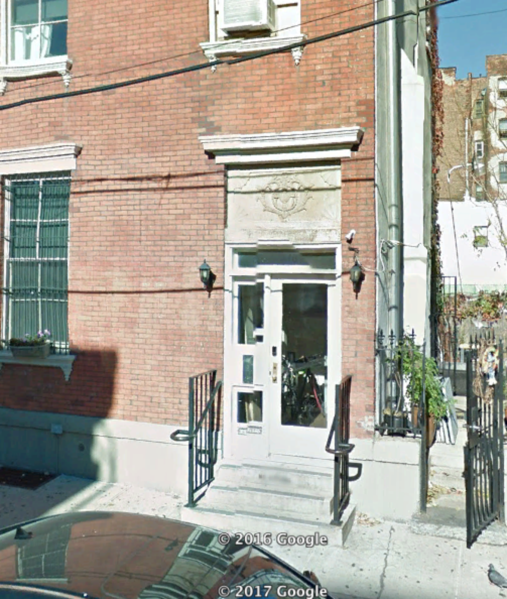
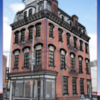
As I did with the distillery, I brought this pic into SketchUp as a "Match Photo", set up the vanishing point and scale and then drew the building overtop of the picture. It's a complicated building and took all my SketchUp skills to execute, but I was able to create a pretty decent rendition. Furthermore, since the building actually exists and has an address (unlike the distillery which was razed 100 years ago) I was able to find it on Google Earth AND it was rendered in 3D so I was able to circle around it and find what the unseen sides looked like. I was also able to go on Street View and get better looks at the doors, especially that back door behind the car. You can see the masonry decorations above the door.
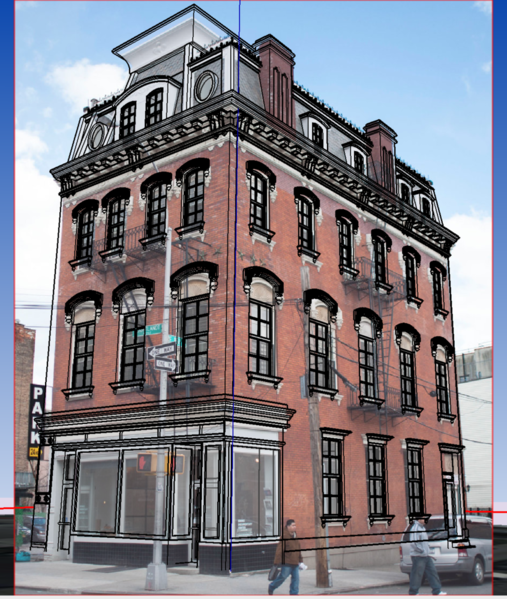
Here was the drawing superimposed over the photo.
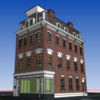
Here's my drawing as seen in SketchUp.
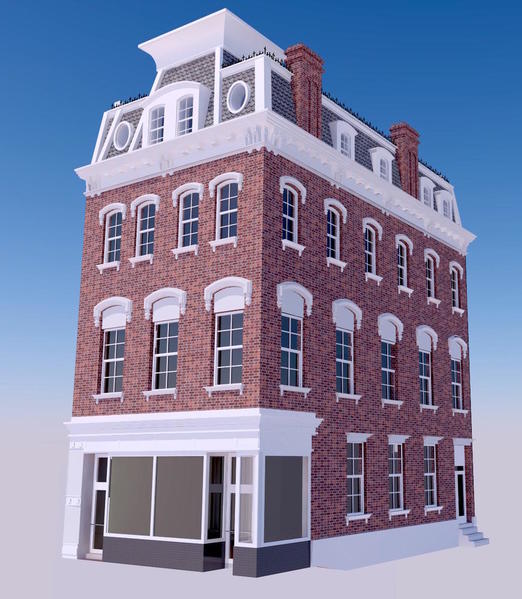
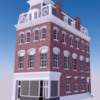
And here's what it look like after rendering with Podium, an add-in for SketchUp that makes photorealistic renderings of SketchUp drawings.
But, the story goes on...
I was unable to get a clear image of those ceramic details around the windows. I would like to draw them accurately, but to do that I needed a better image. So I sent all my work to folks at the Bronx Documentary asking them to take some smart phone pictures of these details so I could can make a better model. They responded with great interest and will take the pictures this week. So, let me tell you, for us modelers who want to do some unique things other than the usual hand car sheds and yard buildings, we're living in a golden age. Between SketchUp's ability to generate scale structures, coupled with Internet for research and Google Earth, you can create almost anything. Incidentally, my drawing scale out to within 2% of the measurements I took on Google Earth.
Next step will be move flat, three view images into Illustrator and create accurate laser cutting drawings. I'm also going to try and contact one of my readers who has the hi-res 3D printer to see if I could get him to print a set of masters for all the ornamentation. I would then take these and made resin casting molds. Again, with laser cutting and 3D printing we can make almost anything.


