Building new layout. About 15 switches with DZ-1000 switch machine. Best way to work with skinny wires to make connection? Any suggestions would appreciated!! -- PK
Original Post


|
|
Building new layout. About 15 switches with DZ-1000 switch machine. Best way to work with skinny wires to make connection? Any suggestions would appreciated!! -- PK
Replies sorted oldest to newest
I like to use wire nuts to splice the wires together with. Also I use a wire stripping tool to take the insulation off the ends of the wires. A knife or other tool may cut into the wire and damage it, as the DZ-1000 uses stranded wire.
Lee Fritz
I would like to use something like this terminal strip. I found these when I was looking for mini euro terminal strips. Pretty inexpensive at $1 for 7 three position segments that snap together.
http://www.allelectronics.com/...king-segments/1.html
They can be mounted on phenolic perf board.

I got some of these Spring Lever Connectors (just a random pick here, they are available from many other sources) to use for experimenting, but they work on some pretty small wire. They are not readily mountable that I can see. They have a name, but it escapes me just now. They are also available with different numbers of terminals. I have not tried one on a DZ1000 yet, I used wire nuts and folded the wire over as Mike CT has described above. Also, cjack's terminals posted above are quite a bit less expensive and he says they ae mountable. Might just get some of those to ry out for myself?
I use the european terminal blocks. A simple hack saw will cut them to size. Then I use Sharpie Gel Pens to color the posts. The three pole terminal blocks are used to connect the push button switches for manual use. The switches themselves are also wired into the AIU.
Here is a link to the terminals blocks:
http://www.amazon.com/Position...opean+terminal+block
And some photos:


I always solder and heat shrink the DZ leads to a 20 gauge wire. From there, its much easier to work with.
G3, I also use a lot of the Euro Style terminal strips. Coloring them with Sharpie's is a good idea that I hadn't thought of.
I got some of these Spring Lever Connectors (just a random pick here, they are available from many other sources) to use for experimenting, but they work on some pretty small wire. They are not readily mountable that I can see. They have a name, but it escapes me just now. They are also available with different numbers of terminals. I have not tried one on a DZ1000 yet, I used wire nuts and folded the wire over as Mike CT has described above. Also, cjack's terminals posted above are quite a bit less expensive and he says they ae mountable. Might just get some of those to ry out for myself?
I just recently saw those at Menards. They had 5 position ones too.
It is tough to find the very, very small wire nuts. Even with the very small wire nuts you would twist and bend the wire over, doubling the wire thickness, then apply the wire nut.
Ideal 71B is the smallest available mechanical twist connector. IMO
Listed for the following and any combination with-in reason.
#22 to #16 AWG
Min. 2 #22
Max. 2 #16
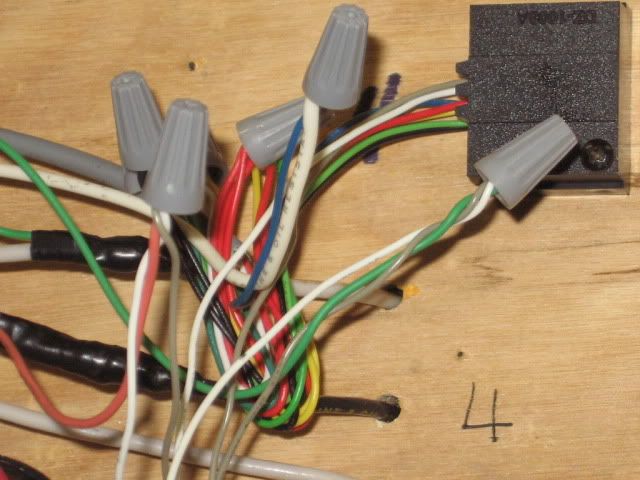
That is the mess we have, the DZ Angel Hair wires are really fragile. You did a very nice job using the wire nuts. Soldered ours... So many failed we'll never do that again!
I got some of these Spring Lever Connectors (just a random pick here, they are available from many other sources) to use for experimenting, but they work on some pretty small wire. They are not readily mountable that I can see. They have a name, but it escapes me just now. They are also available with different numbers of terminals. I have not tried one on a DZ1000 yet, I used wire nuts and folded the wire over as Mike CT has described above. Also, cjack's terminals posted above are quite a bit less expensive and he says they ae mountable. Might just get some of those to ry out for myself?
I just recently saw those at Menards. They had 5 position ones too.
I think I have seen them in 2, 3, 4, & 5 position? May be available in more? I have been using them for bread board type stuff and they are handy for that. They are a little pricy, even on ebay.
For modern switch machine installations I use the standard 66 type connector blocks used in the communications industry. Visit my website www.montanarailpower.com and click on the link for wiring. My library is not complete for all switch motors but is an active work in progress. As time permits wiring diagrams for all the switch motors commonly used in model railroading will be available. Most of the wiring diagrams contain several pages laid out step by step help those not familiar with installing these type connector blocks. You can also reach me with any questions using the contact information on the website. I would also note that a standard installation of Z1000 switch motors and control buttons using one 66 block can handle 16 switch motors. If you use the 4 conductor telephony station wire Red/Green/Yellow/Black the color codes will match the Z1000 motor and control button exactly . This helps keep things neat and orderly . Use the scotch lock connectors to extend wiring from motors and control buttons to the 66 block.


I think Steve is being modest, he doesn't say right out but I have seen his wiring display's and they are awesome. I think he still has ties to Atlas and anything that he recommends, I would second the motion. You do need a "punchdown " for the connector blocks, which I've found at flea markets for a dollar. You can also use(forgive me I don't know the technical names because my telephone skills are limited as an electrician) "coke bottles or chicklets" made for small telephone wire. Usually you strip the wires & put them into either connector, & squeeze with a pliers, but it's a one time use once you squeeze wire into it. I've seen his display's at the TCA at York, PA. check him out, the man is goooooood!
Steam Forever
John
Raritan Valley Hi-Railers
Paul:
As mentioned above I use european connectors. I also add ferrules to the ends of the wires. You can purchase up to 26 AWG. The metal stubs on the ferrules work out great with the european connectors. I bought 22 AWG wire and solder feeders to the DZ-1000 motors then use the ferrules at the opposite end to connect to the terminal board.
If you are interested I can post some pictures. I am working on a Ross Double Crossover right now.
Joe,
Photos would be great. Which exact ferrules did you purchase?
Thanks,
George (G3)
George:
Please see the pictures below showing various ferrules. I included a picture of the crimp tool needed also. Plus there is one picture of a push in wire connector I use in lieu of wire nuts. The push in connector works with solid and larger gauge stranded wire (18-12). The connectors come in 2 / 3 /4 /5 /6 wire ports. I buy these at Lowes.
For part numbers I use:
AW40010 for 12 AWG
AW15006 for 16 AWG
TW15010 for 16 AWG (two wire) for shorting bars.
AW10008 for 18 AWG
AW03408 for 22 AWG
AW01408 for 26 AWG


You might find these jumpers useful when using the Euro style terminal strips.


I've been making wire end extensions from other terminals for decades. To know I can buy them now is nice.
I cant believe I never came across colored sharpie on a Euro terminal block. Just black writing you cant make out due to size.
Too simple. Great idea.![]()
You might find these jumpers useful when using the Euro style terminal strips.
I am in the solder to a thicker wire camp too.
All of these suggestions are most appreciated. I am not computer savvy like most people nowadays ... Please accept my thanks for all you share. Appreciate your patience too.
Access to this requires an OGR Forum Supporting Membership
