HI All,


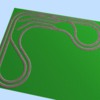
I have renewed my interest in model railroading -  and it has been a long time.  I have a limited space to set up a layout and was hoping to get some input into what I am considering.  I plan to be able to run on at least two separate lines with the capability of having a small yard.  I have attached what is a first cut of what I have envisioned within the space available.  I have one end of a FROG set aside for my layout.  It is a u-shaped layout with one leg approximately 10 feet long x 12 foot long x 5 foot long.  I want to limit my reach to approximately 4 foot, so the attached is what I think I can accomplish.  Thoughts on elevations, terrain, etc.


Mstak

Attachments

Images (1)
  • SRR3: First Time Layout
Original Post

Replies sorted oldest to newest

Hi mstak,

Are you going to curve the table or leave it rectangular?


I have a couple of ideas...care to share the file?


Moving the crossovers will allow you use the rear run edge-to corner-to other edge for a slight elevation of a few inches for effect. Perhaps work in a bridge. A mountain with tunnels would look good in the top corner.


Using 072 or #5 switches would make the crossovers smoother and set the yard spurs better.

mstak,

Here's my mods to the layout. Moved the crossovers to the end corners. Elevated the back run to 3" in the apex of the back curve. Tunnel, mountain & bridge.


Reshaped both r-loops to the same a took spurs off of that angle.


I put 072 in for the yard spurs, but you can put 036 in there if you like. You should start to get 072 switches if you think you'll keep FasTrack and grow to scale engines.


I put a red colored 1 3/8" to cut power to the spurs. There's a 1 3/8" between the crossovers in case you want to separate the mains for individual transformers.


I added a table outline(baseboard in SCARM terms). I may have violated your reach Given. Rounding the corners can get you closer to that number.


Here's the file and the FasTrack Lengths reference to speed your fitting work. You may have it already, your fitting was good. You can eliminate a lot of the little fitters by cutting straights to custom lengths. The LCCA modular specs are attached. The method is in the Appendix.


You could create more space for scenery by changing the inside turn in the center closer to 90°, but that would introduce another reach issue.


I added layers, 1 for track and 1 for scenery. Then you can turn off the scenery for track work.


I hope this helps you refine your design. Nice job! You can run multiple trains, change lines, change the train direction and have some operational activity. These elements keep it interesting.

Attachments

Moonman,


Thanks for the suggestions!!  I like the changes for the yard and the extension of the right side loop.  This will let me increase the number of rolling stock for the inside loop.  I still need to learn all of the features of SCARM (baseboard, layers, scenery, etc.).  I have a couple of additional feet on the right side of the layout (up the other leg of the u-shape and may try to stretch the right loop a bit). 


I see that the when you right mouse click and save-as, you need to change the extension to .scarm.


I presently have a small layout and will be moving slowly to build something permanent.  I began to research the hobby a few months back and am discovering something new daily.  It's been a blast so far.  One thing is for certain, O-gauge is costly, so it will be a slow go as far as that is concerned.


mstak


Add Reply

Post
The Track Planning and Layout Design Forum is sponsored by

AN OGR FORUM CHARTER SPONSOR

OGR Publishing, Inc., 1310 Eastside Centre Ct, Suite 6, Mountain Home, AR 72653
800-980-OGRR (6477)
www.ogaugerr.com

×
×
×
×
Link copied to your clipboard.
×
×