Well....it has been a few years but I am almost ready to start again!  After a few start and stops in HO I finally looked at my layout and said "What am I doing?"  I love O scale and with some inspiration from the JDStucks, The Black Diamond Railway and Doug-LaidoffSick I felt like this was the way to go especially when I consider my future with hopefully kids someday!


I am getting married in July so I won't be able to start anything until after that so for now I am going to be liquidating my HO stock and planning for my O scale layout.  I am set on using MTH DCS and the scale wheeled versions of their modern diesels for this Norfolk Southern layout.


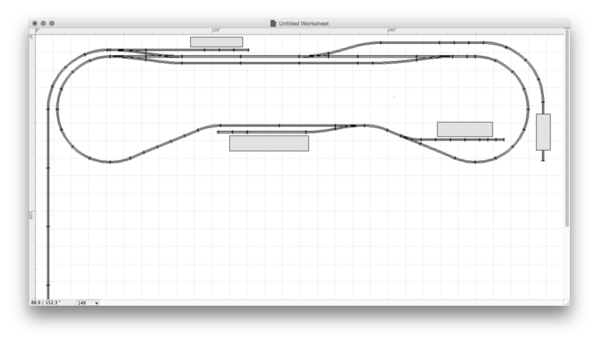
I have a space that is roughly 30x8 with a small 2x20 extension off the top for my yard so I can't do anything too crazy with my track plan.  I was wanting to use MTH ScaleTrax with numbered turnouts and O-72 min radius.  Do you guys foresee any issues with that setup?


Any hints or tips for my planning would be appreciated!


Thanks!

Last edited by Former Member
Original Post

Replies sorted oldest to newest

Hi Will:


Had not seen you post for a while, and quite frankly, I'm surprised that you would want to go three rail.  Based on your past posts, it seemed you were on the "right track" with two rail three years ago.  It doesn't sound like your room sizes have changed, except for a 2x20 area that you did not have in your plan before.  What are you gaining by going three rail if you are going to go with numbered switches, O-72, and modern era diesels?  There isn't anything that you could not do with two rails that you need a third rail for. 


Do I forsee any issues with the set-up?  Yup, I do, you will probably look at the third rail at some point and go "D'oh".  


I'll chime in here with three names that you should maybe have a conversation with, David Friedlander, John Sethian, and Austin Bill.    All three started out in three rail, pitched it, and went two rail.   I don't know of two many people that have went the other way within the last five years.  10 plus years ago, yeah, there were quite a few when the sound and smoke craze hit, and I went there as a diversion to HO.  In hindsight, I shouldn't have done that. 


I'll probably get tarred and feathered on this forum for stating this, but IF (and that will never happen as long as I have my HO layout that I am quite happy with) I ever did an O scale home layout, I wouldn't even consider three rails.  Right now, the only thing that holds back two rail O in my opinion is the lack of track options.  Even there, I believe there are pre-made numbered turnouts available in addition to the Atlas track line (assuming it is available). 


I'd also be sticking with DCC.  Seems to work quite well for HO, N, and most two rail O scale two rail layouts that have DCC, so why limit yourself to MTH?  MTH scale wheel models are also equipped with Proto3 decoders, which work quite well with DCC.  DCC works, and has a lot less issues. 


Regards,

GNNPNUT

Last edited by gnnpnut

GNNPNUT-


There are a few reasons I shy away from 2 rail. The first is exactly as you stated, a lack of available track options and I do not see myself going back down the handlaying route again. Also, at some point I would like to get some of the new steam locomotives that are now being offered with amazing features.  I don't think that I will ever have the space for the huge radius curves that are needed for 2 rail steamers.  Finally, my job as a civil engineer in the rail industry requires me to be extremely precise during the day and when I come home all I want to do is run my trains and not have to worry too much about anything but having fun. 


The size and heft of O scale is what draws me to it.  O scale layouts and trains are simply impressive and it just seems like a lot of fun!

Hey, your back!  Congrats on the upcoming nuptials.  The only issue I see is you are limited to O-80 curves with scaletrax.  Gargraves track comes in bigger radiuses and also have flex track that you can bend to what you need.   Other than that, I don't see what other issues you could have.  MTH is now offering 2-rail o-gauge track.  So, if you wanted to go that route you can, especially since you are looking into the scale wheel versions of the Norfolk Southern.  


I remember seeing some of your old posts and what you can do.  You're one heck of a modeler.  Just as you stated above, "O scale layouts and trains are simply impressive and it just seems like a lot of fun!"  They are!


I posted a tour video of my layout last night in the three-rail forum, check it out and see some 3 rail action. 


Give us an update when you do get started (hopefully later this year).

Thank you guys! Very exciting times coming up as I graduate in May and start working full time and the wedding so Im not sure exactly when I will be able to actually start but planning costs nothing and is a lot of fun!


Johnny-  I actually watched your last video and it was fantastic!  Scaletrax also has flex so I might go that route if I need anything bigger than O80.  I am not really wanting to deal with 2rail anymore...I would rather run AC power so reverse loops and all of that won't be an issue.


I know...big changes from what I had previously done but for my future I think it is the best fit.


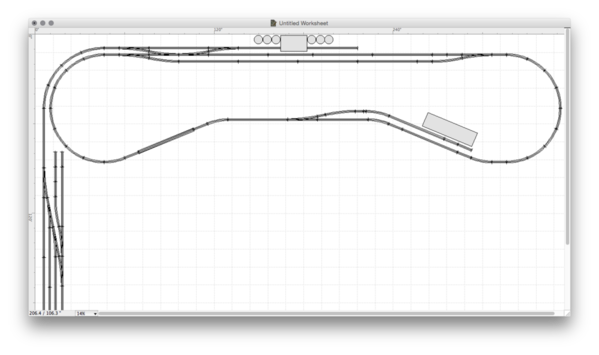
Here is a simple track plan I created for my space.  I am keeping it simple because this really is a temporary layout.  We will not be living in this house for too much longer so I don't want to spend a lot of money building a huge layout that will be torn down in the future.


The bottom that is cut off goes to a 20' long staging yard.  The bridge to the left will be a lift up.

Attachments

Images (1)
  • Screen Shot 2015-01-25 at 10.39.49 AM

Will, glad you liked the video.  I forgot about Scaletrax having flex too.  Your bases are covered with the Scaletrax for sure.  You say the main area is 30x8 with a 2x20 leg.  Looking at my layout, I can imagine the size of yours.  That's gonna be awesome.  You mentioned a lift up bridge.  I take it that's for getting into the center of all the action.  I see your point about keeping it simple since the layout is not permanent.


Good luck and keep us posted!

Originally Posted by willbacker45:

Kon...there are a few of us in the hobby! My friend JDStucks went to Ohio State with me and has an awesome layout!  The Scale locos are a break through for O gauge!

Yup Jasons Layout is awesome! My hardcore HO buddy says the 3 rails kill him and the moving pilots lol... I am  just used to it after all these years.. we have HO too N scale in boxes i like all the scales...

I like your idea of doing your layout in phases.  You've got a nice area to work with and scaletrax is nice looking stuff.


I used to be into HO when I was a teenager, then I left the hobby for about 12 years.  When I jumped back in it was because I was home visiting my parents and my dad had his Lionel Coke train running around the Christmas tree, my son was 2 at the time.  The three of us had so much fun just watching it go around the tree!  Two months later I bought my first O scale set.  The size of O scale is great, especially for little hands.


Blessings on the big year you've got ahead of you!

Originally Posted by wmtrainnut09:

Thanks for the video update will.  You stated that you plan to use a MTH arch bridge for the duck under.  I did the same thing on my layout.


DSC_0134ogr

Johnny,


That looks phenomenal! Exactly what I am going for!  Would you mind taking some measurements for me whenever you get a chance?  Looking for your aisle width so that the bridge still fits


Thanks for that!

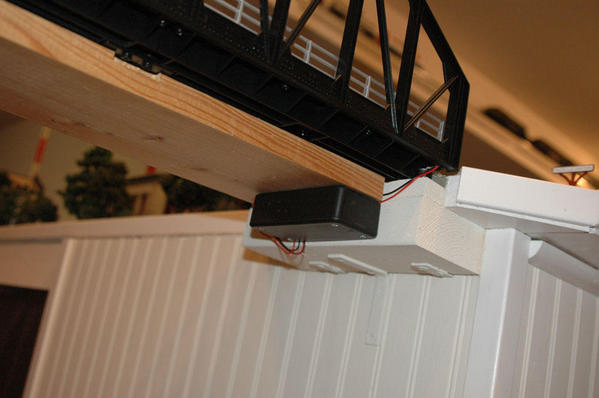
Will, glad you liked it.  Below are some pictures to illustrate better what I did.  The aisle is 35" wide. Since the bridge is 30" long, I had to build out the layout a bit.


DSC_0412ogr

DSC_0413ogr

I installed a piece of 2x4 on each side of the table.  This gave an overhang of one inch on each side for the bridge to rest on.  The black box underneath houses the control board for the strobe light that is on top of the bridge.  Power leads were soldered to the track above.  During the testing stages, larger diecast steam engines tended to make the bridge bow down just a tad.  So I installed the 3/4" pine board underneath the bridge to give it extra strength. (See next two photos below) 


DSC_0414ogr

DSC_0415ogr

The bridge is removable by lifting the left side up and pulling the bridge to the left.  Power for the track is provided by track pins on the right side of the bridge.  The screws protruding from the support allow me to set the bridge down in the exact spot it needs to be in order for the track to be aligned.


DSC_0417ogr

Hopefully this helps you out Will.


Attachments

Images (5)
  • DSC_0412ogr
  • DSC_0413ogr
  • DSC_0414ogr
  • DSC_0415ogr
  • DSC_0417ogr
Last edited by wmtrainnut09
Willbacker45 nice layout plan. I am in the same boat with you. I have a 29 by 11 half foot room to work with and like the walk into the center style you have created.  Trainnut's lift out bridge is a great concept to. Congrats on the upcoming wedding and keep posting your updates.  Nick
Twmtrainnut09,
 
That bridge is a complete liftout? I am contemplating something similar.
I thought of a hinged drop down section or a lift out similar to yours.
The isle is 35 incehs wide?
 
Buzz
 
Originally Posted by wmtrainnut09:

Will, glad you liked it.  Below are some pictures to illustrate better what I did.  The aisle is 35" wide. Since the bridge is 30" long, I had to build out the layout a bit.


DSC_0412ogr

DSC_0413ogr

I installed a piece of 2x4 on each side of the table.  This gave an overhang of one inch on each side for the bridge to rest on.  The black box underneath houses the control board for the strobe light that is on top of the bridge.  Power leads were soldered to the track above.  During the testing stages, larger diecast steam engines tended to make the bridge bow down just a tad.  So I installed the 3/4" pine board underneath the bridge to give it extra strength. (See next two photos below) 


DSC_0414ogr

DSC_0415ogr

The bridge is removable by lifting the left side up and pulling the bridge to the left.  Power for the track is provided by track pins on the right side of the bridge.  The screws protruding from the support allow me to set the bridge down in the exact spot it needs to be in order for the track to be aligned.


DSC_0417ogr

Hopefully this helps you out Will.


Originally Posted by willbacker45:
Oh hey! They are working now! Thank you very much for the detailed write up.  That is very helpful and gives me a great starting point.

Hoping to start benchwork here soon and snag one of these bridges.

Thanks again!

Glad this will help.  When I posted the pictures the first time they were there.  Don't know what happened.    So I reposted them again. 


"That bridge is a complete liftout? I am contemplating something similar.
I thought of a hinged drop down section or a lift out similar to yours.
The isle is 35 incehs wide?"
 
Buzz


The isle is 35 inches wide.  2x4's added to each side enabled me to put the 30" bridge across the isle.  The bridge does completely lift out with no wires to contend with.


Finally nailed down the track plan!  Real work will start this weekend and I am hoping to get a lot of the benchwork done along the main back wall.  Also going to need to clean up the basement quite a bit and find space for some random stuff that we have stored down there.


On the plan the right hand side is the mountain area and the coal flood loader will be located 4" higher than the mainline.  I will climb using the branch line which will go through a short tunnel.


Screen Shot 2015-02-12 at 10.27.30 AM

Attachments

Images (1)
  • Screen Shot 2015-02-12 at 10.27.30 AM

Add Reply

Post
The Track Planning and Layout Design Forum is sponsored by

AN OGR FORUM CHARTER SPONSOR

OGR Publishing, Inc., 1310 Eastside Centre Ct, Suite 6, Mountain Home, AR 72653
800-980-OGRR (6477)
www.ogaugerr.com

×
×
×
×
Link copied to your clipboard.
×
×