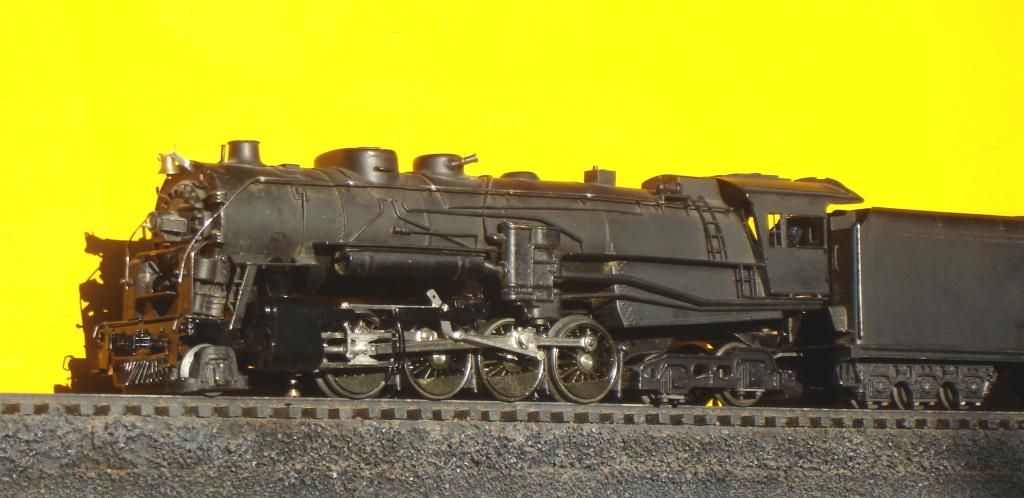
I have done cars, freight and passenger, to get what I want, and diesels and electrics, and gas electrics look doable, (although I have just done brass railbuses like the Mack, with less than satisfactory power), but I have not done steam.

I would want to be sure I could do a good job before I sprung for and tackled a brass steamer.  I can just picture swapping

some 3 rail chassis with the right wheel arrangement under a brass boiler.

Original Post

Replies sorted oldest to newest

Most offerings, Weaver or 3rd Rail were for both 3 rail and 2 rail, 2 rail being significant less in number. IMO Secondary market should be the same profile, which would tend to more three rail being available. IMO usually the conversion is the other way. May be not??? 


Also note that MTH has done a series 3-2  of Premier locomotives that can be either way.  These 3-2 models, shipped as two rail, would be a relatively easy conversion to 3 rail. Parts would be needed.  

Last edited by Mike CT

I've searched in the past for this topic and haven't come up with much.


There are lots of smart people around here and I'm sure they could help.


I think Ron H was working on a conversion but not sure if he finished it.


The only thing stopping me from doing this is the electronic piece, which I'm sure wouldn't be difficult but require some thought.


I almost bought a 2R PSC 2-8-8-0 Bull Moose last fall to convert to 3R.  Wish now I would've. 

Last edited by 86TA355SR

I was installing ERR cruise commander and sound into my beautiful Westside Santa Fe Mikado. I mounted two grounded rollers on the loco and connected everything. I made a second electrical wiper for the right side drivers and use these left and right side wipers wiper for the common. Every thing worked fine. Then after fiddling with it I some how shorted out the cruise. I think I shorted it out with the wiring on one power roller wire against the frame.


I was going to order another cruise for it to continue when my cab forward arrived and I started that project. I'm about to order cruise for both locos soon and will get back to it.


The conversion is pretty straight forward. One just has to make sure the power rollers are completely grounded from the frame.

What's your minimum radius? If O-120, or thereabouts, should be straightforward-for most locos (10-driver, rigid frame locos are another story-which is why I'm in 3-rail).

If you're down to O-72 and you want sizable locos, there's got to be serious work for the conversion. Way, way back when, in the old 48/ft magazine, someone (bob2? Woody Mathews?) wrote a couple of pieces about modifying steamers to run on shorter radius curves.

I have a Lobaugh Berk whose rigid chassis will just go around an O-72 curve. That 4-wheel trailing truck will be anther matter....some "butchery" on the tailbeam will be in order.

Woody wrote it.  Grinding away frames, cylinders, etc., is considered blasphemy in my shop.


Yes, we did one of those "add rollers" conversions for an early OGR, but it did not get much of a rise. I note that the conversion above, while 100% on-point for the original question, got exactly zero rise.  If all you want is rollers on a 2-rail model, that is simply trivial.  Using a 3-rail mechanism gets you back down to the O-72 vicinity, but it costs big bucks for the extra pieces.

I've build 3 All Nation Steam Engines in 3 rail.  The largest was the 4-8-2 Mountain.  People say that you will have to hog away parts of the cylinders and tail beam.  I didn't have to do any of those things and it does run on 0-72 curves.  The one thing that was necessary was to have the draw bar pivot close to the rear driver rather than the end of the tail beam.  I posted pictures and a link to a video a couple of years ago.  If you search the OGR Forum under "All Nation Mountain" you should find it.


I have a Lobaugh Berk that I plan to 3 rail after my current project is done.  I'll increase the flange from 0.047 to 0.062.  If your using Gargraves, Atlas or similar track that should be enough

With the old All Nation kits it was possible to buy code 172 drivers with the flange height increased to 0.090". 


I was looking at a new 3 rail MTH steam engine at my club (Angel's Gate HiRailers).  It had high rail wheels but the flanges looked a bit reduced.  We tool a dial caliber to the drivers and found the flange height was 0.062" on the drivers (the leading and trailing truck wheels were the standard 0.090").  A code 172 driver flange is 0.047" high.  So you don't need to take much off to get to 0.060".  If I had to work with drivers that had a code 145 flange I'd probably change the tires.

I read that three times.  I should go back and read it again - I did not know there were code 145 flanges, and I am quite sure a file cannot be used to go from a  


(the leading and trailing truck wheels were the standard 0.090").  A code 172 driver flange is 0.047" high.  So you don't need to take much off to get to 0.060". 


.047" flange to a .060" flange.


Anyway, interesting thread.  Let me encourage some of you to simply put in a 2-rail loop along with all your 3-rail track, and run a short train of 2-rail cars.  Lots easier than converting.  A good Lobaugh Berk will bring $300-$400, but mess with its frame and drivers and you convert it to a $100 model.


Opinion, of course.

Last edited by bob2

I'm sorry I was so confusing.  I'd never use a file to cut a driver.  I'd reduce the driver radius by 0.013" on a lathe.  That would give you a flange height of 0.060". 


A code 145 driver has a flange height of 0.033".  Getting that to run reliably through three rail turnouts would be difficult.  You'd be better off removing the old tire and turning a new one with the profile you want.


I do have a Lobaugh berk that is a wreak.  In 60 years this kit has has never been completed though it appears that several past owners have made an attempt (all badly).  It has enough smeared solder on it to make 10 locomotives (really).  Someone else thought the tender could be assembled with epoxy (which was applied liberally and didn't hold the tender together).  If I do get this great old locomotive finished, painted, lettered, weathered and running it will have waited 60 years.  After all that time I don't think it will care how many rails it is running on.

The first thing I did with my 2 rail brass Mikado before attempting a conversion was wire a section for DC and run it around and through some scaletrax  turnouts. No problems at a scale 30 to 45 MPH. One thing that can help with engine and trailing trucks is to add lead and stronger springs to these trucks.


At least that is my experience.

The other helpful hint is make sure your trackage and wheels adhere to NMRA standards.


Ron

Ok - I understand now.  Be very careful when cutting the Lobaugh driver treads to a smaller diameter.  It will probably work ok on the uninsulated side, but for insulated drivers you will most likely heat the rim enough to loosen it, even with a very light cut.  You might be better off with a tool post grinder.  Or lots of cutting fluid.  Or both.


A better solution is to get some blanks and machine the drivers exactly the way you want. The cast iron on both sides will act like those rubber bands you normally use on powered wheels.  There are good blanks and bad, but if you get Meehanite iron, it cuts like hot butter.  The harder castings can be annealed if you can arrange to cool them very slowly.


This is an awful lot of effort just to keep that center rail.

Been following this thread with great interest.


For me, I'm just putting in a loop of 2 rail track.  Cheaper and easier.  I've got enough 3R projects to build that turning drivers and stuff just doesn't sound appealling.


Plus, after all the effort to make it 3R, I'd still need command control, which is another expense.  I know some will say I don't need it, but I like it and the sounds.  More than I want to do with this project.


I just want to run a 2R locomotive because its never been made in 3R.


It hasn't been this thread changing my mind either-I've thought about this for some time and bob2 nailed it when he posted about just installing a loop of 2R track (which I've thought about many times).  I've got rolling stock, just need to change the trucks to 2R.


I'll still follow this thread for the great info, but a 2R loop is so much easier. 


Only danger is I like 2R track and it looks better   I can easily see this snow balling into a 2R layout.

Before I had a real train room, I had an L shaped track in the garage, made with 3-rail Gargraves.  Three wires came out to little studs.  If I wanted to run 3-rail, I would clip the two outer studs together and put power to them and the center stud.  For 2-rail, I just clipped on the two outer studs.


If you do it right, the 2- rail loop will blend right in, and your scene will not be destroyed by the lack of a center rail.  The trains are the same size, so you have the very best of both worlds on a single layout.


If having a center rail is essential, plan the loop with no switches, then simply spike a dummy rail in there.  Way, way easier than machining drivers and installing rollers.

"Has Anybody Converted a Brass 2 Rail Steamer to 3 Rail?"

   I've seen folks go the other way from 3 rail to 2 rail where the problem becomes turning and insulating the drivers. In your case I think the main problem might be finding room for 3 rail size flanges, many steam locos have very little clearance between the flanges of adjacent drivers and other parts. Perhaps you could add 3 rail wheels to the leading and trailing trucks and see if the 2 rail drivers stay on the track? If I had a 2 rail brass loco and wanted to run it on 3 rail track I'd probably sell it and buy a new 3rd rail loco instead. Another option is many of the early O scale locos were sold as outside 3rd rail which would just need some center rail rollers added to work. ....DaveB

The cast iron is the raw driver casting.  Two-railers use steel or iron pipe for tires, but 3-railers do not need tires.  You just machine the casting to the proper contour and assemble.


Believe me - for most of us, machining an entire cast iron driver is easier and quicker than machining and installing tires.


I think I am with Hot here - if you have a nice 2-rail locomotive, leave it alone and go buy a 3-rail model to run.


I am impressed with your devotion to the center rail.  In five years I bet its only function will be as a decoration.  Battery and command- control is the future.

My reaction is, why would you want to?

Oh, fer! Because a desired model was only made in 2-rail. I cite the USH L&N M1 Berk, e.g.

In five years I bet its only function will be as a decoration.  Battery and command- control is the future.

When that glorious day arrives I'll happily rip out the offending center rail. I'll still be able to run anything I want on curves down to 36" radius.

Add Reply

Post

OGR Publishing, Inc., 1310 Eastside Centre Ct, Suite 6, Mountain Home, AR 72653
800-980-OGRR (6477)
www.ogaugerr.com

×
×
×
×
Link copied to your clipboard.
×
×