
I want to put in a eleveted graduated trestle  level on the layout im building but Im running out of ideas. My picture shows my 2 mainlines I plan to attach them and put in a yard but I wanted to make part of the layout on a graduated trestle line or sidding pass. I can't upload a file from my rrtrack program because of computer problems and I don't know how to. But any ideas would would be greatly appreciated.

Attachments

Images (2)
  • rrmth1
  • rrmth2
Original Post

Replies sorted oldest to newest

Hi HRSPLA,

Your RRT files reside in a folder in your Document folder named My RR_Track layouts.  On the low right of a forum post is an add attachment option.

Select that in a post and the point to the RRT folder and then file for the layout. Then click on the open button and it will upload to the forum.

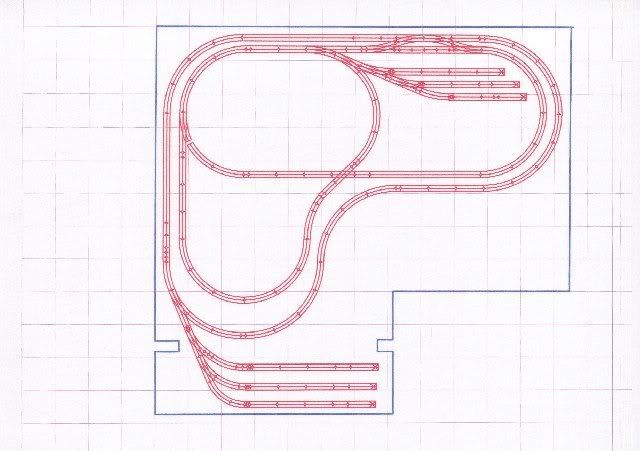
The long run along the left side looks like the best area to create the grade with the top and bottom tracks as part of the incline/decline. You only need to rise about 3" for a good scenic look for train.

Then top and the two sides are another area that looks good.

That means you would only use, perhaps, half of the trestle set. 

I don't see enough space for a second level, unless you want to go up to a reverse loop and come back down, based on the current track plan.

Post the file, then we can play around.  I have attached some example 3D's of the top 11'w x 7'L area with O42 RealTrax rising to 3". it is a 2.6% grade.

Attachments

Images (2)
  • HRSPLA_elevated top
  • HRSPLA_elevated top_1

HRSPLA, note the double-crossover at the top of the layout photo Mike posted. That's how you connect the 2 mains and it will generally determine where you can start/end the incline for whatever part you want elevated. If it were me, I'd probably put the crossover in the lower left of your layout so you can raise the left side to the top and then come back down using the curves along the right side.

Mike CT posted:

I had done this deck bridge several years ago.  It takes 11 or 12 ft to do an acceptable 3 to 4 % grade.  Many will argue 2% grade max.   The MTH bridge right side of picture  is also part of a grade.  Two levels are about 7 1/2" different. 

Slideshow look. Click on the highlighted phrase.

Mike how did you build your grider plate?  I'm doing a upper level on the right hand side with the inner look going up and down. I dont want to have the track just setting on trestles it dosen't look right to me. I love the way you did yours. I work at a glass shop and thought about making a wood base with plexi glass strips painted to look like steel.  How did you do yours. I love the way it looks.  Very nice layout.

Which radius curves do you want to use?  A helix made as an oval shape in the top inside will get you up and be hidden in the mountain. About  a  5" - 5-1/2 " rise.

Then you need a reverse loop on the elevated.

First is CWRR layout that I am working on. 3 level layout, helix allows train to visit each. Next is track plan for you. A 6' x 7' area is needed for O54.

Attachments

Images (4)
  • DSCN1138
  • HRSPLA_Helix
  • HRSPLA_Helix_3D_1
  • HRSPLA_Helix_3D_2

Add Reply

Post
The Track Planning and Layout Design Forum is sponsored by

AN OGR FORUM CHARTER SPONSOR

OGR Publishing, Inc., 1310 Eastside Centre Ct, Suite 6, Mountain Home, AR 72653
800-980-OGRR (6477)
www.ogaugerr.com

×
×
×
×
Link copied to your clipboard.
×
×