As I mentioned elsewhere, we're going to dismantle he layout we're building and replace it with a smaller layout. It was our first layout and we tried wiring per MTH and Barry's book for DCS.   Star pattern.  One - and only one - equidistantly placed OGR stranded wire 14 AWG drop per track block (except in track blocks with turnouts, where all three legs are powered) with each main wired to its own MTH terminal block that is wired to a separate TIU channel that is powered by its own Lionel 180 brick.  Three mains and all the related soldering and wiring took an enormous amount of time and effort.  We get a "10" signal throughout, but this hasn't stopped the more-than-occasional DCS fault.  All Lionel products always work flawlessly.  

Anyway, for our next layout, I'm thinking of just doing simple bus wiring.  Probably take 20% of the time to wire everything and, from what I've seen, most folks do it this way and experience no more or less issues with DCS operation.  If you operate MTH locomotives on your layout, curious - how did you wire your layout and what has been your experience? 

Thanks,

Peter

(Edit: bolded the pertinent piece to keep the discussion on topic - thanks)

Last edited by PJB
Original Post

Replies sorted oldest to newest

Don't have DCS, don't intend to add it.  When I built the layout I was a conventional operator.  I wired it for block control with the idea that two controllers could be used.  I added too many blocks and never really used a second throttle.  When I switched to TMCC I pulled the connection for the second throttle.  Now I am consolidating to fewer more logical blocks.  There has been a lot of crawling around under the layout tracing back my very sloppy wiring job.  The number of blocks will be reduced but I will maintain locations where I can store locos but leave the location un powered.  You may want to consider a few blocks for that purpose.


Always an interesting discussion. There was a topic recently where the OP was designing a new layout (9 x 16 as I recall) with under 300 ft of track, and misunderstood the DCS requirements. He figured he would need 54 runs of 2 wire feeders to his track blocks. Insane! He might as well put a sleeping bag under the layout because he wouldn't get out from under it for days!

My layout was wired long before DCS came along, but it works great with DCS anyhow. I use one Z-4000, one TIU (all 4 channels), "magic bulbs", several Atlas 215 4 pole switches for mainlines, and 3 rotary switches for T'table and yard tracks. There is about 400 ft of track and about 14 power feeders for the mainlines. The feeds are single wire with common ground returns. Several longer blocks have more than one feed. Several sidings have lighted 260 bumpers. Guess what; I get 10's all over the layout except for a couple of small sections that are only 8 or 9. Trains run perfectly all over. So my experience has been great even though the DCS wiring guidelines are not strictly adhered to. So I say go for it. You will probably be pleasantly surprised.

Rod

I have both DCS and Legacy and they both work very well. I haven't had a DCS problem since the layout was setup a little over 2 years ago. I started with DCS and added Legacy a little later. It's wired as close as I could get to the guidelines in Barry's book. I used OGR twisted pair wire, #14 to the MTH terminal blocks and #16 to the track drops. The switch machines and accessories are on power that is separate from track power. I have Atlas track, switches and switch machines. I have 2 loops of track, one on each fixed channel of the TIU, each powered by a PH-180. The layout is currently 6'x16' and if I can ever decide on a track plan to expand it, the layout will be larger. I would like to double the size at the minimum.

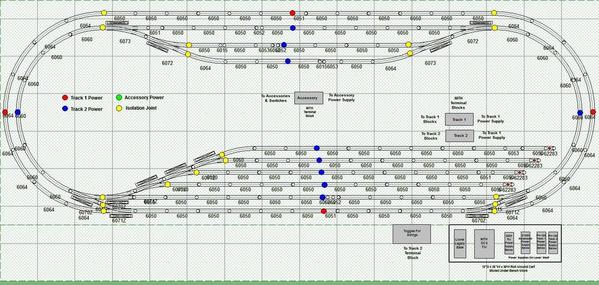
Here's an older track plan that shows the Terminal blocks, power supplies, TIU, track blocks (isolation joints), etc. with different colored dots. There is a legend on the layout. I don't have an actual wiring diagram, but what is here is pretty basic. The TIU, power supplies, etc., where they are shown, will be close to the center of the layout when it is expanded. The expansion was intended to go down from the lower right corner. The drawing is not exactly what I have now, but very close and it is what I started out with after I wired it up. The track wiring is still the same, but some additional power supplies for lighting and things have been added that are not shown. The track plan was done RR-Track v5 and you are welcome to a copy if you would like one. It isn't much, but it works very well.

O63-6'x16'-R-OV-01A-Exact-Table-Size-No-Floor-Plan

Attachments

Images (1)
  • O63-6'x16'-R-OV-01A-Exact-Table-Size-No-Floor-Plan
Last edited by rtr12
PJB posted:

Rod, Greg and Susan - can you provide some detail please?  What gauge wire do you use for your bus?  Feeders?  How far apart do you place feeders?  Is each main on a separate bus?  

Thanks 

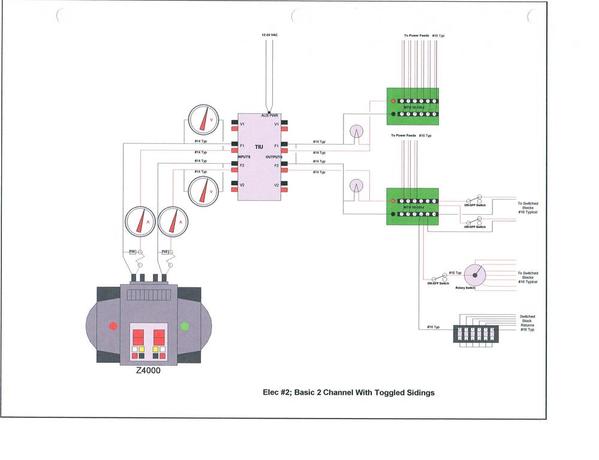
I use a combination of the following typical wiring diagrams. This first one shows how to connect and switch sidings using toggle switches and rotary switches.

Elec 2

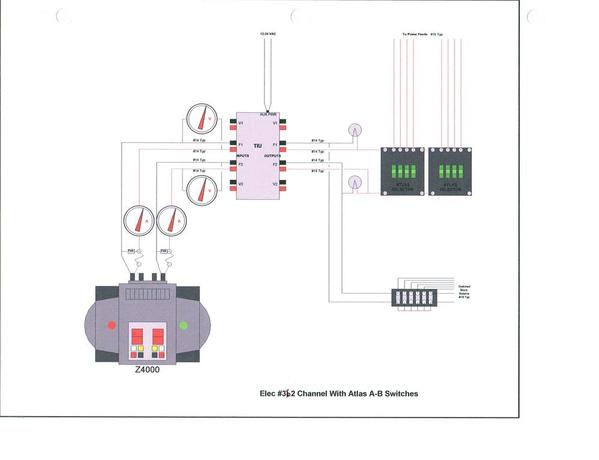
This one shows using Atlas 4 pole 2 pole switches for feeding mainline blocks. Note in this and the diagram above that the returns all come back to terminal strips. All are single run wires; no twisted pair wires were used. Also note the "magic bulbs" at the TIU channel outputs.

Elec 3b

This one shows feeding 4 TIU channels with two Z-4000 outputs. Note the use of TVS's across each pair of Z-4000 outputs. Each Z-4000 output is shown with a voltmeter and ammeter, which is a good idea for any transformer that does not have them. The Z-4000 of course already has these built in.

Elec 4

I really did not use a continuous bus wiring system. My track block feeds go individually from ATlas switches, or rotary switches to the track feed drops. Returns all come back to terminal strips. I use track feeds about every 8 to 12 track sections, wherever is convenient to get to. I used color-coded feeds and common white color returns, all 18 AWG, which is kind of light. They should have been 16 AWG at least, 14 AWG for the longer runs. If I had it to do over again that is the way I would go. Otherwise I am happy with it all and it works well. Before going all command operation I used to get occasional noticable speeding up and slowing down of trains due to supply voltage sags. Now with command and cruise control engines that is a thing of the past.

Rod

Attachments

Images (3)
  • Elec 2
  • Elec 3b
  • Elec 4
What gauge wire do you use for your bus?  Feeders?  How far apart do you place feeders?  Is each main on a separate bus?  

Thanks 

 PJB, did you see my web page, Toy Train Layout Wiring - Bus Wiring?  The largest surplus stranded wire I had available was #10 stranded.  That served well for the common.  The individual TIU Outputs/blocks/circuits are fed with #12 stranded.  Tracks taps off the #12 feeds are #16 thhn solid for Taps to track from #12 stranded terminal strips.

Wire taps to track are made so that every third track section is tapped or every track joins a tapped track, which would be after every third joint.  ( -- -- -- tap->-- -- -- tap>-- )

All commons are electrically connected.  After they leave the control areas, the track and accessory commons are separate.

The control panel below shows the two Main Tracks.  Black is Outside Main and the Red is the inside Main.  The Mains are divided in half so I can run 3 passenger train loads on each Main.  The left side is North and the right side is South.  Example:  TIU #1 is wired with Var 1 - red N      Fxd 1 - blk N   Fxd 2 - blk S      Var 2 - red S  .

5-Main5

See more detail in these two pdf files.


Attachments

rtr12 posted:

I have both DCS and Legacy and they both work very well. I haven't had a DCS problem since the layout was setup a little over 2 years ago. I started with DCS and added Legacy a little later. It's wired as close as I could get to the guidelines in Barry's book. I used OGR twisted pair wire, #14 to the MTH terminal blocks and #16 to the track drops. The switch machines and accessories are on power that is separate from track power. I have Atlas track, switches and switch machines. I have 2 loops of track, one on each fixed channel of the TIU, each powered by a PH-180. The layout is currently 6'x16' and if I can ever decide on a track plan to expand it, the layout will be larger. I would like to double the size at the minimum.

Here's an older track plan that shows the Terminal blocks, power supplies, TIU, track blocks (isolation joints), etc. with different colored dots. There is a legend on the layout. I don't have an actual wiring diagram, but what is here is pretty basic. The TIU, power supplies, etc., where they are shown, will be close to the center of the layout when it is expanded. The expansion was intended to go down from the lower right corner. The drawing is not exactly what I have now, but very close and it is what I started out with after I wired it up. The track wiring is still the same, but some additional power supplies for lighting and things have been added that are not shown. The track plan was done RR-Track v5 and you are welcome to a copy if you would like one. It isn't much, but it works very well.

O63-6'x16'-R-OV-01A-Exact-Table-Size-No-Floor-Plan

No image ...

Susan Deats posted:
What gauge wire do you use for your bus?  Feeders?  How far apart do you place feeders?  Is each main on a separate bus?  

Thanks 

 PJB, did you see my web page, Toy Train Layout Wiring - Bus Wiring?  The largest surplus stranded wire I had available was #10 stranded.  That served well for the common.  The individual TIU Outputs/blocks/circuits are fed with #12 stranded.  Tracks taps off the #12 feeds are #16 thhn solid for Taps to track from #12 stranded terminal strips.

Wire taps to track are made so that every third track section is tapped or every track joins a tapped track, which would be after every third joint.  ( -- -- -- tap->-- -- -- tap>-- )

All commons are electrically connected.  After they leave the control areas, the track and accessory commons are separate.

The control panel below shows the two Main Tracks.  Black is Outside Main and the Red is the inside Main.  The Mains are divided in half so I can run 3 passenger train loads on each Main.  The left side is North and the right side is South.  Example:  TIU #1 is wired with Var 1 - red N      Fxd 1 - blk N   Fxd 2 - blk S      Var 2 - red S  .

5-Main5

See more detail in these two pdf files.


Susan,

I'm barely proficient at electrical stuff for model trains, but I went to your site and from what I can tell, you have DCS signal enhancer doodads wired in throughout. In terms of experience with DCS using bus wiring, did you need these doodads so that DCS works properly or ...?   

Thanks 

Peter

Peter, my layout was wired at about the same time DCS was getting started.  Signals were weak in spots on some large or complicated layouts.  (For more background and technical information see Filter for MTH-Controlled (DCS) Model Train Layouts )

With the new improved TIUs and software your setup probably won't need any "doodads".  If one TIU  output had any signal weakness it would take only one pair of filters for signal improvement.  Sound wiring connections are most important.

My layout is 8' x 18' with 2 loops of MTH Real Trax and 1st. generation Z4000 and TIU (updated to 5.0). The 2 fixed channels are connected to the track with one Real Trax track terminal connector per loop. The wire is #18 AWG. Total wiring per loop maybe 5'. I've had zero problems, so I didn't even bother to test the DCS signal strength. My train room is a very electrically sterile environment. As others have stated, I can't help but wonder if problems are from electrical interference, either air borne or through the power lines.

The first layout was wired in the star pattern in anticipation of installing DCS.  Each block has only one feeder to prevent signal degradation because of electrical loops.  The extra wiring effort was all for nothing as DCS was never added.  The simple, single level plan presents no TMCC signal issues.

Wiring on layout #2 flew against better judgement.  I thought the lousy DCS signal readings I was getting was because of using traditional bus wiring on 300' of GG track.  Turns out the degradation was caused by foreign circuitry ( foreign to MTH ) without filters, a known DCS issue.  From limited experience, DCS and Legacy seem to be working fine together on bus wiring.  I'm not often caught working both remotes simultaneously.

The choice of wiring methods should be tailored to your layout plan.  On #2, its around the wall design and "T" shape had me running feeds overhead in hopes of keeping main feeds as short as possible.   #14 gauge Romex house wiring, stripped of it's outside coating, transmits power around the isle perimeter and track drops attach easily at layouts edge.  Common return is easily identified...it's the bare ground wire.  A few strokes with an Exacto opens a gap in the insulated wires to attach drops.   Additional wiring ( lord only knows how much, unless you're Elliot ) is quickly run around the edge to feed other powered accessories.  Short layout reaches keep those dreaded under the layout work sessions to a minimum.  Sectional fascia or curtain will eventually hide it all.

The only advise I have for those with sections of their layouts out of arms reach..... paint those dark, under table recesses white.   Wiring is much easier when we can see it.

Bruce


Add Reply

Post

OGR Publishing, Inc., 1310 Eastside Centre Ct, Suite 6, Mountain Home, AR 72653
800-980-OGRR (6477)
www.ogaugerr.com

×
×
×
×
Link copied to your clipboard.
×
×