Hi All,
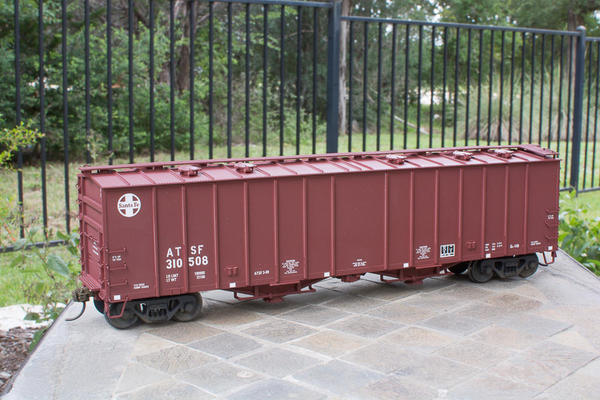
Just sharing my recently completed 2-railing job of this MTH 2-bay airslide covered
hopper.  Some mods that I have done with this car are I stripped it
using Scalecoat II paint remover (originally lettered for Southern) -
paint came off pretty easily.  Then I replaced the MTH roller
bearing trucks with new narrow sideframe Atlas 100-Ton roller bearing
trucks P/N 7066.  Next, I removed the thick molded on stirrups at each

corner and replaced them with hand-bent versions from K&S Engineering

1/16" x 1/32" brass strip.  I also thinned down the overly thick roofwalk using
a Dremel sanding drum attachment and a flat file.  The roofwalk is see-through so
it turns out nice once it is thinned down to a thinner cross-section. 
Lastly, I repainted using Floquil ATSF Mineral Brown and lettered for
ATSF using a Microscale decal set.  All-in-all, this makes a real nice

scale car once some TLC is done to it. 


SJK_0157


Scott K.
Austin, TX

Attachments

Images (1)
  • ATSF MTH Airslide
Last edited by Scott Kay
Original Post

Replies sorted oldest to newest

Hi Jack,

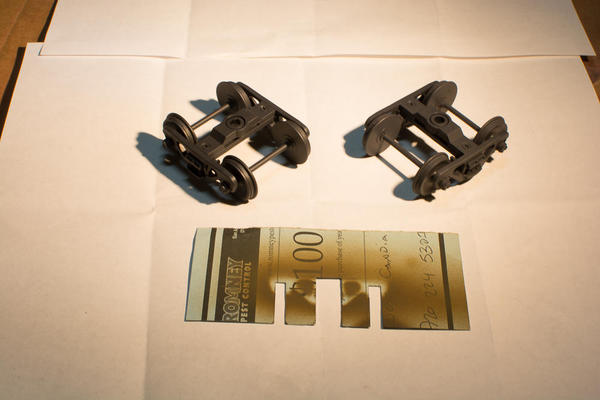
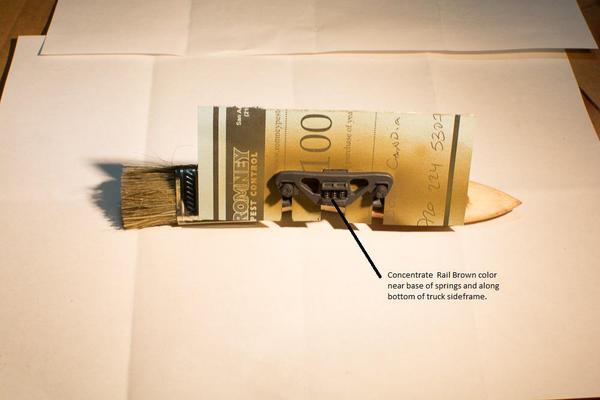
Here is how I weather my trucks, not that exotic but it provides a decent look.  All of this is done with my airbrush.  First, I spray the entire truck with Floquil Weathered Black (will probably change to Micro Mark's Microlux Grimy Black and Rail Brown once my Floquil stock runs out).  Then I do my best to try and spray Rail Brown at the wheel edges as this is generally where rust collects.  Then I use the card stock template shown in the photo to mask off the wheels as best as possible and give a light overspray of Rail Brown and add a little extra concentration at the base of the truck springs.  The template just kinda keeps excess Rail Brown from getting on the wheels.  You could do an additional weathering step with weathering powders and add even more color if you want but I have not done that yet.  I should break out my AIM powders and see if that adds anything to the effect.


SJK_0163


SJK_0164


Scott Kay

Austin, TX

Attachments

Images (2)
  • SJK_0163: Trucks with Weathered Black base coat and paper template
  • SJK_0164: Paper Template installed on Truck

Hi Matt,

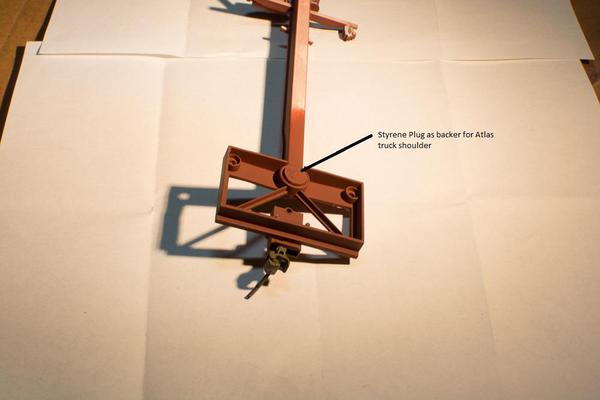
There was a little "engineering" done to mount the Atlas trucks.  First I enlarged the MTH truck mounting hole by step-drilling the hole until it matched the OD of the Atlas truck mounting shoulder that was included in the Atlas 100-Ton Roller Bearing trucks package which turns out to be 23/64".  The Atlas-supplied shoulder is a Nylon-like material and difficult to attach with styrene solvent adhesives but I found CA worked well.  The Atlas truck mounting shoulder was a nice snug fit in the 23/64" hole but I felt it would be better to add a backer plug to give the truck mounting shoulder more surface area to glue to other than just the edge of the shoulder as seen in the second photo.  The Atlas washer-head truck mounting screw was a real tight fit in the shoulder so I wanted the shoulder be able to withstand a decent amount of torque when the screw was inserted and not break loose from the bolster.


I mounted the larger diameter of the truck mounting shoulder flush with existing MTH bolster which made the car sit at the correct height with the Atlas trucks installed and I did not have to use any shims on the Kadee coupler draft gear box either.  One additional thing that I forgot to mention in my original post is that I milled the two angular frame supports (noted in first photo) 0.030" using my Sherline lathe with vertical milling attachment and 1/8" end mill bit to add a little extra vertical clearance for the outermost wheelset when car goes on uneven track.  This step is optional but I found that there was not much extra vertical clearance available between the wheelset and these supports - maybe only 0.020" without the extra milling.  Now if I do another MTH conversion, then I am just going to laminate a bunch of pieces of styrene together and then turn my own truck mounting shoulder/backer plug on the Sherline lathe.  Probably only use the washer-head truck mounting screws from Atlas.


SJK_0161


SJK_0162

Scott K.

Austin, TX

Attachments

Images (2)
  • SJK_0161
  • SJK_0162
Originally Posted by AGHRMatt:

You did a fantastic job. Did you encounter any difficulties installing those Atlas trucks given MTH's mounting style? Where were you able to obtain the new Atlas trucks from?

Hi Matt,

I got the trucks from InternetTrains.com.  Sometimes Model Railroader magazine sends out supplier coupons and I think I picked them up at that time.  The coupon is not much of a savings off the truck price but I think it at least covered the shipping.  Internet Trains doesn't really ship very fast but they usually arrive within a few weeks as I think they have to go back to Atlas to get them.  If you want them fast, just go direct to Atlas.


http://www.internettrains.com/...SRTRATO&Featured=


Scott K.

Austin, tX

Originally Posted by Scott Kay:

Hi Matt,

There was a little "engineering" done to mount the Atlas trucks.  First I enlarged the MTH truck mounting hole by step-drilling the hole until it matched the OD of the Atlas truck mounting shoulder that was included in the Atlas 100-Ton Roller Bearing trucks package which turns out to be 23/64".  The Atlas-supplied shoulder is a Nylon-like material and difficult to attach with styrene solvent adhesives but I found CA worked well.  The Atlas truck mounting shoulder was a nice snug fit in the 23/64" hole but I felt it would be better to add a backer plug to give the truck mounting shoulder more surface area to glue to other than just the edge of the shoulder as seen in the second photo.  The Atlas washer-head truck mounting screw was a real tight fit in the shoulder so I wanted the shoulder be able to withstand a decent amount of torque when the screw was inserted and not break loose from the bolster.


I mounted the larger diameter of the truck mounting shoulder flush with existing MTH bolster which made the car sit at the correct height with the Atlas trucks installed and I did not have to use any shims on the Kadee coupler draft gear box either.  One additional thing that I forgot to mention in my original post is that I milled the two angular frame supports (noted in first photo) 0.030" using my Sherline lathe with vertical milling attachment and 1/8" end mill bit to add a little extra vertical clearance for the outermost wheelset when car goes on uneven track.  This step is optional but I found that there was not much extra vertical clearance available between the wheelset and these supports - maybe only 0.020" without the extra milling.  Now if I do another MTH conversion, then I am just going to laminate a bunch of pieces of styrene together and then turn my own truck mounting shoulder/backer plug on the Sherline lathe.  Probably only use the washer-head truck mounting screws from Atlas.


SJK_0161


SJK_0162

Scott K.

Austin, TX

Thanks. I've been looking at Atlas trucks instead of MTH 2-rail trucks for some conversions.

Add Reply

Post

OGR Publishing, Inc., 1310 Eastside Centre Ct, Suite 6, Mountain Home, AR 72653
800-980-OGRR (6477)
www.ogaugerr.com

×
×
×
×
Link copied to your clipboard.
×
×