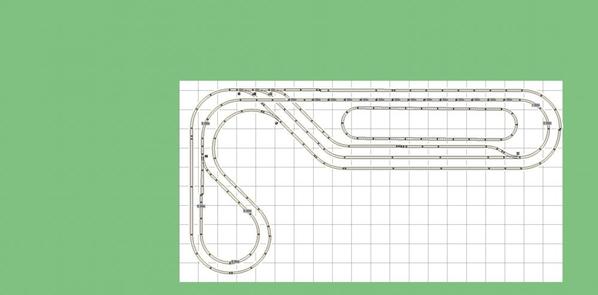
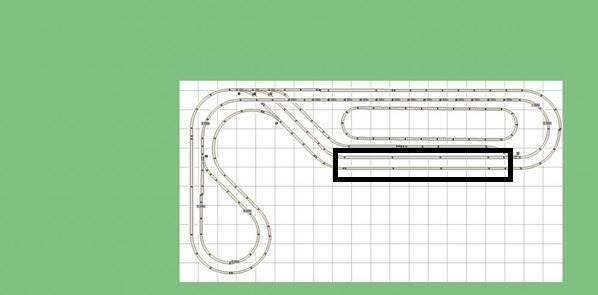
Figure 8 March 23, 2015

This is my newest layout.  I used to have a 10.5 x 17' around the room layout and a few things never made me happy, so it sat for a long time.


We recently had a flood in our basement that led to its immediate tear down to house the household items that were not damaged.


This now allowed me to re think my layout and ended up with this new plan.


It is a mish mash of the Figure 8 In a Room from CTT track data base.


Its 10.5 wide x 20' long, with O48 Outers and in O-36 inner.  3 O-36 switches and 1 O-48.  I have all the track and switches... but now what to do with 8 O-72 switches


Track is Fastrack.


It has a few ways to route the trains, and will run basically all the new LionChief Engines.  I have a few TMCC engines.  It will have an incline upto 6" leading towards the raised reverse loop.


I'll be using the MTH Fastrack Trestle set.  I've used them previously and prefer them over the Lionel brand.   I've shelved virtually all of my accessories, easier to do scenery than to fuss with them.


So instead,  I'll put my Super Streets in.  It too was dismantled for space, but back it goes, only this time in that 8' plus open section.  I can wire up a building easier than an accessory


Any thoughts or otherwise are certainly welcome.

Attachments

Images (1)
  • Figure 8 March 23, 2015
Original Post

Replies sorted oldest to newest

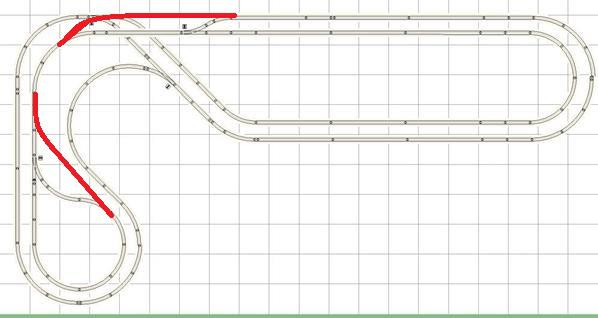
 Not being able to read your grade, I have to ask if the switch at the top of the hill is at the same level as the upper reversing loop or on a grade. I would avoid trying to put one on the grade.  Closer to the top reversing loop and level would be better I think.  

Also make the reverse loop up top as big as you can unless you know you wont ever want a long train.(the red gives more length) Every inch counts, and that loop is your size limiter.

 With a tiny bit of block control too, you could run two trains "look ma no hands" style. But as is, "lazy engineering" is limited to one train. 


rookie

Attachments

Images (1)
  • rookie
Last edited by Adriatic

I'm not to sure of what the grade will be either, it will start at the bottom of the longer section.  I think the MTH trestle has 12 sections to 6" 


As far as the reverse goes it will all be at the 6" height, in fact it will reach 6" height before the curve.


For sure one train will run and with the LC engines, two will not be a problem.


I did not see your attachment on your recommendation, does not show up.


i will do a o-48 reverse curve and check that out... ty


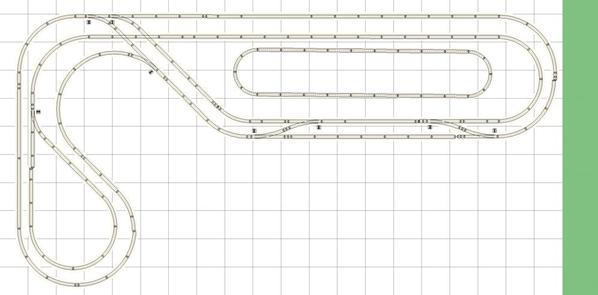
I've updated the track plan with the suggestion from Adriatic, thank you.


Using the MTH Fastrack Trestles it raises each piece by 1/2", in a little over 120" 

I'm up to 6" and I stay at 6" for the reverse curve.


The drawing now reflects the grade change.  I may put the switch back a little as I can foresee a problem with the trestle bases being in the way of the lower track.  I had envisioned a bridge to span that area.


I have also added into the plan a second passing loop.  It might stay, I think it will as it adds different route for the trains.


The Streets layout is also drawn.  A simple loop around the town is all that this will be.  I have an inner and an outer circle, giving me two way traffic.


I have run this grade previously on my old setup and although it was steep, my old conventional stuff went up and down very well.


Figure 8 March 30, 2015 - PASSING LOOP

Figure 8 March 30, 2015 - PASSING LOOP

Attachments

Images (1)
  • Figure 8 March 30, 2015 - PASSING LOOP

I had actually played more with yours in scarm, but fell asleep & forgot about it.

 If I leave you hang, I'm sorry, normally a repost like this will shake me up again.

Lots of attch. at the bottom.


I actually added more elevation for ease of landscaping! Too thin is harder to build up to. It is at 7.24", and it ended up with approx 2.2% max as seen.

I swung the descent's curve to the outside much earlier up top.

 Testing to find your max grade could let you do two different grades, one on each line, but on the same hill, offsetting the loco heights as they pass on the hill. A visual play that would take more work for sure.


The yard can be pulled quick, it was just to get you thinking. Running the streets is a surprise.

 A girder or trestle bridge, or two, over the double tracks, or some tunneling is due.

There are half a dozen "close calls" on real life fitting. All this computer design is not going to be exact. The grades alone change effective lengths, and they will come up a bit short without doing the actual math to compensate for the added rise. 


rookie3

rookie7

rookie6

Attachments

Images (8)
  • rookie3
  • rookie4
  • rookie5
  • rookie1
  • rookie2
  • rookie6
  • rookie7
  • rookielist
Files (1)
Originally Posted by LionelRookie1992:

I've updated the track plan with the suggestion from Adriatic, thank you.


Using the MTH Fastrack Trestles it raises each piece by 1/2", in a little over 120" 

I'm up to 6" and I stay at 6" for the reverse curve.


The drawing now reflects the grade change.  I may put the switch back a little as I can foresee a problem with the trestle bases being in the way of the lower track.  I had envisioned a bridge to span that area.


I have also added into the plan a second passing loop.  It might stay, I think it will as it adds different route for the trains.


The Streets layout is also drawn.  A simple loop around the town is all that this will be.  I have an inner and an outer circle, giving me two way traffic.


I have run this grade previously on my old setup and although it was steep, my old conventional stuff went up and down very well.


Figure 8 March 30, 2015 - PASSING LOOP

Figure 8 March 30, 2015 - PASSING LOOP

Hi LR1992,

My primary comment... only one train running. You still have collision avoidance concerns if you run two trains at once on this revision.


if you operate conventionally, two trains will be even more tricky. Use the simulator and run two trains. You'll see what I mean.


My personal preference is not to have a mound like the elevated r-loop blocking the rear track. Once you rise to the new switch at the top, the outside line should drop to zero at the bottom left and tunnel through the r-loop mound. Extend it to the edge of table in that corner.


Just some thoughts...the track plan is interesting.


I am also curious like 1drummer as to what you didn't like about the ARTW layout.

Last edited by Moonman

I got rid of the ARTR layout due to a couple of reasons, one it was a larger project than I originally thought it was going to be, the typical biting off way more than you can chew type thing especially for my first layout. 


This newer layout seems to give me that.


After seeing the yard design, that gives some food for thought too.


I really want to be able to run multiple trains, that is my main goal.  I will have to work on the track layout for that.


I cannot get the Sim working for two trains on RR Track, one train only... for some reason there are collision potentials


I am going to re-work the plan.  As I am looking at it right now, I might just do a single elevated double reverse loop and then the outer O-48 will all be on one level.


Simpler again,


Bryan


Originally Posted by Adriatic:

 Not being able to read your grade, I have to ask if the switch at the top of the hill is at the same level as the upper reversing loop or on a grade. I would avoid trying to put one on the grade.  Closer to the top reversing loop and level would be better I think.  

Also make the reverse loop up top as big as you can unless you know you wont ever want a long train.(the red gives more length) Every inch counts, and that loop is your size limiter.

 With a tiny bit of block control too, you could run two trains "look ma no hands" style. But as is, "lazy engineering" is limited to one train. 


rookie

Great idea to add some length.

A lot of nice designs run one train at a time. The need for double mains or multiple trains at once can force a design that just isn't as interesting or as much fun to run.


You can run two trains, but it will take dispatcher\engineer control to avoid collisions. That's prototypical.


A different plan will be needed if you want more of the display type of layout with trains running without constant attention.


Go back to the original plan and put a passing siding on the long leg. It won't each up too much city space. You can block it for power control.


The original plan will look nice, leave room for scenery.


Try this-work this switch and crossover arrangement into the switch at the top and adjust the two long legs to fit. This will keep it all flat. Then add the passing siding on one of the long legs on the back.


See if you like that with sim.

LionelRookie1992

Attachments

Images (1)
  • LionelRookie1992

Far less work flat 

 And one day, when you're ready, you could change the whole thing with the elevation if you wanted.


 I assume the "other plan" was in Anyrail?

(I had to uninstall it. Updates made my system unstable running it)

I didn't know there was a track planner & simulator. RRT has one? 


  Rookie ,You should gather a written list of what track you do own.

Mininum turn for your big trains. Are there switchers to service it on a line from tight yards, etc etc, Include it in every new post you might start. A reference/link to the last directly related post wouldn't hurt either. Why buy what you don't really have to?

 I just used "whatever", not knowing what you have.


  Looping is important to me for a few reasons, kicking back, and not operating, but just watching is the #1 priority. And if flat, I would consider trying to get two loops by adding more connecting track somehow, or commit to a bit of automated block control.

"Back to basics", if you will.


  Given a choice, Id  have two carpet loops with no switches, over a single line masterpiece with sidings on a table. But I'd prefer to compromise.

 I'm not much into switching, and train building(still fun). Id prefer switchbacks for linear ops. A "to scale" long distance run, measured by loop count, is far more appealing to me.

 Climbing, and descent on grades, is again more fun to me.

   I love two trains moving parallel, in the same, or opposing direction. It doesn't matter which. 3 or 4 even better.

  I like pesketti bowls. & have been in valley towns that make them near prototypical

  .

  Point is, you can design 100 layouts, but if the wrong part your "design brain" gets its way, you may not satisfy your "operating heart". If your not sure which suits you best, I'd use this layout to figure that out, by incorporating both ops & loops. 

  I don't think we have a detailed commitment as to what your looking for. I thought it was a grade, and separation of destination by height and at least two trains going.


Here is two additions that leaves existing lines, but allows two loops for two trains without any block control. I left 48" on the outside, 36 on the inner. The yellows are near misses as well as the green(closer), but I think it would fit    


rookieflat

  rookieflatyard

 Could one of you guys rip my 2 yards to shreds critique wise? Please.

Its not a joke, or boast. No mercy.

 I think it would work, but could be better. I've never attempted one before, & would like my flaws shown to me.


Attachments

Images (4)
  • rookieflat
  • rookieflatlist
  • rookieflatyard
  • rookieflatyardlist

Adriatic,

A pass through yard is a good thought. It should be long enough to park made up trains. Then, you can change a consist or bring out a completely different train.


If this was intended for cuts and builds, there are no bumpers.


It has a decent yard lead. The engine can go in first and escape out the another end and back out. Leaving the top and bottom track open creates a run-around.


I believe he wants to put a city in that space and run a streets track that he has.


Yes, RRT has a simulator that let's you build a train and run it around your layout design. It helps for a check on the operational fun. It moves at scale speeds. A layout like LR1995 with another 20' leg and a large yard took me 40 minutes to run every route option and drop off, cut and build a new train in the yard. That was moving as fast as I could. It's a nice feature.

Originally Posted by Moonman:

If this was intended for cuts and builds, there are no bumpers.

 I see how a "brace" could be useful. I wondered why so many layout had a lot. I'm not sure the real yards around me use many. I've never even seen a car 100% up against the real ones that I do know of. And my Grandfathers yards didn't have many either. More like hump yards, without the hump if you know what I mean.   

I believe he wants to put a city in that space and run a streets track that he has.

 Yea that why I posted both. I just had "yard fever".

Yes, RRT has a simulator that let's you build a train and run it around your layout design. It helps for a check on the operational fun. It moves at scale speeds. A layout like LR1995 with another 20' leg and a large yard took me 40 minutes to run every route option and drop off, cut and build a new train in the yard. That was moving as fast as I could. It's a nice feature.

I've been to the site a few times before. It isn't to impressive considering they are software based I looked, and looked. Couldn't even find mention of the feature let alone an example. I could see any photos really either, too small.

 Thanks for the info though MM. 


I opened up the RR file MM, that's great... ty! 


Although, I have run into a large road block and one of the reasons why I went elevated in the first place.


This area is my furnace room.  What you don't know or see is my electrical panel that is right in the upper left corner.


On paper, its easy to reach, but in reality it is definitely more than a stretch.


Even on my ARTR layout it was a stretch at 36". 


Doing the elevated section allowed me to push the outer loop up into that corner putting me at my max reach - a doable 36"


I think I need to do two things 1) Take a look at shortening this layout width wise, down to 8' and then again shortening it by 2' to allow me sufficient walk around room, this will give me a layout dimension of a max 8.5" x 18'


Or 2) Rework the elevated plan again, with the goal of two trains.


It seems you haven't given this a lot of thought. Having excluded the reach to the electrical panel as a Given demonstrates that to me.


That is of the same importance as any other Given.


Since you still haven't told me exactly where the electrical panel is from the corner, I squeezed the existing plan as much as I could. It was simply a matter of removing straights to compress the inside corner.


It resulted in a reach of 42" diagonally from the corner and 21" from the wall at 90 degrees. About 28" mid-point between the two. You would just have to cut a deep inset in the table.


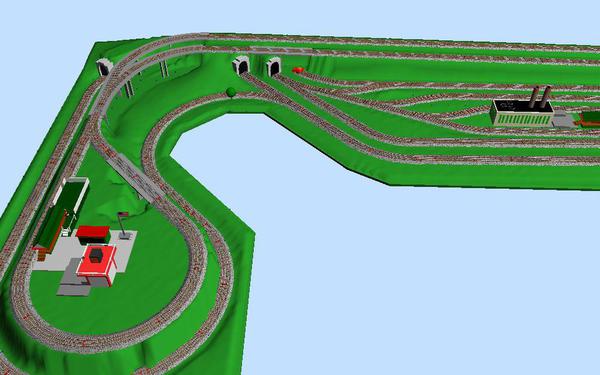
Changed the corner and lengthened the outside line on the right. The outside wall dimensions have not changed, still 10' x 20' x 5' wide on the ends.


Here's a track plan and a 3D.


I have also attached a quick read that should help focus your planning efforts before going to the software.

Attachments

Images (2)
  • LionelRookie1992 v.3 Corner Reach Fix  Track Plan
  • LionelRookie1992 v.3 Corner Reach Fix  3D
Files (1)
Last edited by Moonman

 As I mentioned, I also think this would go much smoother with more info listed within this post.

 I remember bits and pieces of your info, but there have been many other similar layouts discussed over time.


 It would be wise to consider you may be reaching for the fuse box in the dark.

  Any structures or trees proposed to be placed, should keep a clumsy approach in mind. 

There might be some truth in that last post from Adriatic.


I cannot get into the proposed train room until May at the earliest as the various trades come in to repair the damage from the flood.


Then, after that is all done and finished, I will sit down once again and try this all over.


Next time though, I will draw out the room dimensions, electrical panel, furnace etc from the get go.


I'll also include my track pieces and quantity, trains etc to give a better idea of what I have rather than what I think I have...


It will be challenge for sure.


Until then,


Bryan


Add Reply

Post
The Track Planning and Layout Design Forum is sponsored by

AN OGR FORUM CHARTER SPONSOR

OGR Publishing, Inc., 1310 Eastside Centre Ct, Suite 6, Mountain Home, AR 72653
800-980-OGRR (6477)
www.ogaugerr.com

×
×
×
×
Link copied to your clipboard.
×
×