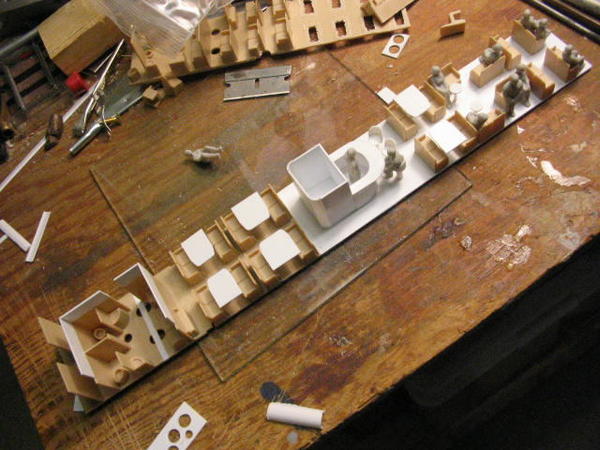
i received a catalog from American Models the other day and while looking at the page showing their Budd passenger cars, I was taken in on the interior photos. That inspired me to see if I could come up with something similar. So, not having a Flyer 963 Observation car, I took the dimensions from a Flyonel flat car and set out to create my own interior scene. Here're the results of my efforts. At some point I want to buy a 963 which needs restoration, install LED lighting ala Banjo Flyer's, remove the silhouettes and replace with them clear windows, and set my interior in place. Other than the figures which are RailKing, everything was scratch built. I don't think all the imperfections will be noticeable once closed up in the car. IMG_0286IMG_0287IMG_0288

Attachments

Images (3)
  • IMG_0286
  • IMG_0287
  • IMG_0288
Original Post

Replies sorted oldest to newest

RBG,


Nicely done, sir.  If there are any "imperfections", I can't see any.  I realize there were some standardization in those cars, but as long as you have some sort of interior, the effect is there. 

I haven't done the streamlined cars, but rather an AM heavyweight car.  The whole interior is freelanced, but looks great on the track and illuminated in a darkened room.

Modified interior compared:

Unpainted

observation interior, unpainted, overview

Painted and installed

overview, finished 001

Bar detail

observation interior, bar

Observation end detail

observation interior, unpainted,rear seating detail

Attachments

Images (5)
  • observation interior, compared
  • observation interior, unpainted, overview
  • overview, finished 001
  • observation interior, bar
  • observation interior, unpainted,rear seating detail
Last edited by poniaj

If you are looking for passenger car interior details we make them. The following link will take you to that section:

http://www.scalecitydesigns.co...r-Details_c_129.html

Also click on the catalog link on the home page to see a more complete listing as to what is available.

We also make headrest covers that are peel and stick and if you don't see your railroad email us and we will make them for you.

http://www.scalecitydesigns.co...st-Covers_c_133.html


Retired band guy posted:

Holy cow! Where did you get the seats and interior fixtures? Did you make them? They look GREAT!!

RBG,

Back atcha!  Your seats look great too, where did you get yours?  Those ash tray stands look very nice, but I don't allow smoking on my trains... . Nice paint job on the figures, and I love the plant stand.

If you look carefully at the photos, you'll see an AM Budd interior "drop-in" cut up into pieces.  AM sells them separately if you call them.  I cut the tan colored seats from that, also the toilets and sinks, which were the complete lounge section.  The white pieces are styrene shapes.  Table tops are either cut from a sheet, or using a hole punch,  I made the circular table tops.  I've used the AM Budd interiors extensively for their heavyweight cars.  I developed a way of dropping them into the heavyweights by only modifying them with three cuts.

Scale City Designs,

Great looking things, but we're an S site, not O.


Last edited by poniaj

Thanks Jerry!

i scratch built all the interior. The bar was made from bits and pieces of styrene and covered with Bare Metal Foil (same with the seats). I took a strip of triangular balsa aileron stock for the seat backs and some 1/2 inch square balsa for the seat and glued them together in about a six inch strip. Then I sanded them to the shape of the seats using the LAR technique ( Looks About Right ). Then just sliced them off to length with a razor saw and miter box. I made he ashtrays using some HO scale signs that used to come in Model Power building kits, snipped the sign part off, heated a #11 x-acto knife and pressed the stem to melt it into shape. Then snipped the base into somewhat square with a nail clipper. The "carpet" is a textured paper towel. If you look closely, you can see the pattern. The plant stand was made from a wire nut which I cut down a bit and stuck a wire armature tree in it. There're some things I'd do differently the next time, but I'm happy with how it turned out. Hard to find some of this stuff in S. thanks again for your comments.

phil

Add Reply

Post

OGR Publishing, Inc., 1310 Eastside Centre Ct, Suite 6, Mountain Home, AR 72653
800-980-OGRR (6477)
www.ogaugerr.com

×
×
×
×
Link copied to your clipboard.
×
×