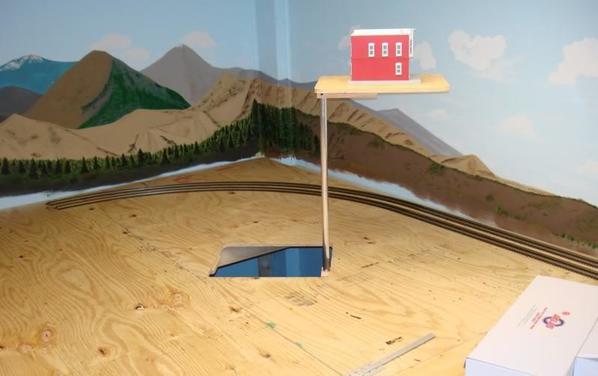
Decided to start a build thread for my just-started prewar Standard Gauge layout.  Thanks to all the members for help with the layout plans. I think I have it more or less the way I want it and have been getting carpet burns with the carpet testing!

I have a combination of 222 switches and 223s. Eventually, all of the switches will be 223s. I like the green colored ones and am shooting for that.  As you can see the challenge of this layout is the placement against two and a partial third walls. In the center, there will be an opening or two larger hatches so everything will be with a 2 ft or so reach.  

The backdrop (which I painted) will extend down the right wall, but isn't finished as yet. Controls will be on the left open side. It will feature all original Lionel accessories, including a 124 station, 300 Hellgate, 440n Signal bridge, 155 Freight Shed (or 2) and some other switch towers and buildings. No. 56 lamps will be used exclusively. I like their look.  I'll update as I go. Hope to start benchwork in a month or so.FullSizeRender-3IMG_9235IMG_9236IMG_9238IMG_9239

Attachments

Images (5)
  • FullSizeRender-3
  • IMG_9235
  • IMG_9236
  • IMG_9238
  • IMG_9239
Last edited by Dreyfuss Hudson
Original Post

Replies sorted oldest to newest

Looks like you're off to a great start.  Love your backdrop, it's dramatic!  Reminds me a little of the semi-surreal impressions of NYC from Mark Helprin's "Winter's Tale", his whole theme with the wall of fog that would approach the city and then receed.

I'm impressed that you're going with all vintage track and switches.  The big 140 tunnel anchors that back corner nicely!  Keep us posted with progress... and if you can, some of reasons or your thought process behind certain decisions that you make along the way.  It's always enlightening to hear somebody else's take on a familiar process.


david

Do you plan on running 2 trains or 1? If running only 1 you can replace the 4 switches with a 20x crossover and inner loop outer loop running. 

I would test running on the back to back switches and try to put at least a half straight in between. Although it may end up if you run 2 trains at once they are mostly for show and trains will not run over the back to back part.

For fun operation I would wire the outer switches straight to curve and curve to straight with a double pole center off toggle switch. Park the inner train on that short siding and let the outer train run on the inner outer loops. Same can be done with the inner loop creating a different operating route.

assume you will be operating conventional so do not forget insulated power blocks for stopping trains.

Great backdrop.

Last edited by F&G RY
F&G RY posted:

Do you plan on running 2 trains or 1? If running only 1 you can replace the 4 switches with a 20x crossover and inner loop outer loop running. 

I would test running on the back to back switches and try to put at least a half straight in between. Although it may end up if you run 2 trains at once they are mostly for show and trains will not run over the back to back part.

For fun operation I would wire the outer switches straight to curve and curve to straight with a double pole center off toggle switch. Park the inner train on that short siding and let the outer train run on the inner outer loops. Same can be done with the inner loop creating a different operating route.

assume you will be operating conventional so do not forget insulated power blocks for stopping trains.

Great backdrop.

I plan on running two trains. A layout this small will get boring with only one. The switches runs fine in the straight to straight position they are in. No problems, no dead spots. Will try other forthcoming engines and cars before I nail it all down. I do have three 20x crossings, but don't have enough room to make them usable (with standard vintage track). Will still look at it for possibilities, because I love the look of those crossings. 

The relative position of the late-colors Hellgate tried out on the carpet mock-up.  Spent 3 days cleaning that sucker. My fingers are raw.  I am thinking about having that bridge over 'water'. Just trying to figure  how to stylize the water like the backdrop. I want everything to look as stylized as the trains themselves.  IMG_9354IMG_9356IMG_9359IMG_9353IMG_9360

Attachments

Images (5)
  • IMG_9354
  • IMG_9356
  • IMG_9359
  • IMG_9353
  • IMG_9360

For your water you might want to use  the lens of a hanging ceiling light. I found by using the lens called cracked ice painted blue works for me. Its a great look. or so I think. Im not the best using a computer, I wanted to show you what my water looks like but the file is too big.  I have a video of it on you tube called catenaryproject2.

pennytrains posted:

You may miss the ability to walk across and correct a derail though!    But I know what you mean!  My knees are flattened from working on carpet centrals for the last month! 

Working on a carpet layout while avoiding knocking into precious trains and accessories is tough. It requires agility, strength and contortions of the body.  I call it 'train-yoga'.

This is what will be fitting on top: (The movie is missing an additional siding that you can see in the photo.) The interesting thing about this layout is you can run two loops at the same time, but with the non traditional usage of a 20X crossing, any train can run around the three loops with minimal switching.  There are 11 cut tracks in this layout. Track software was pretty much for ideas. Thanks to all of you that contributed some plans early on!

IMG_9879

Attachments

Images (1)
  • IMG_9879
Videos (1)
IMG_9890
Carey Williams posted:

Wow that is quite an interesting collection of bench parts ...a wood erector set .   You are very talented being able to do the backdrop . Thank you for sharing your layout progress.  

Thanks much, Carey. I wrestled for a long time on whether I would do the benchwork myself or have custom-built by Mianne (one of the forum sponsors). Considerations were price, time, being able to customize and make changes in future, and if I happen to move, being able to tear it down and re-assemble. Mianne won the plus/minus column. The additional perks of choosing Mianne were of course the ease, no sawing or sawdust, no finding or hauling straight timber, no drilling, no matching hardware, and the look.  I will report back when I have it built. (Or maybe halfway.)

Last edited by Dreyfuss Hudson

The backdrop has been hung. It was a very difficult job. It needed to be obviously even, the panel needed to match up, and it needed to be exactly 1 inch above the benchwork in order to clear the 1/2 inch ply and 1/2 inch Homasote.  These panels are heavy (masonite) and flex, so I needed to build a simple jig to help me keep it aloft and straight. (Just a 1X1 temp-drilled into the studs.)

The devil in these details took the shape of a slightly tilting floor, moldings tighter at the hanging spot than the floor where it was measured, and non-perfect cutting of the panels. Yikes.  It was real tough, but in the end I am happy the way it came out. IMG_9903

Attachments

Images (1)
  • IMG_9903

in the end I am happy the way it came out.

My friend, you should be happy.  It looks great.

You may or may not have intended it, but the look is reminiscent of those industrial prints popular during the art deco period, which is just the right time frame for your trains.  Here's an example of what I mean by that:

Keep up the good work.

Steven J. Serenska


Serenska posted:

in the end I am happy the way it came out.

My friend, you should be happy.  It looks great.

You may or may not have intended it, but the look is reminiscent of those industrial prints popular during the art deco period, which is just the right time frame for your trains.  Here's an example of what I mean by that:

Keep up the good work.

Steven J. Serenska


Thanks very much, Steven!

Mianne benchwork is done. Letting it settle a bit then will re-level it before adding plywood. Real easy to work with. Couple of tricky parts, but not too bad. Not having all the sawdust covering me and everything in the basement made it worth every penny. I am NOT a good measurer/cutter. Just not my thing, so I was real happy to have this custom benchwork made up. Fits my snug space like a glove. Layout is about 9' X 10').

In the foreground you'll notice the transformer shelf with plenty of room. I am most likely going to spring for a nice piece of wood to cover that. Haven't decided how I am going to cover the sides of the benchwork. (Just two sides are open) Any suggestions are welcomed.IMG_9911IMG_9912

Attachments

Images (2)
  • IMG_9911
  • IMG_9912
Last edited by Dreyfuss Hudson

Wow, that is looking great !I have a suggestion for a different topic. Just after the Christmas season I would go out and buy two strings of the screw in type bulbs to fasten under the table top. I did this to one of my layouts and it sure helped out a lot when it came to working under the layout. No need for a flash light or an old table lamp, just hit the switch and I had a well lit work / storage space for the cheap. Looking forward to your next progress report post.

Dreyfuss Hudson posted:

Mianne benchwork is done. Letting it settle a bit then will re-level it before adding plywood. Real easy to work with. Couple of tricky parts, but not too bad. Not having all the sawdust covering me and everything in the basement made it worth every penny. I am NOT a good measurer/cutter. Just not my thing, so I was real happy to have this custom benchwork made up. Fits my snug space like a glove. Layout is about 9' X 10').

In the foreground you'll notice the transformer shelf with plenty of room. I am most likely going to spring for a nice piece of wood to cover that. Haven't decided how I am going to cover the sides of the benchwork. (Just two sides are open) Any suggestions are welcomed.IMG_9911IMG_9912

Looks great! On the next one I build, I am going to put finished wood trim around the edge of the table. I may just use black curtain for the rest of the skirt.

George

Dreyfuss Hudson posted:

1/2 " ply has been put on top. Haven't secured it yet. Tweaking it to get it all to fit real snug against walls and each other. (A little over-the-top because the homasote will be going on top of the ply.) Hatches in center need to be cut yet.IMG_9936

Check out Alex' build thread on 3/18/11 post for his Hidden Pass Junction layout. A very nice hatch system. We have a hatch on the Eagle Scout Project layout with a park on it. When I went up through it the first time, I stood there looking for a place to sit it in the middle of the town. I'll be adding Alex' system over the winter. It's the woods with Dorothy, Scarecrow & TinMan walking out. It end up on the grocery store building roof across the street. It's a piece of 2" foam.

HATCH06medDSC03458HATCH02medDSC03451-1

IMG_0429

Attachments

Images (3)
  • HATCH06medDSC03458
  • HATCH02medDSC03451-1
  • IMG_0429
Last edited by Moonman
Carey Williams posted:

Thank you for showing us the progress photos of your layout .

The framing "custom kit"  ..bolts / screws together ?    

Your hand painted backdrop is wonderful .

Hope you have many happy years running .

Cheers Carey


Hi, Thanks for the compliments on the mural. The benchwork is from http://www.miannebenchwork.com. Check them out, it's a neat system of locking parts and hardwood I-beams. Resists temperature swelling and can be modified without any fuss, also can be packed up and moved with no loss or destruction. Nothing is nailed. The only screws will be the ones that secure the plywood... but those are into brackets that can be removed also. No damage to the ply or the benchwork. Terrific system custom made to order.

Last edited by Dreyfuss Hudson

Add Reply

Post

OGR Publishing, Inc., 1310 Eastside Centre Ct, Suite 6, Mountain Home, AR 72653
800-980-OGRR (6477)
www.ogaugerr.com

×
×
×
×
Link copied to your clipboard.
×
×