Originally Posted by Putnam Division:

That is one handsome bridge!


Peter

It certainly is.  At last Fall's York I had a serious discussion with the guys at East Coast Enterprises and they were very intrigued by the prototype.  I happen to think the prototype is one of the most beautiful railroad bridges in America.


IMG24


I think they captured the essence of the prototype in their model.  The real bridge, including approaches, is over 1,900 feet long.  Obviously you cannot reproduce the prototype as a scale model in 1:48.  That would be a bridge nearly 40' long, but the proportions are correct.


George

Attachments

Images (1)
  • IMG24
Last edited by G3750

Updated 5/18/2014:


I have started assembling the highway overpass at Crawford's Crossing.  Here's a look at the prototype (the highway between the mills circa 1957).


1957 Weirton Steel


Here's my start.  I have glued the edge of the roadbed (closest to the viewer) to the foundation layer of the highway.  The sidewalks are clamped down to help align the roadbed.  Eventually, they will be glued down followed by the roadbed itself.  After that, I will determine locations for the telephone poles, drill holes, and install them.  Finally, I will install the Crow River railings.  Pilings and piers to come after along with placement on the City of Weirton module.


DSCN0236


George

Attachments

Images (2)
  • 1957 Weirton Steel
  • DSCN0236

Updated 5/19/2014:


Got some more time tonight and managed to glue down the roadbed and both sets of sidewalks. The photos don't look much different from the previous post, but there is real progress being made.


DSCN0238


I added a foundational piece under the pointed end of the roadway. This will stiffen the overpass structure and keep the sidewalk properly aligned with the roadway. The end on the left side of the photo will be up against the against the wall.

DSCN0241


Here's another use of a Roget's Thesaurus.

DSCN0242


George

Attachments

Images (3)
  • DSCN0238
  • DSCN0241
  • DSCN0242
Originally Posted by G3750:
Originally Posted by Putnam Division:

That is one handsome bridge!


Peter

It certainly is.  At last Fall's York I had a serious discussion with the guys at East Coast Enterprises and they were very intrigued by the prototype.  I happen to think the prototype is one of the most beautiful railroad bridges in America.


I think they captured the essence of the prototype in their model.  The real bridge, including approaches, is over 1,900 feet long.  Obviously you cannot reproduce the prototype as a scale model in 1:48.  That would be a bridge nearly 40' long, but the proportions are correct.


George

I'll say they captured the essence of the bridge.  I love bridges like this.  This is the first I have seen your thread.  Very impressive work!

Updated 7/19/2014:


Ordered and received a set of 4 working traffic lights, controller, and power supply from Greg Leonard.  Testing is in progress.  The lights look absolutely spectacular!  Traffic light positions are indicated by the RED dots.  Each is a single-facing Red-Yellow-Green traffic light.


image002.jpg


Main Street (the long horizontal road) will have 2 signals.  Clockwise is Country Road and then Pennsylvania Avenue. 


George

Updated 8/16/2014:


Major changes are coming to the PRR Panhandle!


  • Last week, I placed the order for the Steubenville bridge from East Coast Enterprises.  We are scheduled for pickup at Fall York.
  • I have started planning the construction of the new bridge's piers.
  • Today, I removed the Curtis Double Cross-over in preparation for mailing it to its new home. 
  • I also documented the new train movements that will be needed to switch Weirton Steel and Standard Slag without the use of the cross-over.

In the next week or so, I will update the track plan and the front page of this thread.


George


Updated 8/20/2014:


Awhile ago I ordered 1:48 traffic lights from Greg Leonard.  They are fabulous!!!!


http://miniature-traffic-lights.com/testimonials


They have arrived and I finally got them on the bench for testing.  In the diagram below, the lights are assigned to the streets (clockwise) - County Road, Pennsylvania Avenue, Main Street (South), and Main Street (North).


image002.jpg

Here's a video of them in operation.


Needless to say, I am very pleased with how they look and operate.


George

Attachments

Videos (1)
DSCN0434
Last edited by G3750

Updated 8/28/2014:


In honor of the 2014 Steel Mill Modelers Meet, I am posting some steel related photos from the past.


Lionel slag cars dumping their loads at Standard Slag

DSCN0028


My scratchbuilt ingots on my scratchbuilt ingot cars.  Hot, don't touch!

Ingot Cars 2


Open Hearth with ingot cars exiting the front and WSX Alco S-2 #208 entering the side.

SAM_0390W


Lionel Alco S-2 (formerly Western Pacific) now sporting Weirton Steel green (c. 1946).

WSX 208 & Ingot Cars 001


WSX #208 with ingot cars.

Updated slag cars 009


"Mr. DeMille, I'm ready for my close-up".  Great paint job by Tommy Gilbert.

Updated slag cars 001


The Weirton Steel Blooming Mill

Blooming_Mill_04_


George

Attachments

Images (7)
  • DSCN0028
  • Ingot Cars 2
  • SAM_0390W
  • WSX 208 & Ingot Cars 001
  • Updated slag cars 009
  • Updated slag cars 001
  • Blooming_Mill_04_

Updated 9/3/2014:

i got this poster awhile ago, maybe 2-3 years back at a train show. I can't even remember where - might have been the O Scale show at Strasburg. Last night I was looking through my e-mail and realized I had a 40% discount coupon for AC Moore and that they had a bunch of frames on sale. Now usually, the stuff I have for framing is an odd size and requires some custom (read expensive) frame. I measured the poster and went to the store today. Here's the result - instant education for train runners!


PRR_Rules_01_


George

Attachments

Images (1)
  • PRR_Rules_01_

I guess this post could be called "Bad kitty visits the PRR Panhandle". 


Her Orangeness, Pumpkin, decided to assert her authority over her domain in a visit this morning.  Fortunately, the camera was nearby.


Pumpkin_Visits_01_


Here she inspects one of my scratch-built ingot cars.  She's inscrutable, so I have no idea what she thinks of it.


Pumpkin_Visits_03_


If you ever doubted it, the old saying is true:


Dogs have owners; cats have staff.


George


Attachments

Images (2)
  • Pumpkin_Visits_01_
  • Pumpkin_Visits_03_

Updated 9/13/2014:


I have spent the past 3 days working out the dimensions of the model bridge piers.  Because of space limitations, the dimensions are not and can not be 1:48 scale with the prototype.  They will actually be somewhere in the 75% of O scale, but will retain  accurate proportions to themselves and to the bridge model.  Below are three photos centered on the piers followed by a dimensional drawing of the model.


First, a distance shot from the Ohio side of the river.  Interestingly enough, there are no debris deflectors on the bridge.  Upstream is to the left; downstream to the right.
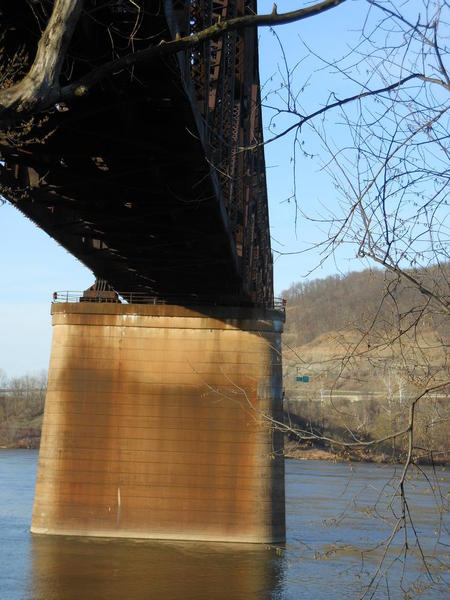
 

DSCN0158


Here you can see the "rings" on the pier.  Each is 3' high and made of poured concrete.  There is also a good view of the left bridge foot (really massive).
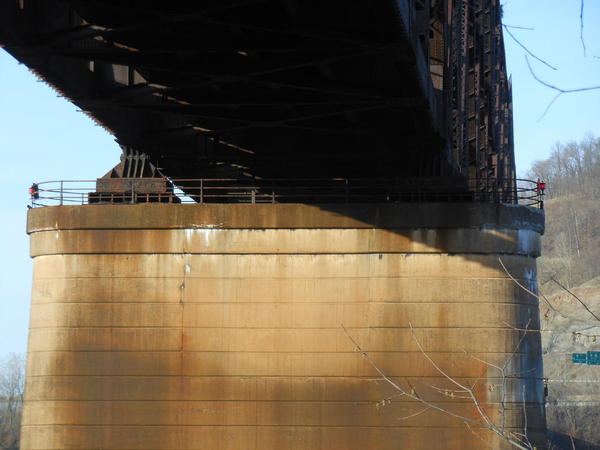
DSCN0157


Finally through the dappled sunlight, we can see the railings, the bridge feet, handrails, and the red navigational warning beacon at the top of each pier.  The Ohio River sees a substantial amount of towboat / barge traffic.


DSCN0155


This is my selectively compressed drawing of the bridge pier. 


Bridge Piers v004


The thinking is to make a longitudinal slice (split halfway down its height) of pier out of pink foam.  The foam will be sealed with joint compound and sanded.  Lines for the rings will be scribed into it.  The "positive" will be used to make a mold.  Halves will be cast using the mold with channels for the beacon light wires cut in the halves.  The halves will be glued together, sealed, sanded, and then painted.  At least that's Plan A for now.


We'll see how it goes.


George

Attachments

Images (4)
  • DSCN0155
  • DSCN0157
  • DSCN0158
  • Bridge Piers v004
Last edited by G3750

Updated 10/11/2014:


It's true.  One thing leads to another.  A few months ago, I began thinking about what needed to happen before my Panhandle bridge gets installed.  I have finally come to grips with the fact that if there is ever to be a backdrop behind the bridge, it's got to happen now.  The original track plan has a hidden passing siding (shown below) behind the bridge.  The passing siding is hidden by the backdrop (indicated by the dark line near the "4").


v226 PRR Panhandle Track Plan - Annotated3


The area covered by the backdrop or screen is shown below.  Add 1' to the yardstick for the correct height.  The backdrop will hide both the yard lead (at the bottom) and the hidden siding (at the top).  At track level, it will extend from one side of the "hole" to the other - a distance of 7'.  Above the track on the left side (and behind the PRR signal bridge), it will further extend 1'.


DSCN0458


The backdrop will portray the landscape behind the railroad bridge.  The postcard below has the proper point of view (it looks north), but does not have the correct angle or distance to the bridge (it will be much closer).  Also, the Ft. Steuben bridge will not be depicted.  However, the general lay of the land, the river banks, mountains, and trees will be shown.


panhand


Lacking the skills to do something like this myself, I have enlisted the help of a friend who is an artist.  We had a discussion today and came up with a plan for treating the back wall of the layout.


More when I know it.


George

Attachments

Images (3)
  • v226 PRR Panhandle Track Plan - Annotated3
  • DSCN0458
  • panhand

Updated 10/18/2014:


I have to say that this Fall's York train meet was my best ever!  I finally took delivery of the 7' long, double track PRR Panhandle bridge.  East Coast Enterprises built it for me and it is a beauty (photos to come later)! 


My work on the foam "positive" of the bridge pier has not gone well.  I am unhappy with how it looks and have decided to pursue creation of a 3D model using SketchUp.  If that turns out OK, I will either have the piers 3D printed or use one model to cast two piers.


Prior to York, I managed to pickup some 4' x 8' sheets of 1/8" thick masonite.  I am going to start work on framing the backdrop.  As soon as it is done, I will apply Gesso and then call my artist friend to start painting.


George

Updated 10/31/2014:


With a memorable October now in the rear view mirror, I have turned my attention to the issues affecting the installation of the bridge.

  1. Backdrop:  As mentioned previously, I acquired 3 sheets of masonite measuring 1/8" thick by 4' wide by 8' long.  Each of these has received 2 coats of Kilz.  They are currently sitting in the garage awaiting a coat of Gesso.  That may happen very soon.  Then they will be sent to the artist.
  2. Bridge Piers:  This is turning out to be a real thorn in my side.  I have been experiencing problems making SketchUp portray the pier components properly.  While consulting with several SketchUp experts, I am also looking into alternative ways of constructing a "positive" in order to make a mold.  It's been two steps forward followed by 1 step back.

I am expecting to complete Item 1 shortly and have a solution for Item 2 from a vendor.  If that happens, I will look at fixing a long neglected electrical switch control problem and then chase bridge pier / river bottom installation issues.


And then we will be ready to install the bridge and run trains across it!  


George


Last edited by G3750

Updated 11/4/2014:

Just for your information, I thought I would relay some of the options I have pursued for the bridge piers:

  1. Have made my own SketchUp 2014 drawing. I am stuck trying to get the major portion of the pier drawing to taper correctly. No progress. I have contacted an expert (book author) for assistance in correcting the diagram. He is looking at it and will get back to me.
  2. I have attempted to hire a SketchUp designer to fix the diagram and to have the bridge piers 3D printed. This is extraordinarily cost prohibitive. "Shocked" is the best way to express the cost!    Maybe "horrified" or "obscene" will work as well. 
  3. I approached two specialty lumberyards about CNC milling of the bridge piers. Neither was interested.
  4. I have a tentative agreement with a local machine shop to make the piers out of wood. The price is pretty reasonable as well. I am cautiously optimistic that this will turn out well, but the jury is still out.

I had a sneaking suspicion that the bridge piers might be as troublesome to procure as the bridge. That suspicion seems to be coming true.  I still have an option or two up my sleeve if none of the above work out.

More when I know it.

George

Updated 11/6/2014:


I'm pleased to report that some progress is taking place on the backdrop front.  The photo shows the test fitting of the backdrop that will go directly behind the bridge.  There is still some cutting and fitting that has to take place.


Backdrop_02_

The areas where the bridge will be mounted (each end) had some extra supports left over from the old metal bridge.  I removed those.  These two spots will need some reinforcement and clean-up in order to be ready for the new bridge.


Backdrop_03_


I also got some good news on the bridge piers.  The person with the machine shop is going to start work soon.  Hopefully we will see these before too long.


More when I know it.


George

Attachments

Images (2)
  • Backdrop_02_
  • Backdrop_03_

Updated 11/15/2014:


There is a bit of progress to report:


  • Yesterday I attended the O Scale Train Meet in Strasburg, PA.  While this is primarily a 2-rail scale meet, you tend to see a lot of detail parts and kits that are absent from 3-rail meets.  I picked up some detail parts for building interiors.
  • On the way home back from the meet, I stopped at Cool Trains in Salunga, PA (really a terrific store with helpful and knowledgeable staff) and picked up my Plastruct order.  I received some parts for the bridge piers.
  • Also got some good news from the maker of the bridge piers.  The prototype is complete.  I'll be taking a look (in person) today.  Meanwhile, here's a photo.


IMG_0925


More when I know it.


George

Attachments

Images (1)
  • IMG_0925

Updated 11/23/2014:


I roughed out a floor for the top of the bridge pier out of .125 Plastruct.  I decided to play with the red, blinking LED and did a test installation.  Below are a few stills.  I might raise the floor a bit, it looks low.  Likewise, I think the bridge pedestals are going to get some minor elevation as well. I want them to look right.  Alternatively, I may be searching for some G scale bridge feet.


Lit_Bridge_Piers_06_

Lit_Bridge_Piers_07_


Ok, and here's some footage of the blinking LED.


Lots of adjustments still to be made.


George

Attachments

Images (2)
  • Lit_Bridge_Piers_06_
  • Lit_Bridge_Piers_07_
Videos (1)
DSCN0531
Originally Posted by G3750:
Originally Posted by Putnam Division:

That is one handsome bridge!


Peter

It certainly is.  At last Fall's York I had a serious discussion with the guys at East Coast Enterprises and they were very intrigued by the prototype.  I happen to think the prototype is one of the most beautiful railroad bridges in America.


IMG24


I think they captured the essence of the prototype in their model.  The real bridge, including approaches, is over 1,900 feet long.  Obviously you cannot reproduce the prototype as a scale model in 1:48.  That would be a bridge nearly 40' long, but the proportions are correct.


George

it is a handsome bridge, I see it everyday going to work at Half Moon.

Add Reply

Post

OGR Publishing, Inc., 1310 Eastside Centre Ct, Suite 6, Mountain Home, AR 72653
800-980-OGRR (6477)
www.ogaugerr.com

×
×
×
×
Link copied to your clipboard.
×
×