
Replies sorted oldest to newest

I cant reference what you've listed, and I'm not familiar with your skills, so....

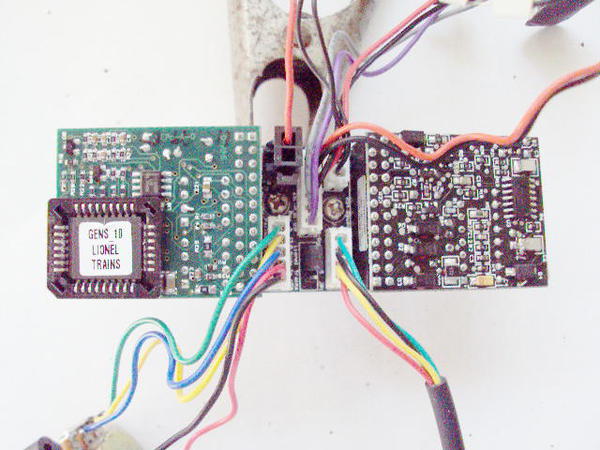
Are the boards for a steamer originally? Is a smoke unit involved somewhere??

 Here are diagrams that might help here(page .22-?) http://www.electricrr.com/Manuals/RSCmdr-Inst.pdf

 If nobody responds with exact diagrams/etc, then photos or drawings may help deliver answers more quickly.

I'll look at it all from the "basics" till then.

 The switch? A slide(direction on/off or program(optional)

 The dual black light lead could be a dual color/focus/bright, or a continuation of ground to something else(I.e. extra), or separate leads to the fwd & rev portions of the plug/board.(single light on a directional output) Test this last, and match to direction at that time. Is it a bulb or LED?

 Will the tender get a light for reverse? Is the headlight to stay on either direction?

    The tether just needs to deliver power to the motor. 3 wires for AC motors. 2 wires for DC motors, [leaving two wires with and/or possibilities. lights? smoke? center rail going back? ground tie) Lighting power can be grabbed off the motor or rail directly. One wire on the tether is likely for front center rail engine rollers to deliver power to the tender.  


Wouldn't that be the tender's end of a tether? (then that is a reverse bulb?.)

Are they a standard?

Because power in and chuff are really the only two options for either tether, or red/blk/blk.


  Separate black connections? You'd have to look at the blk/common traces. Separate  traces are inconclusive.

 But connecting traces, or a Y branch at the plug should answer this too (as R/Blk/Blk being there just for power in).   


What you have is a RS 4.0 type tender set up.  Mother board, Power Supply and RS board. 

If you look at the middle board closely (mother board) you will find a part number like 691-PCB1-02A.  Tell me what that is and I can get you a diagram of the wiring for the connectors.


But you might actually see silk screen print that tells you what they are. 


The 2 black are probably coupler wires.  The red, if it goes to a 2 pin large Molex type plug is AC Center rail input. 


Typically going into the tether from the engine is Reverse light control (yellow), Tender coupler control (Red), Serial Data (Green) and AC Outer rail power (Black).  Put you need to verify colors.


Since this is going in PW you will run it conventionally you don't really need the tether.  You just need good AC power input from the tender frame pickup into the mother board.  You can add a hall effect sensor to the tender wheels to get chuff.


No tether just modifications to you tender.  If your putting TMCC into the Engine, then you would want the tether. 


Let me know the part number.  G

Last edited by GGG

Bill's right, that's why I wanted to see better pictures.  You have a later RailSounds setup, looks like RailSounds 4 to me, but a closeup of the lettering on the audio board would confirm that.


If you look closely at the board, you'll see that the connections are actually silk-screened next to the connectors.  You won't need the two connectors on the right in in the picture below, only the three on the left.  The black connector with one wire has the wire in the 3rd rail position, the other pin is the ground pin.


The 5-pin connector closest to the audio board connector is as follows from inside to the edge of the board.


Volume Pot End

Volume Pot Wiper

Volume Pot End

Speaker #1

Speaker #2


The Six pin connector in the next row is as follows from the edge of the board toward the middle.


Rear Light

Ground

Battery +

Ground

Rail/Signal sounds

Analog Ground


You'll really only need the middle two for the battery for conventional operation.


Finally, you'll have to have a chuff switch wired to pin 17 of the audio board switched to ground to generate the chuffs.  Typically, that's done with a reed switch glued to the truck and a small magnet glued to the wheel to chuff once each tender wheel rev.


If you want just the whistle and bell, you'll have to jumper the Rail/Signal sounds to Analog Ground on the one connector.  That will silence the "running" sounds since you'll have no chuff.  For just the whistle/bell, you're right, very simple.  You do need the volume pot or at least jumper the wiper to the max volume pin.  Try each end of the pot to the wiper, one will turn the sounds off, the other will set them at max.

Originally Posted by JOHN G:

The black connector in the above pics shows a red wire--just to be sure is this center

rail ? ---   is the open hole the gnd if it is I have no way to access it without

a new connector with both wires-----is  there another way to pick up the gnd.

for outside rail

JOHN G


Solder a ground wire to the to pin on  underside of the motherboard thats next to the  red wire in the black connector. You can get them from Lionel.


309726101106303F7804764 [1)


Also I have have them with longer leads. P.N. 1-AL1002-2M


235174180


Bill

Attachments

Images (2)
  • 309726101106303F7804764 (1)
  • 235174180
Last edited by Boxcar Bill

Add Reply

Post

OGR Publishing, Inc., 1310 Eastside Centre Ct, Suite 6, Mountain Home, AR 72653
800-980-OGRR (6477)
www.ogaugerr.com

×
×
×
×
Link copied to your clipboard.
×
×