Decided to go with the carriage bolts and T- nuts.

I started bench work this week.  I am re-using lumber from my last layout as much as possible.  2x6 frame. 2x3 legs.  Nearly got the right wing done. I need some internal cross braces.  I think I'll be using 1x4 for that.

Office Table

Once that is done, I'm going to move the workbench away from the wall more and find a piece of plywood for the top of it.

Then, I'll work on the left wing.  That one needs less math since it will just be a trapezoid where the three walls and the workbench are the sides with a diagonal to close it up. 

Then comes laying track! 

Attachments

Images (1)
  • Office Table
Moonman posted:

I was wondering if you dove in when you returned home. The levelers are easy to use, yes?

They will be.  I haven't actually adjusted them yet since I don't know how thick the ply on top of the workbench will be. Installing the T-Nuts was much easier than I feared.  I had a brad-point drill that was the perfect size and it cut down into the pine VERY easy.

Got the framework done.  Plywood cut and down. Working on the homasote.  Have tried to minimize cuts.  All of the plywood and framework is mostly reused from my last layout.  Only the 2x3s are new.  I love the 2x3s!  Very affordable and work just as well as 2x4s.  Used them for legs and some cross braces.  Was able to come up with a track plan that eliminated the need to cut track (still don't own a dremel). 

Next I will work to level the outer wings with the workbench and get all the homasote down.  Then I'll start on cork.  Might hook up some wires just to run a train.  Who knows...

1

2

3

Attachments

Images (3)
  • 1
  • 2
  • 3

Looking good John!  My laptop power supply pooped out in July so I cant access Scarm, but was wondering how long that is? I forgot. Purely plagiaristic intententions in mind of course.

Also cant zoom without seeing more blue banner than photo on Android; what loco is that on the layout? I like the black/red/black and the locos era too.

That's pretty cool having all run over the desk.

It looks like the center track straight is a tad long on the angle coming off the center to the right facing the wall at the desk. It's pushing towards the outside line. It's looks centered at the end and the curve near the back.

I mixed curve diameters to keep it centered there and adjusted the straights to suit.

Attachments

Images (1)
  • John_D
Moonman posted:

That's pretty cool having all run over the desk.

It looks like the center track straight is a tad long on the angle coming off the center to the right facing the wall at the desk. It's pushing towards the outside line. It's looks centered at the end and the curve near the back.

I mixed curve diameters to keep it centered there and adjusted the straights to suit.

None of the track is in its final resting spot.  I did the right wing first complete with nearly all its Homasote.  Then built the left wing.  While I was attaching track, it was moving all over.  Once I finish the Homasote, I will measure and secure the track where it should be based on the plan.  

Adriatic posted:

Looking good John!  My laptop power supply pooped out in July so I cant access Scarm, but was wondering how long that is? I forgot. Purely plagiaristic intententions in mind of course.

Also cant zoom without seeing more blue banner than photo on Android; what loco is that on the layout? I like the black/red/black and the locos era too.

Adriatic,

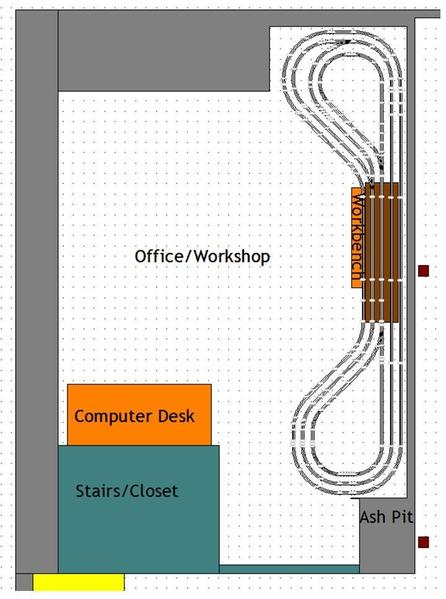
Overall length is 19 feet long.  The right wing (to the right of the desk) comes out 57" and the left wing 66.5.

That locomotive is a battery-operated toy that I inherited from a distant relative of my Fiance.  I was helping clean her house after she passed and we found it and they said I could have it.  We have not tried to run it.  It had been sitting on my workbench, but I put it on the track on the right wing when I needed to lay track on the desk.  It is probably closer to G than O.  It is a W&ARR 2-6-2 # 55.  Here are a few more pictures of it of it for you. I like this style of locomotive, too!

4

5

Attachments

Images (2)
  • 4
  • 5
John D. posted:
Moonman posted:

That's pretty cool having all run over the desk.

It looks like the center track straight is a tad long on the angle coming off the center to the right facing the wall at the desk. It's pushing towards the outside line. It's looks centered at the end and the curve near the back.

I mixed curve diameters to keep it centered there and adjusted the straights to suit.

None of the track is in its final resting spot.  I did the right wing first complete with nearly all its Homasote.  Then built the left wing.  While I was attaching track, it was moving all over.  Once I finish the Homasote, I will measure and secure the track where it should be based on the plan.  

John,

The left wing with the switches "sets" the spacing. That makes the right side adjustable by track length and radius mostly, with a little slide around. Everything looks like it fits except for that section with no homosote in the photo. Not a biggie since your still fitting.

Nice work! It's not as easy as most would think. Heck, I would be connecting some jumpers and running a train already.

Moonman posted:

John,

Nice work! It's not as easy as most would think. Heck, I would be connecting some jumpers and running a train already.

If we didn't have company coming over to BBQ and Swim in the next few hours, I'd have something running by now.  Instead, I'm doing dishes and cleaning house.  MUCH less fun.

Thanks John, I thought it was Og, that is G if Im not mistaken, I have a blue and silver UP version. Mine works by manual switches off/on at the bell by twisting lighly, then go is on the dome, or by radio remlte control, and there might  also be a switch on the underside controlled by special track sections. That version looks way better than the UP IMO. The fact its Western Antlantic a bonus! Mines also been outside in the garden for three years, Michigan winters and all, still runs....after I dump the water out of the tenders battery compartment anyhow. The other amasing thing is the same batteries have been in it the whole time!  Radio Shack C size, in it when I bought the whole set for $15 at a garage sale still run it for half hour stretches!

Im thinking into the future Ill move my 4.5x9 to the bazement as a module to add onto the old 18x30 yet to be redone, then a slightly smaller, shorter, bent version of what youve done for a desk & a clearer area. I cant reach up well anymore so tunneling trough the walls at the ceiling is out, but a layout in every room that doest make sizzling or flushing sounds, inevitable, lol.

Enjoy yourself, guests are fun too

With family coming in less than a week for the big wedding day, we cleaned up a bit.  

The right wing had to be removed so the chimney sweep could clean out the ash pit and inspect the chimney about a month ago.  Fortunately, there are track joints close enough to the joint between the bench and the desk.  In the future, I will just make some cuts.  I need to trim the homasote or something to make the wing slide in and out easier. Hopefully this is only 2-3 more times before I start the larger permanent layout in the garage.  I'll replace the right wing with a 2-3 track main that goes through the wall.  There would then only be a shelf and the chimney sweep said he could work under that no problem. 

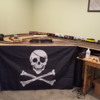
The fiance stapled some cheap black fabric for a skirt and we hung two flags.  The inner two loops still only have one power drop from CW-80s.  I'm hoping to get the big brick and the Legacy connected to the outer loop so I can run my new SD60E's (Veterans and First Responders) in time.

It is still not 100% level, but it is really close and the trains seem to run well.  Cleaned the track with alcohol and an old t-shirt.20161126_125418[1]

20161127_043403[1]

20161127_043406[1]

Attachments

Images (3)
  • Overview: cheap black fabric stapled to the framework makes for a simple skirt...and hides a LOT
  • Left Wing
  • Right Wing

John,

Congratulations on the wedding!

Good job on improvising for the maintenance access.

It's a good thing that only one power drop is needed. Speaks to the track work.Keep it that way until a train complains.

I would operate the layout from this point of view with the Legacy:

Finished_Office_Layout

I don't like the swivel head thing.

I wish you and the new bride to be all of the best!

Attachments

Images (1)
  • Finished_Office_Layout

Just realized I never shared my "Shipping Test" story over here.   If you missed it, here it is:

Shipping Test

Last weekend, I bought some more Nest Cams.  I love them because they are so easy to set up and share on your own personal website.  I won't leave them on all the time, but I have them posted here:

Uncle John's Trains

I'm going to set up some time with the nieces and nephews to run the trains for them over the web.

Mark Boyce posted:

John,

The layout is looking good from what I see on the nest cams.  Neat idea, but you never know who of us will be watching and when!  

I will be looking forward to seeing the nieces and nephews running trains on Uncle John's trains!!

That's one thing I love about the Nest cams, Mark.  I can open my app anywhere in the world and turn the cameras off. Plus, the camera has an indicator light so I know when someone is watching.  We have two in the dogs room right now and I've already caught my wife spying on me from work while I fed the dog at lunch.  :-)

The nieces and nephews live in St. Louis, San Diego, and Milan.  That's one of the main reasons I wanted the cameras on the layout.  They can watch when they can't come visit.  Someday (and one of these three loops will be my experiment) I hope to be able to rig something where they can actually start and stop the trains and blow the whistle via the web, too!

Add Reply

Post
The Track Planning and Layout Design Forum is sponsored by

AN OGR FORUM CHARTER SPONSOR

OGR Publishing, Inc., 1310 Eastside Centre Ct, Suite 6, Mountain Home, AR 72653
800-980-OGRR (6477)
www.ogaugerr.com

×
×
×
×
Link copied to your clipboard.
×
×