


Today as I ran some trains. I decided to try to make better the last sections of rock I washed with a different yellow ochre. At the Greenburg show I found a bottle of Woodland scenic yellow ochre. While the trains were running on the lower level I applied the wash to the areas on the top level and although it didn't totally changed the color it did to a point where I don't have the harsh gold color that was from the other pigment. To toned it down a bit more I applied the other two colors I work with and now I have something I can live with. I may try to do a black wash again but I am going to sleep on that for tonight...............Paul
Many years ago I used to fantasize on using REAL WATER on an indoor model railroad. I believe the subject has been addressed over the years in Model Railroader magazine.
The idea of the "babbling brook" meandering around your layout WOULD be cool.
Miniature boats might operate on your stream or lake. A supply of "Minnows" could simulate Salmon. A working Dam might generate six volts of AC for the effect, et al. The ideas would be endless. However, reality comes into play and nixes those great ideas.
1. The water would have to be cleaned daily and kept circulating.
2. The stream bed or pond would have to be water-tight.
3. Stagnant or smelly water would have to be addressed.
4. The possibility of various BUGS would need to be watched out for.
5. Most important thing to remember:
The SPEED of the water cannot be scaled down !! It flows when it wants to and how it gets there.
Cheers.
KRK
Originally Posted by brwebster:
Originally Posted by brwebster:
Originally Posted by Moonson:
Originally Posted by Matt Makens:
Worked on scenery for the river scene and power plant, then tied the town together....


That bridge complex is an especially attractive feature and balances so nicely with the cityscape in the background, kind of adding muscle to the whole impression. Cool job!. And when you craft the water below the bridges into place , Wwooooooweeee, that's going to be a very rich setting - something stopping visitors in their tracks, I'll bet.
FrankM.
The 300 placement on piers, along with the accompanying lead in bridges is pure artistry. Can't wait to see the completed visual once the river receives water.
Just noticed that another bridge will be placed in front. Keep 'er low so as not to block the view. ![]()
Bruce
It is becoming a fine scene, Matt! Don't be hard on yourself. As Bruce mentioned, I noticed those piers (blocks of wood) in front. My only thought was, you would have to get the Lumberjacks in to remove a few trees before putting in amother track or a road. So what is your intent there?
Frank's way with words really describes a fine scene in a great way!
Former Member
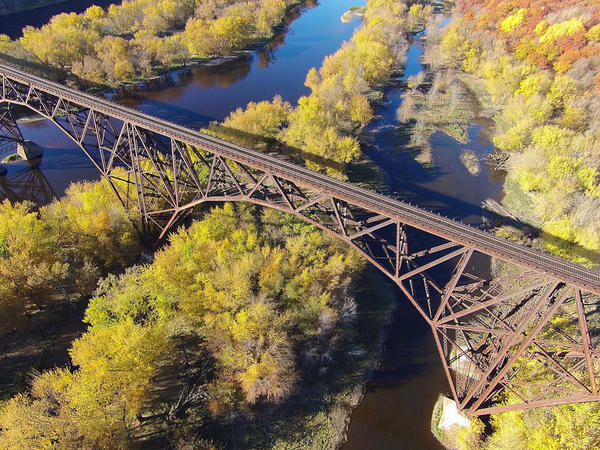
OK guys I am waiting for Stainless Unlimited to get his shop up nad running, he is going to build me a stainless steel model of the Soo Line High Bridge accross the St. Croix River in Arcola MN. There is an amazing photo of this bridge in the fall with a train crossing it but I cant seem to locate it. Ive got 66 more trees on order from Sterling Models to fill it out. Seems like a lot of work for a lead in track to my Lionel rotary coal dumper but this scene is going to look amazing when I get it all tied together. My river will be 1/2 deep Envirotex, there will be lots of RipRap around the bridge piers and lots of stuff in the water. There will even be a rope swing hanging from the bottom of the Soo Line Bridge because there was one there when I was younger and we spent lots of hot summer days using the rope swing under the train bridge.


Attachments
Images (5)
I received my Atlas Pratt bridge today. I ordered it Saturday from Trainworld. Remarkable. Now I need to deal with a 40" bridge.
Here are a few pictures of layout progress showing my newly paved Route 611 Patsburg Rd., the new Ford mini pumper fire truck ( 1953 F-100 ) and 1952 Seagrave pumper at the firehouse, and of course the chain gang cleaning up alongside Rt 611. A loan Pennsy caboose ( weathered by yours truly) sit on my new siding. Hopefully more pics to follow as well.


Attachments
Images (4)


Here are the rest of the photos from my post war haul.
6110 without a tender. Something else to look for

Some cars, flat with helicopter, flat with pipes, Allis Chalmers, and he insisted throwing in this exploding box car.

Next four 042 switches, 4 operation track pieces

Last a log loader.

Attachments
Images (4)


Originally Posted by Matt Makens:
OK guys I am waiting for Stainless Unlimited to get his shop up nad running, he is going to build me a stainless steel model of the Soo Line High Bridge accross the St. Croix River in Arcola MN. There is an amazing photo of this bridge in the fall with a train crossing it but I cant seem to locate it. Ive got 66 more trees on order from Sterling Models to fill it out. Seems like a lot of work for a lead in track to my Lionel rotary coal dumper but this scene is going to look amazing when I get it all tied together. My river will be 1/2 deep Envirotex, there will be lots of RipRap around the bridge piers and lots of stuff in the water. There will even be a rope swing hanging from the bottom of the Soo Line Bridge because there was one there when I was younger and we spent lots of hot summer days using the rope swing under the train bridge.
Very impressive Matt!
Originally Posted by trumptrain:
Here are a few pictures of layout progress showing my newly paved Route 611 Patsburg Rd., the new Ford mini pumper fire truck ( 1953 F-100 ) and 1952 Seagrave pumper at the firehouse, and of course the chain gang cleaning up alongside Rt 611. A loan Pennsy caboose ( weathered by yours truly) sit on my new siding. Hopefully more pics to follow as well.
Pat: These are GREAT photos of a GREAT layout! your scenery is artistic.
Originally Posted by trumptrain:
Here are a few pictures of layout progress showing my newly paved Route 611 Patsburg Rd., the new Ford mini pumper fire truck ( 1953 F-100 ) and 1952 Seagrave pumper at the firehouse, and of course the chain gang cleaning up alongside Rt 611. A loan Pennsy caboose ( weathered by yours truly) sit on my new siding. Hopefully more pics to follow as well.
Wipin' it off here, Boss! Okay, wipe it of there, Koko.
")

")

Stunning! No above the rail super structure to block the Hellgate. If they can replicate the spindly appearance of the original it should make it equally as interesting.
Bruce
Well, I finally got more benches done, down to last one, and I also got the last 2 brackets up for overhead shelf, got my metal hanger supports from the welding shop, so now I need to grade and plum the bridging across entry, one step forward and so many to go.........
![IMG_2251[1]](https://ogrforum.ogaugerr.com/fileSendAction/fcType/0/fcOid/12129987997660671/filePointer/43383978979781072/fodoid/43383978979781063/imageType/LARGE/inlineImage/true/IMG_2251%255B1%255D.JPG "IMG_2251[1]")
![IMG_2253[1]](https://ogrforum.ogaugerr.com/fileSendAction/fcType/0/fcOid/12129987997660671/filePointer/43383978979781073/fodoid/43383978979781066/imageType/LARGE/inlineImage/true/IMG_2253%255B1%255D.JPG "IMG_2253[1]")
![IMG_2254[1]](https://ogrforum.ogaugerr.com/fileSendAction/fcType/0/fcOid/12129987997660671/filePointer/43383978979781074/fodoid/43383978979781067/imageType/LARGE/inlineImage/true/IMG_2254%255B1%255D.JPG "IMG_2254[1]")
![IMG_2255[1]](https://ogrforum.ogaugerr.com/fileSendAction/fcType/0/fcOid/12129987997660671/filePointer/43383978979781075/fodoid/43383978979781068/imageType/LARGE/inlineImage/true/IMG_2255%255B1%255D.JPG "IMG_2255[1]")
Attachments
Images (4)
![IMG_2251[1]](https://ogrforum.ogaugerr.com/fileSendAction/fcType/0/fcOid/12129987997660671/filePointer/43383978979781072/fodoid/43383978979781063/imageType/LARGE/inlineImage/true/IMG_2251%5B1%5D.JPG "IMG_2251[1]")
![IMG_2253[1]](https://ogrforum.ogaugerr.com/fileSendAction/fcType/0/fcOid/12129987997660671/filePointer/43383978979781073/fodoid/43383978979781066/imageType/LARGE/inlineImage/true/IMG_2253%5B1%5D.JPG "IMG_2253[1]")
![IMG_2254[1]](https://ogrforum.ogaugerr.com/fileSendAction/fcType/0/fcOid/12129987997660671/filePointer/43383978979781074/fodoid/43383978979781067/imageType/LARGE/inlineImage/true/IMG_2254%5B1%5D.JPG "IMG_2254[1]")
![IMG_2255[1]](https://ogrforum.ogaugerr.com/fileSendAction/fcType/0/fcOid/12129987997660671/filePointer/43383978979781075/fodoid/43383978979781068/imageType/LARGE/inlineImage/true/IMG_2255%5B1%5D.JPG "IMG_2255[1]")
I find juggling time as grandpa with a newborn granddaughter and working on the layout leaves me little free time.
Originally Posted by keyrouteken:
Photo 1. Trolley Yard Latest count is sixteen trolleys.
You can never have too many trolleys!
By some odd coinkydink, I also have two SF Muni PCCs...picked one up as a parts donor on eBay, only to discover it was a ProtoSound 2 car... ![]()
Mitch
MdMikey,
No pictures on your post only "Image Not Found".
This is the first time I have ever worked on the layout in the summer. So far I've identified and fixed flawed track locations, installed more signals, installed a valance and will be working on improving the overall look of the layout by improving scenery and planting trees. It is amazing what can be accomplished one hour at a time. The best part is I can have one of the cruise control locos make it's way around the basement while I am doing this work.
Today was suppose to be 90% rain. So far not a drop has fallen. But this morning I was in the attic. I ran a couple of trains while adding some grass to the two places I redid the colors. After that I started contemplating the industrial area again. I took Dom's advice and removed the MTH station. I replaced it with the Lionel Grain Elevator. Still at a mental road block as to what I want. Maybe I should mix up the area with just a double siding and one single siding. It like doing a jig saw puzzle but the pieces don't fit. Still not defeated just a bit challenges right now. But I can run trains and think about it..................Paul
Originally Posted by MdMikey:
Well, that sure was a grand display, wasn't it Sorry about that. Everything looked fine when I posted it last night. I'm figuring it out and will fix it shortly. D*** computers.
How are you posting them? Are you using the "Add Attachments" feature next to the big +near the bottom of the form?
If you don't do that, and just try to link them or paste them, you can see them and they look fine, but when you leave the forum, nobody else can see them. When you Add Attachments, they are uploaded to the forum, and the copy is hosted by the forum and becomes a part of it.
Look at the bottom of any post with photos. You should see the thumbs of the attachments. Your post doesn't have any.
Try a test with one.
Got the second module frame built tonight after work. Taking a deck section from my previous layout attempt down to the club tomorrow to make a couple of table saw cuts to make the remaining roadbed sections. Will probably get fascia material and sound board this weekend to finish up at least one of the sections.
Not much done today on the layout. I am having new glass block windows with vents put in the basement. The old ones had no vents. I had to do this before I can start a new switching layout in the basement. I am not stopping work on the attic layout. I ran a train after I got out the remainder of my Weaver flats with trailers. The TCA one for this year and a three car set from Stockyard Express from a year or so ago. Now I am sorry I did not buy more of them. Some pics..................Paul


Attachments
Images (4)
Let me try this again. Two days ago I posted comments and photos about how happy I was to be able to flip the switch on my new O gauge layout, after working on it for over two years. Somehow I messed up and the photos didn't show up. I hope it works this time. Because I'm retired, I needed to be thrifty, so I dismantled the previous layout and used any lumber or track, etc. that I could salvage to build the new design. I wanted it to be "topless", i.e. not having flat plywood all over the top of the table. I also wanted some elevation and some bridges and a trestle. My old layout was accessible on two sides only, so I wanted to be able to have access on three sides, especially where the straightaways were. Here's how it turned out:
First, a shot of the old layout. Made for running trains, but not suited for landscaping because there was track everywhere.


Dismantling begins:


Beginning the build:

And at last:


A new, more simplified and efficient wiring system:

A new switch panel:


Using the warm white LEDs, I made some lights for the bridge:


Now comes the (just as much) fun part - doing the scenery and buildings, roads, train servicing equipment, etc. I may need to take the summer off to catch up with my jungle that's been growing outside. Hoping for a few more stifling hot days that will "force" me to head for the basement and not feel guilty about not working outdoors. I hope everyone is enjoying their own creations. What a way to relax.
Attachments
Images (15)


MdMikey; looking very nice.![]()
MdMikey, excellent results so far. I especially like the organized 'back-of-the-house' where your wiring converges and you keep your command components.
Originally Posted by Ron_S:
Well, I finally got more benches done, down to last one, and I also got the last 2 brackets up for overhead shelf, got my metal hanger supports from the welding shop, so now I need to grade and plum the bridging across entry, one step forward and so many to go.........
Have a plan for the bridge, Ron? It'll require something quite substantial I suspect. I had the same obstacle to overcome on my plate rail layout.
Bruce
Major milestone tonight. Just finished cutting / installing the last piece of plywood. Next stop--homasote!!
Attachments
Images (1)

Elliott:
Thanks for your help on posting the photos. I have done this over and over again without any problems, but for some reason I did something wrong and couldn't figure out what I did. Your guidance helped a lot. Thanks.
Mike
Finally finished work on my sanding towers/platform. My first effort at scratch building. Did not come out perfect but I am learning.
Attachments
Images (3)


Originally Posted by MdMikey:
Elliott:
Thanks for your help on posting the photos. I have done this over and over again without any problems, but for some reason I did something wrong and couldn't figure out what I did. Your guidance helped a lot. Thanks.
Mike
You're welcome Mike. I enjoyed finally seeing them. This feature is one of the great things about this forum. If I remember correctly, the Kalmbach forums require that photos have to be hosted on the internet and linked to post them.
As reorganization opens up more and more floor space I took the opportunity to break in the new room. Take time to smell the ozone.


Bruce
Originally Posted by Spence:
MdMikey; looking very nice.![]()
+1
Originally Posted by Len B:
MdMikey, excellent results so far. I especially like the organized 'back-of-the-house' where your wiring converges and you keep your command components.
+1
Finished off a large section of the new upper tier...including the placement of the swing bridge (which was the root of the entire redesign). Very happy with the results, the bridge seems much more natural and takes up much less room on the upper deck. Not sure why I didn't have the idea in the first place, it's four inches high to begin with so it only took a couple of more inches in wood blocks to raise it up to the height of the second tier.
Next it's on to the rest of the upper tier which includes replacement of the last of the old sections. While that's off the layout it'll be a good chance to double check the stability and connections on the track on the lower deck. I had to shuffle a lot of structures and such out of the way so things are bit cluttered right now. I'll post photos once I get everything re-organized.


Bruce, I do, a local fab company which specializes in bridges and supports, made me 3 brackets to tie into attic truss joyce, and will suspend down to support a set of 3 Arch bridges with 3 girders on either side and between so it spans the space, then I am going to use thin plywood to build a faux girder under the bridge then put Atherton scenic foam rock across to make it look like a stone support under it, not sure quite how it will turn out but it is fun working on it.
MdMikey.
I hope when I'm finished my wiring looks as organized, tabbed and functional, this is my first command layout so learning a lot. 3 TIU, 4 AIU, TMCC and aux, accessory bus and 2 ZW with 8 180 powerhouses should be enough to frazzle my brain before done. 35 switches will be fun to organize and cluster as make 8 power blocks.
I didn't do anything on my layout this week due to travel. I visited Elliot's layout (Big_Boy_4005) instead. For those of you who haven't seen it in person, the pictures here don't do it justice. It is truly mind blowing in terms of size, engineering and the amount of raw material involved. The wiring alone is even a sight to behold. There's probably enough wire to have attached a tether to the New Horizons Spacecraft with enough slack to get well beyond Pluto.
Originally Posted by Bruce Jacobsen:
Finally finished work on my sanding towers/platform. My first effort at scratch building. Did not come out perfect but I am learning.
Nothing sticks out like a sore thumb!![]() I think your being a bit to hard on yourself
I think your being a bit to hard on yourself![]()
Whats next?![]()
Originally Posted by Big_Boy_4005:
Originally Posted by MdMikey:
Elliott:
Thanks for your help on posting the photos. I have done this over and over again without any problems, but for some reason I did something wrong and couldn't figure out what I did. Your guidance helped a lot. Thanks.
Mike
You're welcome Mike. I enjoyed finally seeing them. This feature is one of the great things about this forum. If I remember correctly, the Kalmbach forums require that photos have to be hosted on the internet and linked to post them.
There are other ways to post them, but using the attachment tool every time, allows some people (at least me![]()
![]() ) to view photos more easily.
) to view photos more easily.
Len, My layout is small, but my Grandfathers wasn't. In fact my largest is about the size of his smallest (that I ever saw). I watched closely and before the average Joe used drills with screwdriver bits or cordless screwdrivers, helped till my wrists ached, and ran wires to save him a crawl. I was right there as the big ones appeared and changed. Later in life, sorting birds nest wiring for repair, was a bit of a specialty of mine. I also did some cabinetry, and woodwork in some of the most expensive houses ever built in the Great Lakes region.
I have a "It can be done" attitude.
Elliot's layout actually scares the %&* out of me just fine from here. Always has ![]() .
.
I added another light![]() ...to the siren pole ....boring, but its all looking so cool with all my passenger trains lit at night
...to the siren pole ....boring, but its all looking so cool with all my passenger trains lit at night ![]() .
.
.....Now I want just two more wheat lights....![]() ... Yep, again!
... Yep, again!
Twenty five now....16 unplanned lights, 14 of them, grain of wheat bulbs.
Not only do I think I've given up daytime running for while, but I'm thinking that for future buys...well, lets just say I think Passenger Train Collector has a real cool name![]()
Ron S,
The shelves look great! I hope to get mine finished this coming winter.
MdMikey,
That is some of the neatest layout wiring I have seen. Having worked in electronics for various utilities for 39 years, I love neat wiring!
Originally Posted by Bruce Jacobsen:
Finally finished work on my sanding towers/platform. My first effort at scratch building. Did not come out perfect but I am learning.
That is a VERY GOOD first attempt at scratch-building. Keep at it. You will only improve with experience.
Add Reply
Sign In To Reply
