Originally Posted by clem k:

I actually ran the trains. After dinner with the neighbors everyone came over to see the trains, I think i'm ready for open house next weekend. Than the other neighbors and their family came over and ran trains again, everyone liked it so I guess I'm ready. The newspaper came over last week and did a nice article. Of course you now all the forum is invited. 

Clem  

Blissfield Railroad Days' Events - Blissfield Main Street

Sounds like you are ready for the open house.  Congratulations!!  Looks great!  I have never been to your state.  Now I have a reason to go.

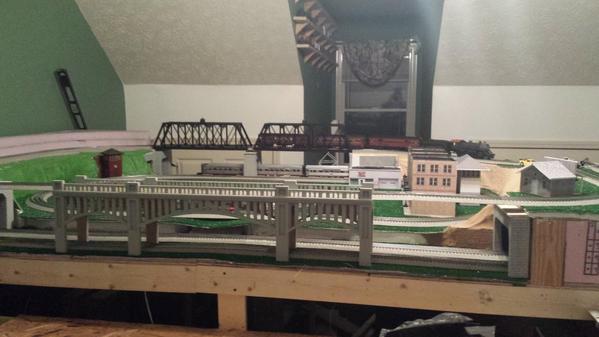
Installed two steel girder bridges across the attic stairway. They are a scale 460' from the stair treads. If there's gonna be a wreck, it's going to be a whopper!


These were painted, weathered and decal-ed by my buddy Walt in our modular club.


PICT5635

PICT5634


Originally Posted by Laidoffsick:

The round house roof is complete:

 oops, that's just the template.   

The "Roof of Many Colors"..... 


Gilly

Attachments

Images (2)
  • PICT5635
  • PICT5634
Last edited by Gilly@N&W
Originally Posted by clem k:

Hello Mark


If you google... O scale three rail Blissfield mich….You will see a video from last year


Clem

Blissfield Railroad Days' Events - Blissfield Main Street

Clem,

Wow, you have lots of space!  The layout sure looked good last year.  One question.  At various points through the video and right at the end, there is a rock cut between a through truss bridge and a tunnel portal.  what kind of rock is that representing?  I am not familiar with Michigan geology.  also, how did you make it.


Blissfield.  Sounds like the perfect town.  I actually thought it was a madeup name for your layout, until I saw the town is hosting a railroad days.  I see Doug Tasgold is in your area.  I have seen his modeling, probably in Model Railroader.


Thank you!

Mark

My scenery does not represent anything in particular. All the terrain is foam blue board and carved with a Hot Wire carving set or a 4" shop grinder. the flatter areas have fusion fiber on them and a few small parts of the mountains has a plaster type texture stuff that Hot Wire Foam factory sells. Yes Doug is part of the festivities also, deffently a master modeler. I have another video you might like in titled... O gauge train 100 feet long...

Thank you

Clem


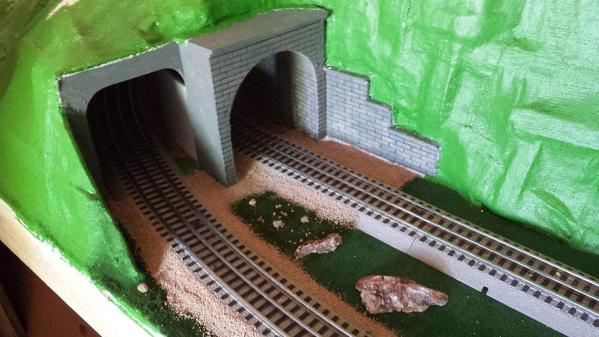
UPS showed up less than an Hr ago. here's what it brought. both Bridges tonight I get to get them leveled and setup correctly. Last night I spent the night organizing the train room putting the shelves back up and My wife for Easter got me a crafts box with paints and brushes so I packed it out with grass and such so all the scenery stuff was in one spot . hope you enjoy still waiting on one under arch bridge to show up for the gorge I built over the weekend.


20140422_163052

20140422_163107

Attachments

Images (2)
  • 20140422_163052
  • 20140422_163107
Originally Posted by Jhainer:

UPS showed up less than an Hr ago. here's what it brought. both Bridges tonight I get to get them leveled and setup correctly. Last night I spent the night organizing the train room putting the shelves back up and My wife for Easter got me a crafts box with paints and brushes so I packed it out with grass and such so all the scenery stuff was in one spot . hope you enjoy still waiting on one under arch bridge to show up for the gorge I built over the weekend.


Mighty nice bridges!  Who made them?

Originally Posted by Mark Boyce:
Originally Posted by Jhainer:

UPS showed up less than an Hr ago. here's what it brought. both Bridges tonight I get to get them leveled and setup correctly. Last night I spent the night organizing the train room putting the shelves back up and My wife for Easter got me a crafts box with paints and brushes so I packed it out with grass and such so all the scenery stuff was in one spot . hope you enjoy still waiting on one under arch bridge to show up for the gorge I built over the weekend.


Mighty nice bridges!  Who made them?

Lionel bridges


Originally Posted by Jhainer:

also thinking of adjusting the layout plan to add a yard and a turntable. Also connecting all the loops together.


This Layout is nice!  How big of a foundation does it need?  I'm nearly done with the framing and putting the 1/2" MDF down, as well as the pink foam insulation, followed by the grass mat.  If we wanted to do this layout, what size would I need and what's after the base is built for the 1st level?


loft5rev2b


Well, I had to back up a few feet today. I was "on a roll" laying track, forgot feeder wires for my block signaling (6), insulated pins (8), power feeder (4 sets), and put down Rossbed w/o painting them first. Kicking myself for having to take it all back apart again.


I'm almost done putting everything back together. Tomorrow morning, the last of the track on the unfinished side of the attic goes down and work will focus entirely in the train room!!!


Pictures tomorrow....


Gilly 

Last edited by Gilly@N&W
Originally Posted by RyDog:
Originally Posted by Jhainer:

also thinking of adjusting the layout plan to add a yard and a turntable. Also connecting all the loops together.


This Layout is nice!  How big of a foundation does it need?  I'm nearly done with the framing and putting the 1/2" MDF down, as well as the pink foam insulation, followed by the grass mat.  If we wanted to do this layout, what size would I need and what's after the base is built for the 1st level?


loft5rev2b


this layout is 12 x10 with a 56 inchX36 inch leg off the side .


Originally Posted by John Pignatelli JR.:

Sheet rocked all day, Any body know of someone that does sheet rock work in the Fredericksburg VA area?It is wipping my caboose bad!!!

John P

No John, I don't.  However, I lived in Fredericksburg in 1977-78 and again from '85 to '93.  I worked for Vepco then (Dominion now, so my pension papers tell me) It shouldn't be too many more years before I can start collecting.


I was in N scale at the time.  I remember a hobby shop that was open a few years in the strip mall beside Cloverleaf Mall.  They closed before I moved away.  Is there a shop in Fredericksburg now?  Putnum Division told me Chesterfield Hobbies closed and now there isn't one in Richmond.  I worked in Richmond for Vepco also.


I see Greenbergs comes to town every so often now.  I go to the Monroeville Greenberg shows near Pittsburgh. 

Originally Posted by John Pignatelli JR.:

Sheet rocked all day, Any body know of someone that does sheet rock work in the Fredericksburg VA area?It is wipping my caboose bad!!!

John P

Been there! All I can say, is just knock it out one sheet at a time. Take the time to make a jack out of 2x4s. Also spend the $$ and get a power screw gun. Buy the premixed mud and the adhesive backed fiberglass mesh joint tape. 


I spent the better part of a week humping sheet rock up to the attic. Certainly isn't prefect but when I go to the train room there is the satisfaction that "I did it".


Gilly

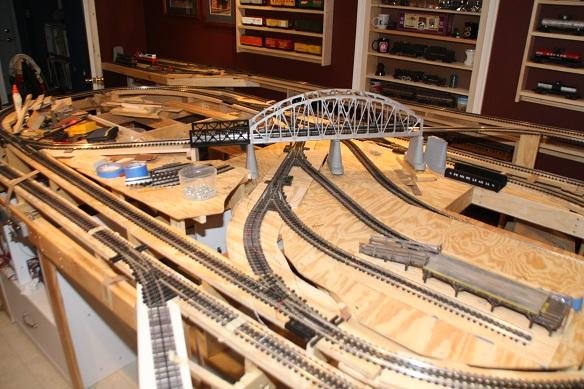
I have been busy for the past two weeks staging my track plan and making changes as I go.  Since I have lots of elevation, I keep adjusting the grades until I'm sure they're smooth, with no dips or peaks.  Has been quite a challenge.  I am making a bridge for the overhead track on the far left, and then I can begin putting down the cork, wiring the track, and attaching it to the mounting plates.


I started here by dismantling the old layout and reconfiguring the table: 

LAST MONTH


Reconfigured the table and laid out the new track plan: 

LAYOUT OVERALL


Then cut and installed the mounting plates for the track and figured out elevations:

1 NEW LAYOUT FULL

1 NEW LEFT AND BEHIND DOOR

1 NEW RIGHT SIDE


And reconfigured the sidings and the small yard behind the train room door.

1 NEW DIESEL YARD

1 NEW BEHIND DOOR


Still lots to do, but making good progress.


Mike

Attachments

Images (7)
  • LAST MONTH
  • LAYOUT OVERALL
  • 1 NEW LAYOUT FULL
  • 1 NEW LEFT AND BEHIND DOOR
  • 1 NEW RIGHT SIDE
  • 1 NEW DIESEL YARD
  • 1 NEW BEHIND DOOR
Originally Posted by MdMikey:

I have been busy for the past two weeks staging my track plan and making changes as I go.  Since I have lots of elevation, I keep adjusting the grades until I'm sure they're smooth, with no dips or peaks.  Has been quite a challenge.  I am making a bridge for the overhead track on the far left, and then I can begin putting down the cork, wiring the track, and attaching it to the mounting plates.


I started here by dismantling the old layout and reconfiguring the table: 


Reconfigured the table and laid out the new track plan: 


Then cut and installed the mounting plates for the track and figured out elevations:


And reconfigured the sidings and the small yard behind the train room door.


Still lots to do, but making good progress.


Mike

Mike, looks like it will be an interesting layout to run trains.  I like the yard behind the door and the spur leading to it.  Good use of space and gives you access to the main layout.

Originally Posted by MdMikey:

I have been busy for the past two weeks staging my track plan and making changes as I go.  Since I have lots of elevation, I keep adjusting the grades until I'm sure they're smooth, with no dips or peaks.  Has been quite a challenge.  I am making a bridge for the overhead track on the far left, and then I can begin putting down the cork, wiring the track, and attaching it to the mounting plates.


I started here by dismantling the old layout and reconfiguring the table: 


Reconfigured the table and laid out the new track plan: 


Then cut and installed the mounting plates for the track and figured out elevations:


And reconfigured the sidings and the small yard behind the train room door.


Still lots to do, but making good progress.


Mike

Your layout is progressing well. You are making GREAT use of the space that you have.

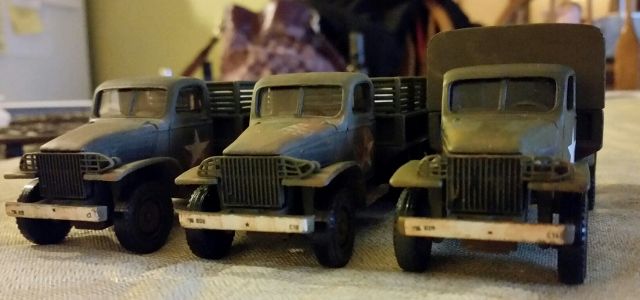
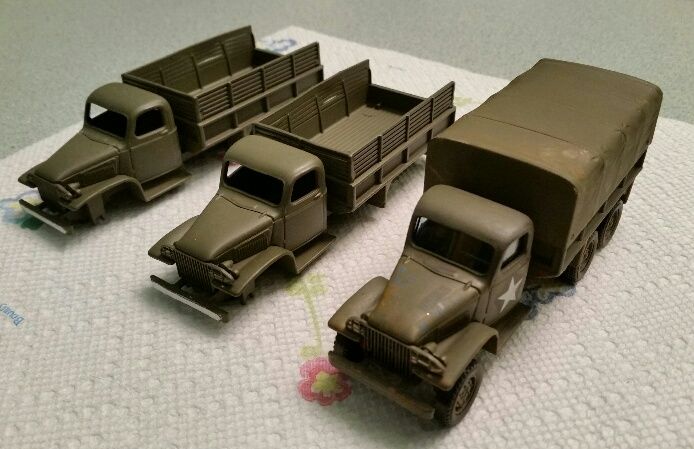
I am in the process of completing two WW2-era GCCW 2 1/2 ton trucks. The third is one I have already done the paint and decal work on, but all will have white front bumpers and black unit markings for a Army railroad operating unit (it was relatively common for white bumpers and black markings in some cases, as you could see those bumpers pretty well in blackout conditions). The truck with the tarp over the back was actually a French fire truck when I got it, it took a lot of modifications to get it looking 'GI'. All three are diecast from a company called Solido and are not easy to find today. Nobody makes a 1/48 scale plastic kit of a closed-cab cargo GCCW for some reason. These Solido trucks are 1/50, so they'll have to be slightly toward the background as otherwise they'd look odd with 1/48 scale figures alongside them (I have a 1/50 scale Sherman as well, that'll be back toward the background, too). These will probably be in a parked pose, with the noses sticking out oward the viewer/operator as the back ends aren't all that great looking.

I'm working up correct markings on my computer right now to print onto decal paper. All the trucks will have the non-surround white star on the doors and blue numbers on the hood, like all early war stateside trucks did.

I also have two Jeep kits, I need to get those built, too (one of those will be made to look like the 1:1 scale 1944 Willys MB I have in my garage).


Last edited by p51

Randy & Mark -


Thanks for the comments.  It has truly been a challenge.  If I had the room to make it another 2 or 3 feet longer, it would have eased the complexity.  I didn't want it to become a rollercoaster railroad because of the over/under elevation changes, so adjusting the angles took many days.  Can't wait to get it running, but that's a few weeks away.  I'm enjoying the challenge. 

Ok Hello every one. Well its been a long winter + I was recovering from a Valve replacement surgery. And now its time to restart the layout. Cleanup time.  1st under the layout Then the storage on the bench work. Then under the bench  it needed it pretty badly. Then I went into the garage and built an extension to the bench work. Then today I added some rope lighting to the under side of the layout wear I will be adding all my relays and controls at. And electric in the future.

Attachments

Images (11)
  • 001
  • 002
  • 006
  • 019
  • 021
  • 031
  • 035
  • 038
  • 049
  • 051
  • 052
Originally Posted by sp2207:

Ok Hello every one. Well its been a long winter + I was recovering from a Valve replacement surgery. And now its time to restart the layout. Cleanup time.  1st under the layout Then the storage on the bench work. Then under the bench  it needed it pretty badly. Then I went into the garage and built an extension to the bench work. Then today I added some rope lighting to the under side of the layout wear I will be adding all my relays and controls at. And electric in the future.

Scot, it is good you are feeling up to the task again.  I am amazed at how much light those rope lights give off.  I will have to get some of the same.  The older I get, the more light I need.

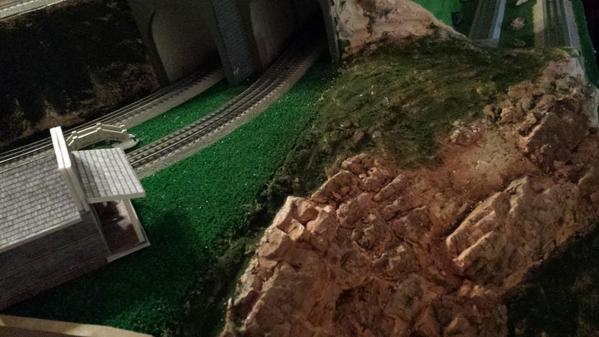
Finally getting the layout back to what it was before I had to move it getting the lights hooked up buildings in place and cleaning up the unorganized stuff laying around it's finally getting there. started to make a rock face with spray foam gonna try it and see how it comes out any suggestions on chopping it up to make it look right?


20140424_115505

20140424_115528

20140424_235320

20140424_235331

20140424_235344

20140424_235435

20140424_235442

20140425_000046

20140425_000059

20140425_000118

20140425_000131

Attachments

Images (11)
  • 20140424_115505
  • 20140424_115528
  • 20140424_235320
  • 20140424_235331
  • 20140424_235344
  • 20140424_235435
  • 20140424_235442
  • 20140425_000046
  • 20140425_000059
  • 20140425_000118
  • 20140425_000131

I can't believe that nobody has posted here in over 5 days. On the other hand, it was York week for most of you.


I took a couple days off myself, though not entirely. I didn't go downstairs, but I did spend time with pen and paper sketching the track plan for the next peninsula of the upper deck. I'm really happy with this latest version, and am glad I didn't just jump into laying track to the previous sketch. The new version is much cleaner and more to the point.


Today Matt came over. While he worked on more Tortoises, I Started to lay out the tracks, even getting the first few pieces secured. It should go fairly quickly. In the middle of the afternoon, we took a break and ran a train. But it wasn't just for fun, it was a test run!


We were able to throw enough switches, so as to run in the opposite direction from what I have been limited to for the last 9 years. We took a train all the way over to the new helix, until it reached the end of the wiring. A couple more sessions with Jon and Patrick, and the new hidden yard should be ready for action.


In the process, we did identify a few flaws that will need to be corrected, but they were minor, and shouldn't take long.

Add Reply

Post

OGR Publishing, Inc., 1310 Eastside Centre Ct, Suite 6, Mountain Home, AR 72653
800-980-OGRR (6477)
www.ogaugerr.com

×
×
×
×
Link copied to your clipboard.
×
×