I am moving my layout from a small room to a much larger room. I realized how dirty my layout is and how much money I spent on plastic. It was a little disconcerting. Also, my wiring was a tangled mess. I hope to keep the new layout much cleaner and to straighten the wiring out. It really made me think about all the money I have spent.

But, I love the hobby so up goes the new layout. I am putting a grass rug underneath. That will probably change the way I have to do many things. For example, I cannot just stand people or glue them down to a grass mat. They will have to be attached to the sidewalks on the buildings. Also, I don't know how I am going to put roads and other things across the grass mat.

I'll let you know how it goes. If you have any suggestions or tips I am all ears!


Last edited by Michael Hokkanen
Original Post

Replies sorted oldest to newest

hey Michael,

Take a small piece of the grass carpet as a test piece. Then hit the tools and find which one scrapes, cuts or melts the "grass" away.

An air cleaner sized for the new room will keep the airborne particles down.

There are plenty of good threads on wiring techniques. Think terminal blocks and various wire hangers.

Have fun building the new layout.

About ten years ago I dismantled my old layout to move it to our new home. I reused the tabletops (and added one). The main thing I learned was that that lumber must have soaked up some water as it was much heavier than it was six years before when it was first brought into the old house.


Anything you can do to reduce weight (without making it too weak) is time and money well spent. I think my next layout will be made out of 4 x 4 tables that will be bolted together, for example.


As for the grass mat, if you know where the roads are going and they aren't going to change, you could cut the grass mat so it buts up to the road. Another possibility is to use roofing starter strip. It's a roll of shingle material that's about 6" wide (it's been awhile since I roofed, forgive me if that measurement is way off) that you could place directly on top of the grass mat.


Good luck with the new layout,


J White


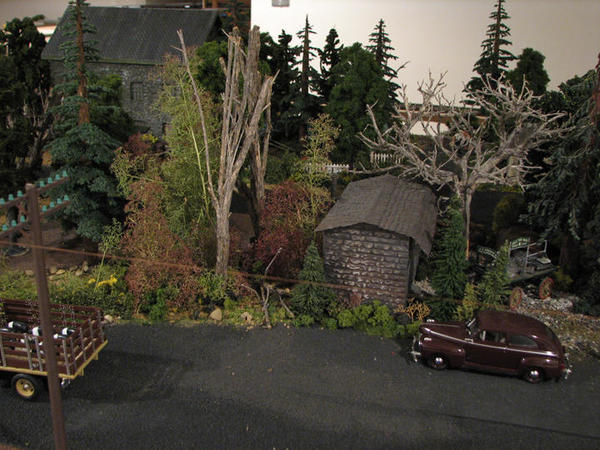
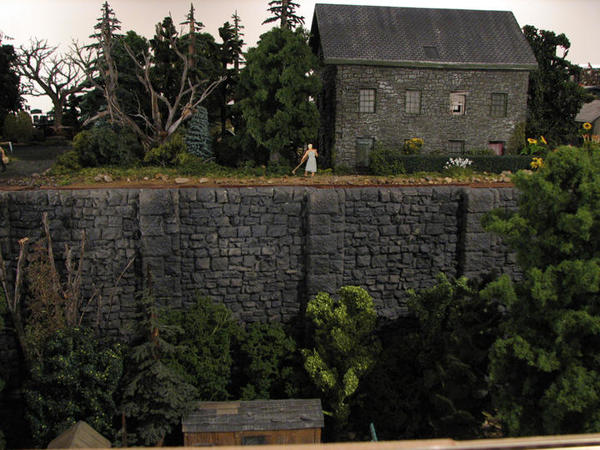
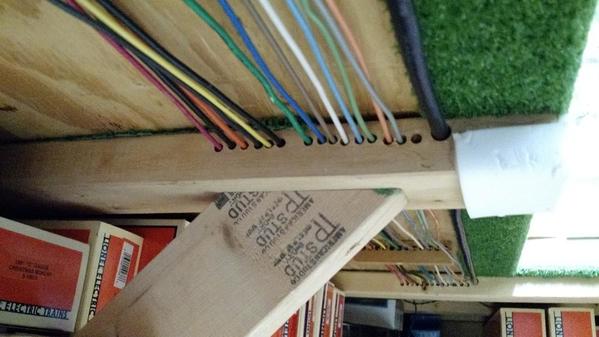
My previous layouts were made with 2x4's.  Because of back problems I needed something light weight and strong this time. I used a technique found in one of the RR books. Nothing is more than a 1x something. The tops are 1/4" plywood with the light weight fiber board glued to the top. The layout is 8' x 16' - (4) 4x8 sheet tables fastened together. I used the same construction for the second level without the legs. I could not ask for anymore stability and have had no issues with anything. I would never build with any other method again.PB260008DSC00164P1000370DSC00162_2

Attachments

Images (4)
  • PB260008
  • DSC00164
  • P1000370
  • DSC00162_2
TURTLE 2 posted:

My previous layouts were made with 2x4's.  Because of back problems I needed something light weight and strong this time. I used a technique found in one of the RR books. Nothing is more than a 1x something. The tops are 1/4" plywood with the light weight fiber board glued to the top. The layout is 8' x 16' - (4) 4x8 sheet tables fastened together. I used the same construction for the second level without the legs. I could not ask for anymore stability and have had no issues with anything. I would never build with any other method again.PB260008DSC00164P1000370DSC00162_2

Light weight framing is certainly the way to go.  A beam made from 1" x ?s is stronger than a single piece of heavier lumber.  Certainly a 1" x ? by itself is flexible and has strength only on one axis.  But if you give it a top and bottom flange, like a steel beam, it becomes much, much stronger.  I built alot of walls during my career.  I started out in housing and moved onto commercial carpentry.  Wood framed walls are heavy.  Steel studs are lightweight but flexible.  However, once drywall is fastened to them, the whole assembly becomes super stiff.

Mike G., et al ...

I also have green "patio" carpeting on existing layout platforms that I plan to reconfigure into a new L-shaped layout. I was puzzled about how to install streets on top of the grass. Your clever "beard trimmer" method earns the MUTUA (Modeler's Use of Technology in an Unintended Application) award. There are probably many other examples of this phenomenon out there; such as using a table fork to carve parallel yet irregular lines in scenery foam to suggest geological layers. Then paint the foam as "sedimentary limestone layers."

Mike 
(ritrainguy)

Michael Hokkanen posted:

I am moving my layout from a small room to a much larger room. ...I am putting a grass rug underneath. That will probably change the way I have to do many things. For example, I cannot just stand people or glue them down to a grass mat. They will have to be attached to the sidewalks on the buildings. Also, I don't know how I am going to put roads and other things across the grass mat.

... If you have any suggestions or tips I am all ears!

 If I may, my suggestion(s) would come in the form of a question: Why the grass mat?

FrankM.


Moonson, that is a good question. I guess I have been influenced by the attractiveness of the display layout at my LHS, English's Model RR Supply, in Montoursville, PA. Theirs very effectively deadens the hollow echoing sounds that come from running on Fastrack over bare wood. I realize that there other ways to do this but this seems simple, efficient, and cheap. Plus, I am using (currently) 6 tables of 3 different manufacturers rather than building on grid-work. Once I have determined the final arrangement of tables I will stretch the carpet, which is 10'x12' in size, over all of the tables and cut out where walk spaces are . This will provide, in my mind at least, a uniform surface in texture and appearance that will unite the layout as one unified space. In addition, the walls being sky blue, I think the grass mat will make an attractive contrast. Finally, the mat, or carpet itself, will give unity to the under structure and hold things together somewhat as it will be tacked or stapled around the edges, especially away from viewing visitors.

The layout at my LHS, although somewhat toy like in appearance, looks good to my eye. I will admit that viewing it inspired this notion. Having said this, and being aware of some disadvantages, I am open to comments and criticisms of the idea.

Thank you for your question.


Michael Hokkanen posted:

Moonson, that is a good question. I guess I have been influenced by the attractiveness of the display layout at my LHS, English's Model RR Supply, in Montoursville, PA. Theirs very effectively deadens the hollow echoing sounds ...

...Plus, I am using (currently) 6 tables of 3 different manufacturers rather than building on grid-work. Once I have determined the final arrangement of tables I will stretch the carpet, which is 10'x12' in size, over all of the tables and cut out where walk spaces are . This will provide, in my mind at least, a uniform surface in texture and appearance that will unite the layout as one unified space....

...and hold things together somewhat as it will be tacked or stapled around the edges, especially away from viewing visitors.

The layout at my LHS, although somewhat toy like in appearance, looks good to my eye. I will admit that viewing it inspired this notion. Having said this, and being aware of some disadvantages, I am open to comments and criticisms of the idea.

Thank you for your question.

Thank you for inviting further conversation from me.

Given your initial posting and explanation of your plans, it seemed like you were starting with something that was obstructive, putting up a kind of barrier, a problem to overcome even before you began. Gluing figures and establishing roadways, in particular, seem important to any layout plan and execution, no matter whether toy-celebrating or realistic. To me, the whole effort should give us pleasure, not an extra job to work  at. I wouldn't want anything standing in the way of enjoyable progress and creativity.

The reasons you have given, especially the " uniform surface" idea, seem practical, for now, but what if you want to affix/expand mountains, for example, someday? Won't that predict another problem and or mess to surmount?

FrankM.

Good luck on your layout whatever you make it it will be somthing special just dont be like me never happy with anything you do i would buld somthing then 2 days later start over again when i moved for baltimore to deleware i started over again thinking i wont make the same mistakes i made in the first one thats why i keep fixing my layout over and over again so all i can say is enjoy the larger space and have fun

Texas Pete posted:

To me a "permanent" layout is folly.  A layout should be engineered from the ground up so that any changes can be manageable instead of traumatic.  A lesson learned the hard way from my HO daze.  If I ever make another "scale" layout I'll use... modular scenery.

Pete

I have to make a point of agreeing with you, Pete. My Moon Township layout has been changed several times, since its inception in 1995-96, and I have gradually shifted it all over to modular, or at the very least, with everything on base-plates for easy removal and relocation. Seams are easily crafted-over for a totally blended panorama.

For example, here is a section I did on a client's layout, not too long ago, all of it composed of modules, what I call my "Insta-Ramas." I was able to craft each scene on a workbench, comfortably, over time, and then move it into place on the available wood acreage. He and I had a good old time of it rearranging and re-configuring these completed scenes until they presented, in concert, as totally a rural vista as I could give him. However, recently, he told me he picked all of this up and is re-doing the entire layout himself, having broken down basement walls to enlarge the layout's overall square footage. He was very pleased to have had the ability to move every scene I had crafted with zero loss of ingredients, zero damage, and with full ease of creativity for him.

I'm hoping that IMG_5881xIMG_5886xIMG_5912xIMG_5913xIMG_5914xIMG_5905xxIMG_5905x_edited-2sharing my agreement, here, with your statement, via these photos, may encourage others, and perhaps Michael, to consider this method as advantageous. It may add to the enjoyment of having a layout, one that is never quite done and is able to be modified comfortably as time goes on.

FrankM.

Attachments

Images (7)
  • IMG_5881x
  • IMG_5886x
  • IMG_5912x
  • IMG_5913x
  • IMG_5914x
  • IMG_5905xx
  • IMG_5905x_edited-2
Last edited by Moonson
Scrapiron Scher posted:

BTW, I tore down my layout, too. What I learned is don't tear down your layout.

I'd LOVE to hear that story, Mr. Scherbear. You ought to start a thread to tell the whole story, complete with photos. Pllleeeeeeaaaaase.... FrankM.

I bet we'd all  like to hear about all the mischief, lessons, and epiphanies. Missteps, too?

Last edited by Moonson

My layout and train collection is very small.  I'm sure I would do something else if I had the room to do it.  My layout room is a porch with pillars that I enclosed.  Its about 6'x20', so I made the layout as large as possible around the outside walls.  But the layout has one corner pillar in the left side of the photo and one other pillar just barely visible on the left edge.  The layout and track have to curve around those two which is a royal pain.  I used the grass carpet (or Astroturf as it was called back in the day) on my layout many years ago.  The carpet came in different qualities.  The more expensive carpet had a thicker mat and more dense "grass".  I preferred the cheaper carpet because the grass wasn't terribly dense and was easier to stretch. 

IMG_20150826_185918544_HDR

There are no legs.  Everything is supported off of the wall with 2x4s with one suspended section visible on the right hand side where the sliding glass door is.  The surface sections are 1/2" plywood cut to fit the irregular outside wall contour with the astroturf stretched over it and stapled on the under side.  Then each section is screwed down to the horizontal 2x4 support pieces that come out from the wall.   It has supported my weight plus what I was carrying many times over the years.  The 2x4s that support the surface have many holes drilled through them for the buss wiring to run through.  The wiring is either 12ga or 14ga solid wire stretched as tight as I could get it.

IMG_20150826_185248642

I hung shelves between the 2x4s for storage.  I took 1x4" boards and 1x8" boards and used them for shelves from the layout to the ceiling.  I cut grooves in the shelves for the train wheels to drop into and mounted them on all the walls.  I hung painters sheet plastic from the ceiling down to the layout as close to the shelves as possible to reduce the dust collection.   For electrical connections I just drill a hole through the carpet and plywood and mark it with a pipe cleaner or toothpick.  Poke the wire through and clean a piece of insulation off of a buss wire and solder it in.  I keep the connections about 3/4" or more away from each other.

IMG_20150826_185329656

I have never done much scenery.  I do have branches cut off of various size and types of fake Christmas trees that I use for trees.  I drill a hole through the plywood and poke the tree into the hole.  A slight kink in the wire of the "tree" will hold it in place.  I guess you could do the same with people, bldgs and vehicles.   I can remove everything and vacuum the layout with a tool for doing pets.  It is a about 4 inches wide, has several holes and several rubber fingers that poke down.  It gets down between the rails fairly well.

There has never been a thought of tearing it down and doing a new one, cause it would have to be the same size and shape as this one.  Since the carpet covers the plywood, I can re-arrange the track or anything without leaving any holes that are visible.  For new stuff or moving things, I always try to look underneath and find an old hole before drilling a new one.


Attachments

Images (3)
  • IMG_20150826_185918544_HDR
  • IMG_20150826_185248642
  • IMG_20150826_185329656
Gary Graves posted:
Michael Hokkanen posted:

I realized how dirty my layout is and how much money I spent on plastic. It was a little disconcerting.


Michael, can you clarify something for me? What do you mean by plastic? Fastrack? Plasticville or other buildings? And how did this have a negative impact on your layout? 

Gary Graves: Mostly buildings, the majority of which are MTH.

The grass carpet, which cost me a bit over $125, is down. Pictures to come.

My new motto is; One track or one vignette at a time until it is perfect, then the next thing!

On my largest oval, 10'x12' I am going to have at least 5 feeders to the track. After the track has been proven to run reliably, no slowing down, stalling, or stopping, only THEN will I screw in every third section.

And THIS is a BIGGIE - there will be no place on this layout that I can not reach to clean without advanced Yoga positions for 18 year old Olympians.

Once I get it up and start using my stock of buildings, houses, trees, people, roads, and etc., I will likely sell the unused items to feed one of my  other overly-expensive hobbies.

Again, thanks all for your input. Great reading....


Add Reply

Post

OGR Publishing, Inc., 1310 Eastside Centre Ct, Suite 6, Mountain Home, AR 72653
800-980-OGRR (6477)
www.ogaugerr.com

×
×
×
×
Link copied to your clipboard.
×
×