Boo Man posted:

An update...I have 12 of 20 signals installed, but am still awaiting my crimping tool from Amazon to attempt the integrated connections between boards.  

In the interim in stand alone mode, the signals are cool to watch in action.  They really add to the layout and will really add to the realism of running trains.  I have 3 passing sidings that will receive quite a bit of action while running trains in both directions.  For switching off the main, the signals will come in very handy for multiple operators.  

My layout is 16x35 and has 20 turnouts on the single mainline.  I have a bus wire that I ran all the way around the layout for continuity.  I cut it at each block.  After isolating the switches by cutting rails, I had to drop additional feeders to maintain continuity within each block.  Once you work with the signals like I have, they really aren't as intimidating as they were before I watched Eric's video.  For the umpteenth time, thanks for the video Eric.  


Glad to see you are making progress. Let's see some video when you get them fully wired.

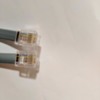
Here is the picture you asked for. A bit blurry but you can get the idea. When side by side, and the connectors oriented the same way, the color sequence should be the same.IMG_20170109_194145

Attachments

Images (1)
  • IMG_20170109_194145
Last edited by tr18
tr18 posted:
Boo Man posted:

An update...I have 12 of 20 signals installed, but am still awaiting my crimping tool from Amazon to attempt the integrated connections between boards.  

In the interim in stand alone mode, the signals are cool to watch in action.  They really add to the layout and will really add to the realism of running trains.  I have 3 passing sidings that will receive quite a bit of action while running trains in both directions.  For switching off the main, the signals will come in very handy for multiple operators.  

My layout is 16x35 and has 20 turnouts on the single mainline.  I have a bus wire that I ran all the way around the layout for continuity.  I cut it at each block.  After isolating the switches by cutting rails, I had to drop additional feeders to maintain continuity within each block.  Once you work with the signals like I have, they really aren't as intimidating as they were before I watched Eric's video.  For the umpteenth time, thanks for the video Eric.  


Glad to see you are making progress. Let's see some video when you get them fully wired.

Here is the picture you asked for. A bit blurry but you can get the idea. When side by side, and the connectors oriented the same way, the color sequence should be the same.IMG_20170109_194145

John,

Thanks for the photos.  I have further reporting.  Your help did the trick.  I installed two more of the signals today; I am up to 14.  That's not the news though.  The real news is that I got the crimper.  I cut off one modular connector off the telephone cords and reversed and crimped a new RJ11 onto it.  I have the 14 connected and they are working on an integrated basis.  WOW!  It is so cool.  I cannot see having a layout without them.  

I am having a problem with two blocks.  I have to check the phone cords...I am sure it is human error.  

I bought my signals some time ago.  I have the G-type signals which I understand are not offered any longer.  Some have RJ45 and some RJ11 connectors and receptacles for the wire to connect the signal to the board.  

Two of the signals have LED issues.  My brother is going to put new LED lights in those.  It is a very tight working space.  I hope he can replace them.  I'll finish the rest of the installation when he fixes those and I figure out what mistake I made in those two blocks.  

Once done, I'll have to try my hand at doing a video.  I've never done one on here before.  

John, thanks for your input.  It was invaluable in getting me to this point.    


Add Reply

Post

OGR Publishing, Inc., 1310 Eastside Centre Ct, Suite 6, Mountain Home, AR 72653
800-980-OGRR (6477)
www.ogaugerr.com

×
×
×
×
Link copied to your clipboard.
×
×