


Now that we've got a reliable millisecond timer class, it's time to consider extensions to this idea and other ways to process timed events in an Arduino program. In this section, we will develop another class that allows a function to be called after an event timer has elapsed.
Let's call it the EventTimer class. Here is the main body of the EventTimer.h file:

Right at the start this class makes use of an "MsTimer" to do the timing operations of this new class. This is followed by a pointer to the function to be called when the timing cycle has completed. Notice that the function prototype calls for a function with no arguments and returns a "boolean" value; either true or false.
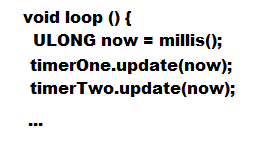
The rest of the class operations parallel what we've seen before in the MsTimer class. But there is a way to set the function as you would expect. At the bottom, there are 2 versions of the "update" function which is used to launch the function call when the timer has expired. So the loop of a program might look something like this:
Update checks if the timer is done and if it is calls the event function associated with that EventTimer. As an example of the event function, it might look like this:
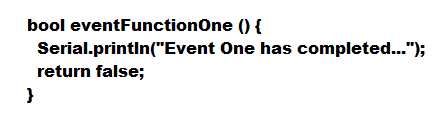
So this event function is called through "update" when the EventTimer has expired. The returned value of the event function determines if the timing cycle should be restarted or stopped. The return value false will cause the timer to stop (but it can be restarted using "start" elsewhere). The return value true will restart the timer immediately.
Because C++ has a somewhat limited ability to deal with forward references, it is usually necessary to place the event functions before they are declared in "setFunction" or by the class constructors. Like this:
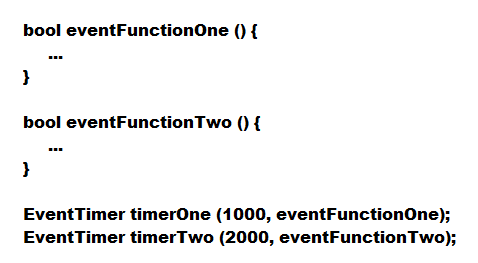
As an alternative, the function prototypes may be declared prior to the use of the function names and the actual functions can then appear anywhere in the program (sketch).

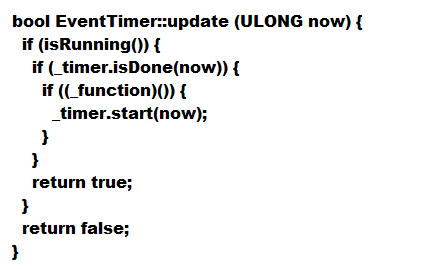
Here is the implementation code for the "update" function from the file EventTimer.cpp:
The rest of the pieces are available in the attachments. Use them freely or modify them if you like.
I hope that this lesson has given you some further insights into the Arduino programming world. I have been using these methods recently to control multiple events; and yes they have to do with model trains. I'm working on an Arduino controlled station stop with operator controls to vary the timing and stop direction. More on that later.
Good luck!
-- Leo


