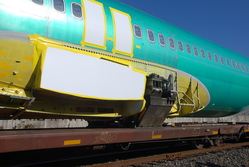
I have recently got in contact with some people at Boeing Employees Model Railroad Club. They have very kind in answering my questions and helping me make my model more accurate. With all this new information I decided to start on a Second Revision of my model.
REV_02 has more detail around the wing sections. There some under structure that is exposed on the prototype that I did my best to replicate. I had to make some sacrifices in accuracy in order to make a more stable model. The printer I use can't replicate all the real world details because of it resolution. Also the details would become so small and weak that they would become too fragile to handle. To counter act these both problems I made some of the parts a little thicker than the prototype.
The wing section had so much detail I decided not to use a normal FDM (Fused Deposition Modeling) printer. I instead used a SLA (Stereolithography Apparatus) printer in order to capture the detail. The differences between the two is too complicated to get into in this post. This link goes into more detail. Basically, the SLA uses UV resin to make the part. The resin allows for more detail. To get these details fit on my model I added locating holes to lock these parts in place. These locking features allow the fuselage to be printed with FDM while allow the parts with more detail to be printed in SLA.
This time I also model the cradles and the brush guard. This is where Boeing Employees Model Railroad Club help out the most. They gave me some good pointers on how to get the correct measurement. I can say that these part are about as close as I'm going to get the prototype. These were also printed in SLA.
After trying to assembly a few of these planes I noticed a few were slightly misaligned. I decided to key the sections together instead of using a round pin. This has help out a lot and made the planes easier to glue together.
The last part I worked on was the tail section. I add the sections that would normally connect the tail fins on to the plain. I decide not to make these removeable because I felt that the FDM printer would do an okay job at capturing those details.
Overall, I am very happy how REV_02 has turn out. I am still in the process of teething out issues with the new model so I won't release the model on thingivers right away. I will let you guys know when they are up.
Also, If anyone is interested I am thinking about trying to do a smaller 737 so that they can negotiate around smaller layouts (my layout included). I'm think 737-200 or 300. Please let me know if anyone interested.
I'm also printing these for people if anyone still wants one.
Thanks for the feedback,
David


