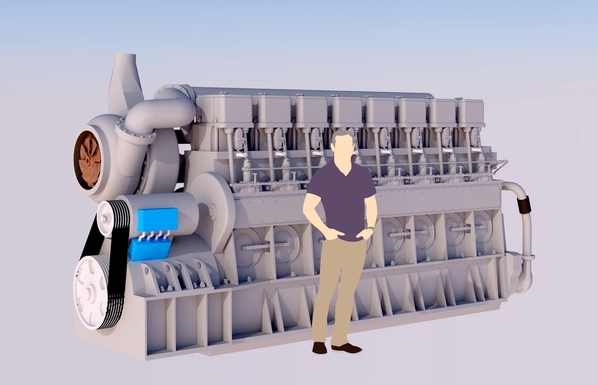
I finished the Baldwin VO Engine drawings and prepared them for printing. When I loaded some of the big parts onto the splicer, they seemed really large, almost not fitting the machine. Since the EMD parts fit easily, and most loco prime movers are similar in overall size to fit into similarly sized loco bodies, I suspected something was amiss. I then went back to the main drawing and imported a scale human figure and the engine looked about 12 feet tall. Too big! I was basing the entire drawing on an old scaling I did where the access hatches were 21" in diameter. Last night I found a good cross section of the Baldwin engine on Wikipedia and also found that the bore was 12.5". Using that dimension I scaled the cross section and then compared it to my drawing. I was about 20% too big. I reduced the entire object by that amount and the cross section and my drawing coincided. This represented the third iteration. The second iteration was when I realized that I hadn't hollowed any of the really big chunks to save resin.
This is the correctly sized engine with the generator and a human. It seems about the right size now. I added some supports behind the tiny fuel lines in an effort to hope they'll survive the printing process. I think I went overboard on the belt drive. I couldn't tell how many sheaves there were under the shroud so I just added a bunch. The shroud is all sheet metal and as such lends itself to styrene or brass construction. It's not the strength of resin printing. I left it off. There are also some open spaces on the generator that has screening on it also, which I also chose to simplify.
I got back to work on the engine house by doing the back fill using Sculptamold. I prepped the building with Stretch-n-Seal so I could plaster right up to the building without getting it on the building. In this way, the building will still be removable and yet not look so.
I lifted up the building and got the protector underneath. Sculptamold is good because it holds its shape and fills big gaps easily.
I added some Woodland Scenics earth tone tint to kill the white plaster. It's still not earth color, but less visible when chipped.
I may add a skin coat to better feather the STM into the existing terrain. I used the medium putty knife to delineate the walkways to the entry doors.
While the plaster of paris portion of the STM cures chemically and relatively quickly, the fiber portion has to dewater by drying. Depending on the mass, this drying can take days. I won't do any further work on it until it's totally dry. We have to make an emergency trip to California to attend a funeral on Friday so work on the terrain will wait until Monday.
S-38
I epoxied the props and landing gear on. One of the team members visited yesterday and declared the model complete. I'll keep it at my house until the site prep is finished so nothing bad can happen to it. I'll report on the installation when that occurs.


