Thanks guys!
I did go back to Costco today and got that flu shot. It was one VERY EXPENSIVE flu shot. Free from Medicare and a few thousand bucks since I'm paying for the other car's repair. My car just got scuffed.
Got the second coat of paint on the chandelier and tested it again. It still needs more light blocking right around where the LED is. Instead of piling on more paint, I'm going to attempt to wrap it with some Bare Metal Foil and then paint that. Being metal it will block the paint. When I pulled the mask off the bulbs it frosted them a bit and made the light scattering even better.
We're getting close with this deal. If I was to have made it actually out of brass the light leakage wouldn't have been as much of a problem, but machining it sure would be. Those LEDs are really bright. It's great that LEDs produce all this light without heat. I don't think you could imbed an incandescent bulb into the resin and expect the same results.
I finished printing all the crown molding, so I have a supply of "millwork" for this project. Today's picture batch is a bit fuzzy. My iPhone camera lens had a smudge and it shows. I may need more baseboard and I have plenty of crown molding.
I commented to my wife that building this project is resembling building an actual house. I have walls and floors and window units and "Drywall" along with moldings, wall coverings, floor coverings, doors, lighting, etc. And I have to think about its construction sequencing in the same terms.
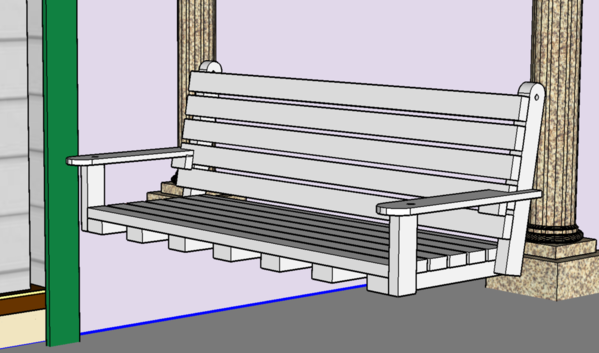
A Victorian house with a copious porch needs a porch swing. Found one on the SU 3D Warehouse, but couldn't download it since it wouldn't recognize my password and the "Reset password" string wasn't sending me the email to reset. I drew my own. It took maybe 20 minutes. I printed it this afternoon, got one cleaned of its supports. It's delicate and I will probably grind off the supports on the other ones. I made three just in case. Again, the printer doesn't care how much you pile on the build plate. It's the height that controls print time (along with layer exposure times). I didn't bother to suspend it. It's a magic, anti-gravity porch swing.
Here's the output. The armrests are the Achilles Heel. I made is scale thickness. That's kind of a no-no when working in 1:48. It's really fragile. I broke the vertical support on one side and used Bondic to put it back together. I need to get some fine chain to hang it from the balcony joists. I toyed with scratch-building it out of styrene or basswood, but this was slicker and easier.
The rest of the time was spent working on the Mansard skin and cutting the "drywall" for the interior attic walls out of Bristol Board. I was a lot of finicky fitting due to getting around all of those extra supports. Each piece had to be custom measured and cut since none of the wall spaces are the same nor are they really square.
After fitting the outside I held the Mansard window tightly against it to track that inside profile. The main reason to put this layer in is to hide the back edges of the Mansard windows.
The clamp is there to hold it in place for the picture. I'm not sure what adhesive to use to hold this in place. I have some choices. Aleen's would work and would MicroMark PSA. I can use 3M99 which is a strong spray adhesive or I can use the pressure sensitive transfer tape that has terrific holding power. I broke some more balsa during this work and had to do some more patching and filling. I traced the inner curve through the window openings with a sharp pencil.
Pretty soon I'll have to start painting all this. And all those printed parts represent a lot of painting. If the weather holds up I may use Rust-oleum rattle can paint for the white trim. UV resin is not affected by solvent paint. The attic is not getting wallpaper, just paint. The only reason I'm thinking about NOT gluing in the floors and roof is to be able put in furniture sometime in the future. I can buy 1:48 furniture from Shapeways, but it gets real expensive really quickly. If I have to print my own, we're talking a lot of weeks of time.


