I woke up thinking about support all the cardboard strips on the mountain's large surface area. I realized that in addition to the vertical profile line, I needed to establish the horizontal profile. So I thought of using horizontal sheets of cardboard supported at various places and at various levels. Before getting into it, I decided to finish up the track by painting the edges rail brown. This time, and especially since I'm painting the track at the workbench and not when its all glued down, I used some Tamiya grey primer as a first coat and then the Joe's Paint rail brown. It gave me much better coverage and very even coloration. I masked the track pins and the switch machine, but let the spray go where it will for the rest.
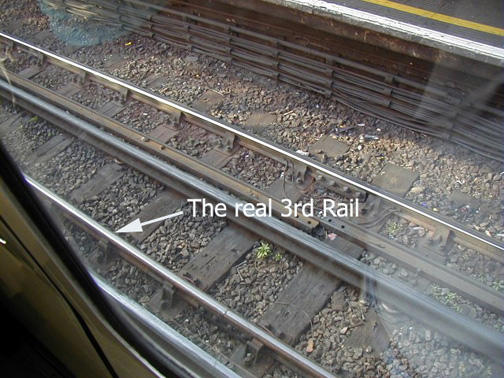
After painting and when it was mostly dry, I go over the rail heads with an alcohol dampened rag to remove all paint. After using the dampened part, I got back with a dry rag wrapped around a finger to remove the remaining film. The rust on the ties looks normal, and the little that gets on the center rail looks okay too. I know I posted this a long time ago, but there is an extant example of real track with a center rail. Some of the U.K.'s regional rail has track with a black (and hot) center rail. Rail looks really good painted.
Here's that 3rd rail. I took this out of a train window in London when there in 2000. I really couldn't believe what I was seeing. It made having three rails much less troublesome. My arrow is pointing at the wrong rail. Notice it's held off the cross-ties with insulators.
Now onto the mountain. I'm putting the cardboard that wrapped the Eames Chair to good use. I've been collecting cardboard for a while just for the mountain and right end terrain work. I started on the right side and made some standoffs to support the contour sheet.
And here's the piece laying across. I will use a staple gun to fasten the cardboard to the standoffs. As I was doing this I realized that I didn't need all that depth. I only need cardboard at the contour face and enough behind it to provide some stiffness. I had originally cut a gigantic wedge to go all the way into the corner. I hacked off that back part, but needed to leave what's there to tie into those uprights. On the left side I will be more judicious in my positioning of the supports and use less cardboard.
One layer is not enough so I'll put a second and third layer. These will be supported by styrofoam blocks instead of lumber to reduce complexity and keep the whole thing lighter. I just has to support some hardshell plaster work and maybe some rock castings. On Monday I'll add more cardboard hopefully reaching the point when I can start weaving in the strips and then plaster. I've also been holding onto some styrofoam for a long time just for this eventuality.


