Thanks for the input. I went with the crumpled aluminum foil. I woke up this morning thinking about building them out of plaster, styrofoam planks glued together and carved, and finally the foil. All the other methods just seemed to elaborate for a component that supports no load, is practically invisible and only has to look dark.
As usual, I tend to over-design and over-build, but the whole project just took an afternoon. I used Reynold's Heavy Duty foil folded over a couple of times and then built some cardboard framing. This added enough stiffness to make the whole deal work.
I first just folded and then crumpled the foil to see how it would work in the tunnels. I made no attempt to put a ceiling on the liner since it would be invisible to anyone other than someone driving the train.
When the size looked right, I started to add the cardboard framing. I traced some of the Ross curves I'm using and cut the cardboard inside and outside curved reinforcements. These were hot glued to the foil. I used three longitudinal pieces and some cross pieces to form the frame.
On the outside curve, I had to trim some of the frame to clear the wing wall that will be in place on the outer tunnel.
For the two tunnels on the right side I made liners for both sides since a view can walk over to that area and see the other wall. However, on the left side tunnels there's no way to view the near side wall so I didn't need to make liners for them.
After they were all framed and shaped properly, I took them outside and primed them with Krylon Gray. It was hot out and the paint dried very fast, so I was able to bring it inside and air brush Tamiya Nato Black (like a weathered black) for the final color. This too dried quickly so I was able to get them installed on the layout again using hot glue. The results met my expectations and got the job done swiftly so I can get back to cardboard strips. The crinkled foil certainly looks rock-like.
I didn't install the tunnel liner on the lower left portal. In fact, I unscrewed that portal and set it aside. When I laid my work plank across the track to reach that back portal, it became very clear that access to that part of the mountain to do stripping, plastering, painting and landscape will be challenging at best and very difficult at the worst, and I'll be able to reach more to the back without that portal installed...yet. So... I'm going to stage the mountain building even more than on the right side.
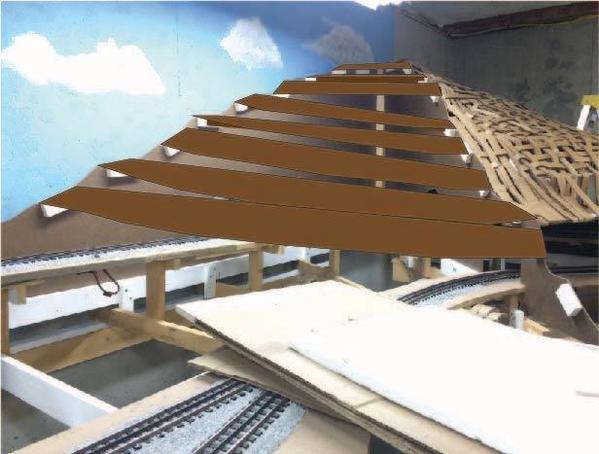
That being said, I stared at the left side and realized that because all those little white blocks are facing in the right direction, I can use a different method of framing up for the stripping. Here's my attempt to draw what I'm describing. What you don't see are the stiffing ribs vertically glued under the cross pieces. I think I can stiffen cardboard sufficiently so I don't have to use hard board. Cardboard is so easy to work with being cut with a utility knife versus a very noisy saber saw. The only hitch is each piece needs to curve outward with a mountain-like contour. When I first drew this I had them as straight planks and realized I wasn't making a mountain... I was making a pyramid! This idea still may not work. I try it out and see. Otherwise I have to go back to adding vertical wooden supports to hold up the contoured cardboard layers.
Tomorrow's Saturday so no more work. Monday I have a checkup (routine) and probably won't get anything done till Tuesday. Y'all have a nice weekend.


