Happy Monday. Unlike the rest of the civilized world, I actually like the weekdays more than the weekend, since I've made this deal of "no working on the trains on the weekend".
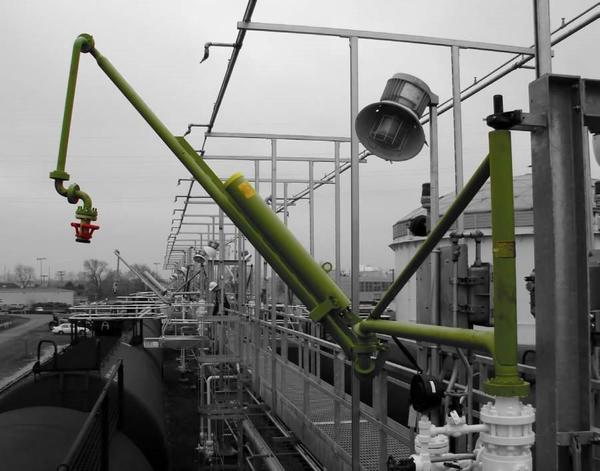
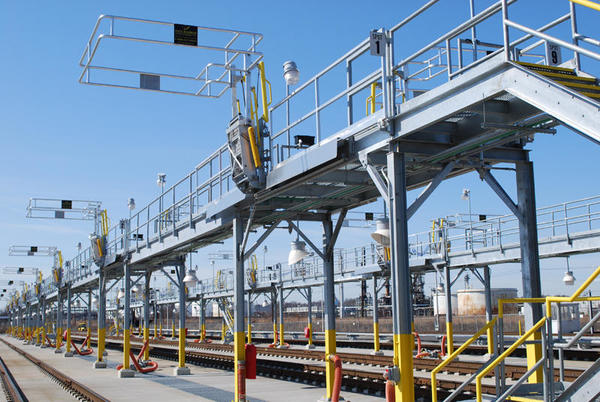
Spent the entire afternoon continuing work on the loading dock. Got all the railings and stairs finished, and then started working on the enhancements. The kit includes no information on how materials get from the all those tanks to the tank cars. So I went online and found many illustrations of chemical loading racks. First of all, there are movable platforms that drop down to bring the operator safely over the tanks loading ports. There are also, sometimes elaborate, articulated piping systems to bring product to the filling ports.
So after putting on all the railings I started to cobble together my version of the loading system.
I had ensured that the platform was a multiple of the Plastruct railings spacing. I had to shorten the overall length any about 1/2" total taking equal amounts from either side. This proved very smart since the long rail fit perfectly. I used some square edges blocks to hold the rail vertical while I solvent glued it over its length. I did the same for the shorter rail-side railing. I clamped the whole deal in the wood worker's vise and blocked it in so I wouldn't crush the leg bases that were wider than the legs themselves. This made it nice and stable to be able to work on getting the rails installed.
There were a bunch of little short rails to build in around the stairway and the loading sites. It was these short pieces that brings all the concern and provides good excuse to make your own railings.
I built the two stairways and this time glued their rails on top of the stair stringer. I really don't know whether Plastruct wants you to put the railings along side or on the top. Hopefully, one of my followers can clear this up for me.
I needed to find out exactly where this thing was going to go vis a vis the railroad. It's going to be permanently mounted to the narrow piece of Masonite. I had to remove the ballast up to the edge of the Vinylbed roadbed foam, and then place the rack on the Masonite which my biggest rail car next to it. There are no curves approaching on either side that are close enough to cause overhang problems.
When it was where I thought it would work I marked the location with a Sharpie. Here're the final location marks.
Once all the details are built an it's all painted I'll epoxy the rack to the base. Incidentally, the epoxy was letting go at various places where the deck met the brass frame. I find gluing plastic to metal a problematic activity.
I built two articulated platforms out of the thin ABS with the ABS 3/32" angles. To this I added some ABS wings which will provide the pivots for the platform. THE PLATFORMS WILL NEVER BE DOWN! If so, they will be rammed and destroyed. That is an absolute certainty. Work began by adding more beef to the extensions to which the pivots will attach.
Here is one of the two platforms just after I attached the pivot wings. Technically, since as stated before, the platforms will never be down, they don't need actual pivots, and some NBWs would provide the illusion of mobility.
There's more to these platforms than just this, as seen in the first picture in this post. There are lift cylinders, and articulated railings that close the gap that occurs when the platform is down. There's also an additional railing up above that comes down over the tank car's load ports to add more security for operators on the tank. I'm not going to model that detail based on its fragility and the difficulty of modeling it faithfully. But I probably will add he lift cylinders.
In exploring all the Internet images, I did find proof that single-legged platforms do exist. I was concerned that this seemed a bit weird, but they're not uncommon. Some have additional diagonal bracing in various places. They also have some additional gusseting at the baseplates. But I made my baseplate are bit too narrow to accept more details. I did add this level of detail on leg feet in the substation.
Oh... and one more thing. I molded two more light hoods. It only takes a view moments to mix the resin and pour the mold. And then while it's curing I'm working on other stuff. By the end of the week, I'll have the full set of light hoods needed for all the lighting.


