I'm familiar with Shapeways, but I don't know how to create a good 3D drawing of these people. I've just started learning how to use Blender, which is better than SketchUp to do organic shapes, but I'm very, very low down on the learning curve and it doesn't work very well on an Apple MacBook Pro with a touch pad.
I got the word that my Sculpey liquid products are shipped so it won't be long till I can attempt to use them. Meanwhile, a faithful reader on my other forum where I post this identical thread, is attempting to shape his own people using a slightly different approach and he's sharing his results with the forum. Instead of trying to work in layers, he's loading up the armature and carving it in one go. We'll see if it's more successful. My problem with that method is that you keep deforming already-sculpted areas as you hold onto the piece. It's so small there's very little to grab onto. Layering and baking enables you to harden parts that are already correct so you won't wreck them moving along.
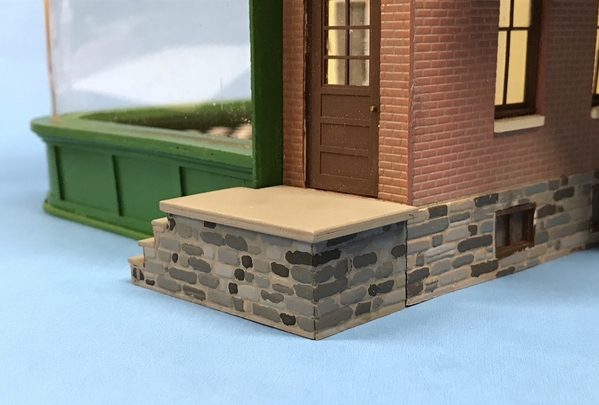
Got the exterior steps completed today. Glued them all together, painted concrete color and painted the stone.
After cutting and gluing the left step unit, I measured and glued up the top concrete platform. I made it a two-layer affair out of 0.040" sytrene, sanded the edges to match the layers (which were glued with tube cement) and then slightly rounded the edges as concrete often is. The top pad needs one back corner notched to wrap around the window box. I did this with a razor saw. I glued the steps starting with the top riser which also needed a notch to conform to the top platform sticking out a few scale inches from the stone foundation.
Each riser and tread had to be custom cut since there is some small deviation between the step cuts. After gluing (and reinforcing with thin CA) all the treads and risers I went back and files all of the ends flush front and back. The treads all have rounded edges and protrude a bit over the step below.
I mixed up some concrete color as before using a mixture of Tamiya Wood Deck Tan and Medium Gray. It came out a little darker than the mix that I used on the rest of the building's mortar. You can see this difference. I didn't realize that I had save that previous mix and could have used that. It wasn't until I went to save the new mix that I found the older bottle. Oh well...
The effect of the stone and concrete is what I was looking for.
Here's the building with the steps in their place (not glued).
I was thinking about making the railing out of soldered brass, but I'm rethinking that since the slats would have to be soldered into holes drilled on an angle. I'm not looking forward to that, so I'm probably going to build them out of styrene. It will be a simple affair with a rectangular top rail and sound supports. Brass will be much stronger, but much more challenging to build.
I can't install the steps until the window assembly is in. Can't put the window in until the interior is fitted out, and I can't do the interior until the (%Y()_(5-^3@%)* little people are in place. Those people are now smack dab in the middle of the critical path. I may fill the time waiting for the people problem (hmmm… sounds like a job for HR) to be solved by building some nice small exterior LED lighting fixtures which are needed too. I also need a plumbing stack vent on the roof and can start crafting the down spouts. Still stuff to do...


