While waiting for some final stuff to dry on the Corsair I started working on the Bronx Bldg. I have to say, I did one really, really good thing, and one idiotic screw up. Par for the course.
First, let me describe the really good thing.
The front right corner of the building needs to be a miter joint. And it's a miter of 1/4" MDF so it's a pretty thick piece to put an accurate 45° angle on it. I was looking longingly at a 4" belt/disk sander combo on sale at Harbor Freight, but never could pull the trigger. Then I was thinking about turning my portable belt sander upside down in my woodworking vice, but the table where the vise is mounted has and overhang that makes it a bit unstable and I would have to put some temporary legs to keep it from toppling forward.
Regardless, I needed a fixture to ensure a good angle. I made a fixture from scrap wood where I cut the angles on the Chop Saw and they were dead on. Incidentally, those side pieces are leftover L-girders that were originally constructed in the early 1990s when my son and I were attempting to build an n-Scale layout just before he was off to college. They were then incorporated into the railroad when I returned from Germany and before moving to Louisville. And here they are again doing something useful.
I needed to extend the to-be-mitered edge just the right amount. At first I set the fixture on a piece of MDF that same size and pushed the workpiece down until it touched the table surface, but when I tightened the clamp bolt, it lifted the fixture slightly and put the piece out a bit too far.
So instead, I marked the miter on the edges and aligned the marks with the fixture base and carefully clamped the block.
And instead of attempting to use the power sander where the fixture would be hanging out over the edge, I glued a piece of sandpaper to my ultra flat granite surface plate and just sanded it by hand.
And boy! Did it work. Took a little elbow grease, but created a dead-even miter right to the very edge.
Now to the screw up (which I did recover from). I had checked the parts as soon as I got them last week and realized right away that the blank, big right wall was too long. When I reduced the building's length, I must have forgotten this piece or… maybe I reduced it by the wrong amount. Either way, it's my problem. The laser is dumb and just cuts what I drew, and clearly, I drew it wrongly. So I put the big wall next to the long window wall which is opposite and marked it for stock removal. And then I cut off the excess. These two walls are the same overall length to the tip of the mitered edge.
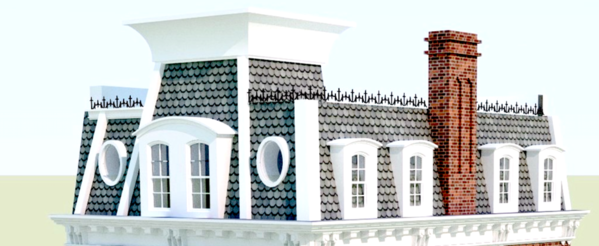
No big deal… right? Well…It was. That's because when I put all the pieces together temporarily, I find that I CUT THE WRONG FRICKING EDGE!!!! I cut the amount off the bottom! And now the wall was too long in length and way too short in height. It's almost a square wall, but not really AND there is a specific cut on the top front edge that sets up the angle for the Mansard roof., which I had not paid any attention. DOH!
So I had to get our my board stretcher. Man! It's sure easier to cut stuff off than to put stuff back!
I cut a piece of ply that was almost the same thickness. I don't have a circular saw, and to rip thin pieces on a chop saw is a great way to rip parts of your anatomy. So I cut the piece first on the scroll saw and then, using an edge sanding fixture that I built a long time ago to prepare balsa skins on the bomber, I sanded a true gluing edge.
I clamped the piece to some steel rules to have the outside flush, and then glued it with Aleen's followed by thin CA. Any gaps remaining will be filled and sanded and the patch will be invisible. Whew!
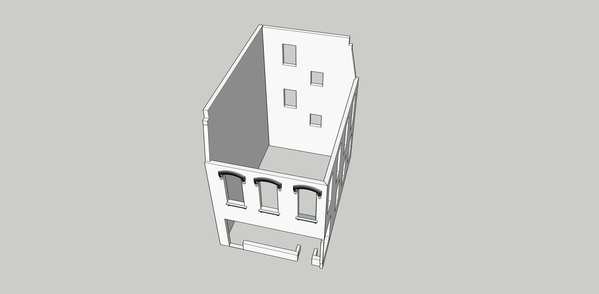
The new height is again correct. Then I put the entire building together with clamps and angle blocks and got ready to mark off the actual amount to remove from the big wall. This image shows the actual overhang that needs removing.
So once again, my impatience is my downfall. Maybe not impatience. It just didn't register that I had the wall rotated 90 degrees when I was measuring for the excess. By using a miter at the front corner gives me perfect brick alignment and I don't need a cap strip to high the 1/4" MDF end grain. On the opposite front corner, the front wall overlaps the big side wall and that corner will get filled and made to look like a seamless joint. The back wall goes between the long front and big side wall and it too doesn't involve any brick work. The building's back and side are painted white and I'm assuming to be a cement layer. I've got some exposed brick on the back wall to add interest.
This image shows how the walls fit together.
BTW: Here's the Corsair one day from completion. I have to finish the prop, add the antenna wire, and put on the very delicate pitot tube. It was a wonderful model and Tamiya's engineering is stunning. If something doesn't fit perfectly, you've done something wrong. In addition to the engine wiring, I added hydraulic lines in the wing fold and landing gear well areas. The paint is Life Color acrylic, gloss coated for decal application, and then air brushed Tamiya clear flat. The finish came out very nice.
The color scheme is early 1943 when the plane wasn't being used on carriers since it had some landing difficulties (which were later corrected). It bounced too much and the pilots had a poor view forward due to the long nose. (Fuel tank is in front of the pilot). To rectify the visibility problem they raised the tail wheel 7 inches and raised the pilot's seat. Tamiya included the taller tail wheel for a different (later) version of this plane.
It's funny, but the F-35C also had similar teething troubles with bouncing on carrier landings and the hook not grabbing the line. Those problems, too, were fixed.
I don't weather my modeling excessively. I just added staining from exhaust and guns, plus some dirt around the landing gear. Corsairs were almost entirely spot welded so there's not much panel detail to add.
One more day of work on it and I'll be on Bronx full-time. There's roof filigree that is in the mail to me. Andre cut it over the weekend. Between the architectural details and the roof decor, this building's going to be very special.


