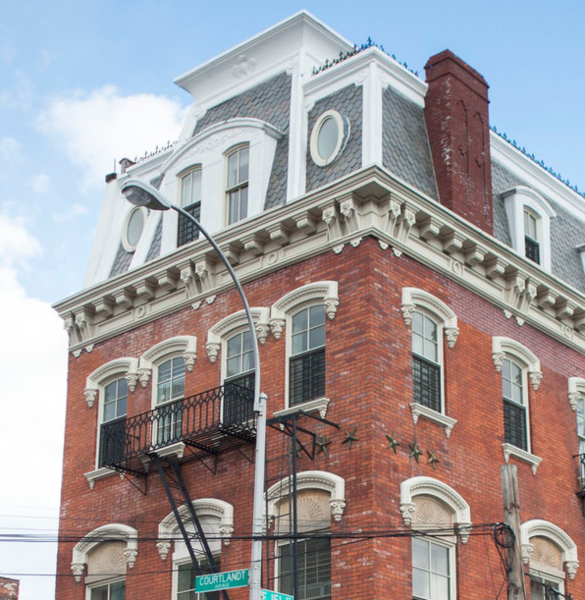
I finished the big trim pieces with the build and attachment of the shorter right-side piece. I should have done the entire length in one assembly, then cut it where the miter had to go. Instead, it was a pain to recreate the right side with the exact same spacing of all the members so the miter would meet correctly. I got the small rear windows completed and started working on the fancy main 2nd floor windows. I did find out something interesting. The real building is even more ornate than my model. I made a cropped picture of the real building to show this. Notice the raised details within the flat areas of the upper cornice. Notice too the friezes on the upper fancy roof facing. And then there's those corner details where the trim members meet in the Mansard roof. There are joist clamps (starts) on the brick at the corner. I don't have stars, but I do have some Grandt Line "S" curve joist clamps that I can use. And I just realized there is a masonry lintel on the main windows at the top below the frieze panel. I may add this since the windows are very fragile and could use a bit more bulk.
After building the lower trim and sanding the miter nice and true, I decided to pre-glue this piece to make installation easier. I clamped it onto an angle plate so it dried square.
When it was dry I filled any remaining gaps with thick CA and filler beads and then Tamiya Fine Filler. When dry and filed, I painted this trim and the upper trim airbrushed flat white. Here's what the lower trim looks like fitted to the building.
To my chagrin, I found that my drawing only had one small back window. I made a mistake and had two large windows cut and only one small. The modified building was the reverse. So I had to scratch build another one which has a slightly more bulky profile than the laser cut ones, but it's in the back, will be highly difficult to visualize and it will work. It's either that or spending $$$ to get this little part re-cut. Using that method I developed of using thin styrene sheeting as a backing for the window structure works really well. Also, the texture imparted by using hand brush-painted craft paint on the "stuccoed" walls really looks kind of nice.
The main windows laser cutting is so fine that it's almost too delicate to build. I was surprised just how thin the cross-sections were and how carefully I had to work to get them together. Those mullions are probably no more than 1/64" wide. That window is not glued in and was the first one I built before the day ended.
So here's another picture showing all this molding trial fitted.
Have a great weekend!


