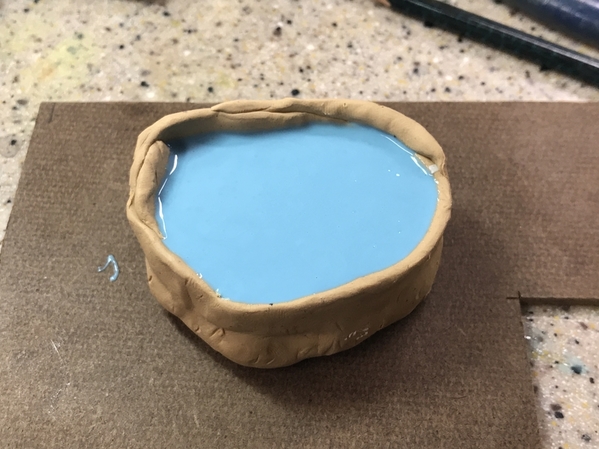
Started the mold making process. The part is so small that the mold process is very crude not needing a lot of sophistication. For silicone mold making you must use a tin-free clay that available from art houses. I simply built the clay base on my Corian work surface and made the dam out of the same clay. For larger pours I've used Lego bricks to build a mold box. The master was imbedded halfway in the clay and I use extra plastic kit sprue material; it's round and already has curves and joints that make for good flow. After all, that's the purpose they play in the plastic kit manufacture.
The Smooth-On M0025 2-part silicone is mixed 1:1 by volume. I just opened some brand new stuff. It has a shelf life and one of the two components starts to set by atmospheric moisture. You have to use it up (which I won't). I use disposable plastic cups and since I'm using such as small amount, I make the cups with the same level on both. You pour Part A and B into separate cups with the equal amounts, then pour this into a 3rd cup which is mixed a lot until it is completely homogenized. Pour from one end and let the material slowing work its way up the mold so the entrained air is pushed out ahead to the silicone.
Looks like a kiddie pool… I head the mold plate with the pour on top of my air brush compressor to help vibrate the pour and encourage air bubbles to exit. This is a very basic silicone and doesn't need vacuum degassing.
It takes about 6 hours to cure at room temperature. I brought it upstairs since it's a bit warmer than the shop. I went to my model club meeting tonight and when I got back it was cured some pulled off the clay to expose the mold half.
Next session I'll wrap a dam around this portion, spray it with Easy 200 mold release agent and pour the top half with additional silicone. The lumps are alignment tabs that will insure the two halves register properly. Then I'll be pouring resin over the next week or so while I start working on the Thunderchief.
After the pour I got back to the base plate construction. I took the template I made yesterday and placed it in the spot. My corner was exactly square being slightly open, so I adjusted the template and then transferred this to the 1/8" Masonite. I cut the Masonite with the saber saw clamping the stock to my back shop work table. I then finished up the edges on the belt sander and my edge sanding fixture. Using 3M99 high-strength spray adhesive, I glued on a piece of 1/8" foam core to the bottom, cut it flush with the Masonite and tried it on the layout. The curb height was just a tad low, so again I used the spray adhesive and added a layer of Bristol Board on the back which gave me the correct curb.
I marked the location of the storm drain on the street and cut the notch using a razor saw and scroll saw. Into this I glued the Westport Model Works resin cast curb inlet. The last things I did was locate and drill the hole to pass through the power leads and then measure and scribe pavement expansion strips and some strategic cracking. A corresponding hole was drilled through the layout by tracing the location of the base plate hole so the leads will be able to be terminated.
I split the difference on the setback at 1.5" (6 scale feet). There was a little filler piece that occupied the space between Saulena's and the Fire House that needed cutting down. I first had to get it off the layout. I had used styrofoam structural adhesive and had to use a putty knife to break it loose. I measured and cut it in the chop saw and just cleaned up the edge. The base plate and the filler fit like a glove. That filler was the black top area where the rescue fire truck sat.
Next session I will paint and weather the base and attach the building to it. I will also fabricate a TV antenna and install the power utility stuff like I did with Nighthawks. And I need to do something about the ivy. I probably have to do the parking lot and Appliance Store next since it's going to look funny if not done. I will make another chain link fence, only this one will be cinch at only a foot or less, compared to the monster that surrounded the refinery. Getting there… Can't forget modifying the gas station either...


