I took advice and redid the paint job. I wouldn't have except I found that both long walls had the problem and I found exactly when it happened. My scribe was not tight enough in its holder and was moving. About a third of the way along on the first long wall it began moving and within a couple of bays was almost a 1/4" higher and I didn't notice it. I rescribed the walls ensuring that the scribe was tight this time.
Now the corners match perfectly and I can sleep better at night. A friend of mine just nicknamed me, "Mr Never Good Enough".
I fixed the headstock on the lathe model where some material was missing. Bondic is exactly the same chemical composition as the 3D resin and cures at the same 405nm UV wavelength. I built a little masking tape dam around the perimeter and just filled it to the edge with Bondic, letting it extend past the bottom edge. I cured it first with the Bondic LED and then stuck it in my UV chamber to harden it all the way. A few strokes on my sand paper glued to a surface plate and the bottom was whole and the repair was entirely invisible.
The segmentation on the chuck is due to having the circle segment setting in SketchUp at 24. You can set it to any number, but the more segments the more CPU time and larger the files. I'm going to up it since the printer sees everything! Notice that you can see the hexagonal nut on the tailstock lock. You can also see space in the rotary tool post for a tool holder. If I would have put threads on the lead screw you would have seen them too.
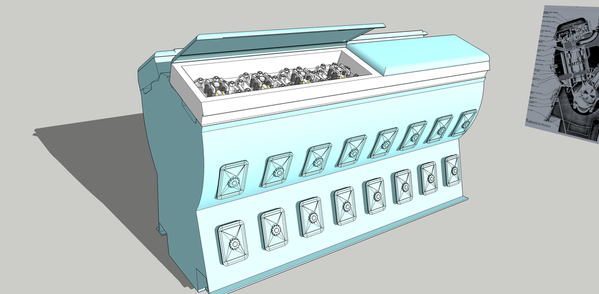
With my increasing confidence, I'm "building" an EMD 567 in SketchUp that I'll 3D print. I'm going to print this as a model with multiple parts so if one print doesn't go so well, I don't have to spend the time reprinting the entire model. So it will have separate block, valve cover, heads, front accessory drives, exhaust manifolds, roots blowers, etc.
It's going to be one heck of a model. Walthers does have an HO plastic version of this baby, but no such luck for us O'scalers. I'm drawing it all from scratch based on a good cross-section drawing and photos. I don't know how long it is. I had to increase the length since the power heads didn't fit into the valve box. I've yet to put in the cam, rocker arms and fuel pipes. Don't what the printer will do with the flue pipes. That may be some thing that can be installed afterwards. Took quite a while to get the bridge rocker right as well as those access covers. Regardless, it's certainly easier drawing it, than trying to make it. I checked the block with the slicer and, at least, that will print. I'm
I know I sound like a broken record… this thing changes everything.


