Thanks! It sure is! One nice thing about "The Machine" is it can work on weekends. My deal is "I don't do modeling on the weekend", but the machine is humming away downstairs and I'm upstairs not modeling.
I successfully printed the air conditioner legs and am ready to glue the entire project together and paint it. The support network was SO much more involved than the actual part it's almost comical. The part only used about $0.40 worth of resin, but the support network probably tripled that. The slicer doesn't give you the network estimate.
I'm learning how to carefully cut away the supports without damaging the part. You have to remove it in layers watching for the interconnecting angular ribs. Then you can reach the interior supports.
Here's the finished leg assembly. I added all the cross bracing in the modified drawing so it had more structural integrity. It worked!
Immediately after this came off the printer I printed the entire Hoist Structure in one go. The print was actually successful, but it's not going to work. In true 1:48, it's really a bit small. I would be almost invisible in the engine house. Also, as I'm still a student, not a master, I learned that if a free-standing wall in a 1:1 thickness is much less than an inch, will print too thin to be practical. The wall thickness for the outside of the wheel assembly was 3/8" in 1:1. That printed at .008" thick in 1:48. As I was cutting away the supports—carefully—it was breaking away. This resin at .008" is too thin to handle. Otherwise, it really resolved pretty well. The wheels, motors, bumpers all printed. The bumpers too were too fine to withstand the cutting pressure.
So I went back to the drawing board (figuratively) and enlarged the entire unit by 30%, then I thickened the floor place and the outer wheel housing plate to over 1" true inch. It's now printing again, and I believe it will be successful. All the motor and gear box ribs showed up. They're thin too, but they're not unsupported or attached to support rods.
One the original download from SketchUp, there were a lot of objects that were not solids or had their faces reversed. If the faces are reversed the STL file converted doesn't recognize them and leaves the shape unclosed, not solid and missing walls. You can review the STL file visually to see where these errors are. I just learned that today! I am literally learning new stuff every day with this technology. Alanrail has been doing this for a number of years and he and I communicated via eMail and he gave me some other pointers. I'm still printing at 40 micron layer sizes. I may start experimenting with finer resolution (and therefore even longer print times) on these kind of complex structures. Because layer thickness plays such an important role in print time, you need to understand what resolution will do for print quality and optimize it by the job.
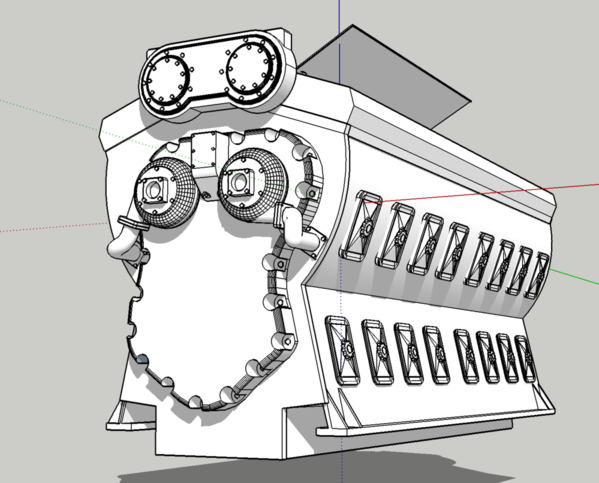
I'm making steady progress building the complex front-end of the 567. I check each part by exporting them as an STL and if they check out, put them into the rest of the assembly. I'm using ALL of my SketchUp skills on this job. The rectangle with the angled bottom is the mount for the Woodward Governor.

The new print came off the machine and all the changes I made were successful. I enlarged it and strengthened the week areas. I used the "Heavy" support setting, but that was overkill. I'll not be making any more of these so I'm not refining it further. Here's the top view. Notice how all the bumpers are now there.
Here's the bottom. Motor and gear box flutes came out perfect.
And here's the comparison of the trial piece at 1:48 and the fixed one 30% larger. Imagine doing that if you had to scratch-build them. It took me just a couple of minutes to make the changes. You can't see it in the pics, but the machinery is all sitting above the platform on their legs. Tomorrow I'll prime and paint it. I'm thinking of printing the main wheel trucks also. I'll make the wheels to conform to the Atlas gantry track profile. The rest of the gantry will be scratch-built from styrene. This thing is really going to pop when it's painted!
This application is exactly how I've envisioned it. I'll continue to scratch-build sensible assemblies and use the printer to handle the nitty gritty details that would be a pain to build or I'd simply ignore. It just ups the ante. Onward and upward.


