Thanks guys for understanding just what this thing does for the hobbyist.
I believe we are home… just give me a heads up to straighten the mayhem and make sure the trains are running. Engine house should be almost finished by then.
Speaking of engine house, multi-faceted work day today. Finished the main roof, electrified the machine shop roof, grew the main wheel truck for the gantry crane, painted the roller door mechanisms. In other words, busy. And I knocked over the Sikorsky's wing and separated the tail structure from it. Not a show stopper, it's just one for thing to solder. I'm convinced that the hardest part of that job is going to be stripping all the paint so I have native surfaces upon which to work. Any torch work near the old paint will make a mess with charred paint. Can't repaint over old paint either.
I cleaned up the remaining two duct pieces and then glued them all to the HVAC units with medium CA. The resin really likes CA and cures quickly and strongly. I laid out the location of all four HVAC units and marked where the duct would go. I then started paving the roof with 3M White Duct Tape. I cut out the openings for the stacks and also removed the tape where the duct would be so the duct would be stuck to native substrate and not tape.
I didn't lay down any guidelines for the tape; just made sure that my overlaps were parallel over their whole length. When done I had a pristine white surface that hid a lot of the ugly stuff. The tape was just translucent enough that I could see the layout lines below when cutting the duct holes.
To mount the HVACs I used those handy contact cement gel strips. Once they stick they don't let go. And having the surface sealed made it very adhesive friendly. I used two strips, one of each of the long duct sides and then pressed it to the surface in the rectangle. I had made sure that the duct and the legs were one the same level with some careful surface sanding after gluing on the duct. They hold good enough that you can almost pick up the entire roof by the HVAC, but I wouldn't recommend it. The unit may come apart.
I glued the stacks in with Testor's Canopy Cement. It's a milky water-based adhesive that dries clear and sticks to plastic. After drying, the stacks are well-adhered. I took the completed roof into the shop to get it out of way and took these pics.
The HVACs are a scale 12 feet from the roof edge. I put the big vent intakes towards the middle so they wouldn't suck up any of the fumes coming out of the vent stacks. ![]()
I first painted the machine shop ceiling with artists tube white acrylic with one coat, wired the LEDs and adhered them to the roof and then went back and did a second coat including the wiring. I held the wiring to the roof with hot glue. I put a Euro-style connecting terminal strip so the roof can be completely removed just like I did with the main roof. Again I used a CL2N3 LED driver chip to manage current so I don't have to worry about what applied voltage I'm going to use on that end of the layout. I didn't paint the LED driver. It gets warm and paint would insulate it.
Tested the lighting. I wish I had one more of those LED strips, because it's a little bit underlit (according my standards.) This picture was taken with the room lights off so it looks pretty bright. I'm going to have a lot of cool stuff in there and I want it to be seen.
I brought the engine house back into the shop. The next step would be nearly impossible up in the air as I discussed in yesterday's post. I wanted to try and use the small screws to stabilize the main rail girder while it would be curing. I tested it on the top buttress pieces since they were much easier to drill and drive. I used a 1/32" drill to start the holes. The heads of these screws aren't that broad so while they held, they weren't particularly strong. I then measured the spacing on the actual buttresses further down the wall and installed the back screws without the girder being in the way. I did break one carbide drill and decided to use a high-speed steel drill instead since they're more forgiving. I got one back row in place and started putting in the clamping screw in the front. I actually thought that the screws themselves could hold, but it really wasn't secure enough. I'll go back to my original idea of using the screws to stabilize and let the epoxy do the grunt work. It kind of hard to see what's going on in this picture and it was a pain in the butt to do it. Getting the screwdriver on that back screw was taxing in many ways. It was too close for my normal bifocals and too far away for the Optivisor. So I had to bend way over the wall and my back didn't like that. I ended up putting on my LED headlight too so I could see the slot. That's why I had to bring it into the shop.
I sprayed the roller door apparatus with that nice Coral Blue. I'll pick out the equipment cabinet with yellow tomorrow.
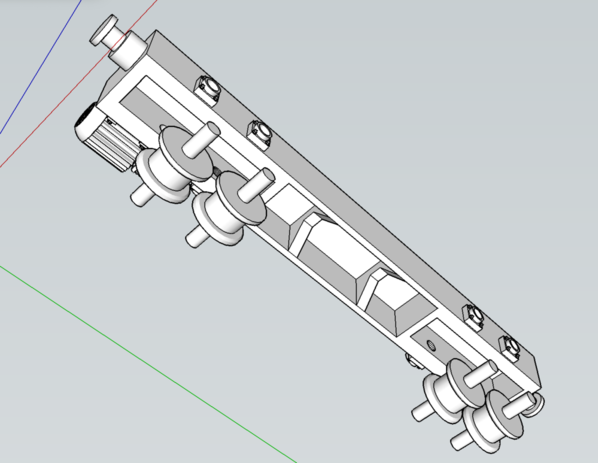
And finally, woke up this morning drawing the main wheel truck for the gantry in my head. Up until a month ago I wasn't sure how to fabricate it. I was thinking about folding and soldering brass, using all styrene, and then comes the Machine. I already had the drawing as part of the gantry download from the SketchUp 3D Warehouse. As usual, it needed work.
The drawing had a ton of reversed faces in the motor/gearbox model. I had to spend almost a half hour just cleaning that up. I opened up the inside and added some bracing to keep it straight, and then I added the 1/16" through-bearing holes and the cute little bearing blocks on the outside. I added fasteners to these and to the motor brackets.
And here's the result. The only thing that's sub-par is the motor fins on one of them. The Resin is pretty soft and I probably was too ham-fisted when cutting off the supports. But I'll use it since it's basically invisible in the engine house ceiling… of course. These grew when I was working on other stuff and when we went out to dinner. When we returned, it was done. I cleaned them up, hardened them a bit and then just spritzed them with Tamiya primer to show the details. They'll be yellow with red motors. You can't see the bolts and nuts without magnification, but they're there. I know it.
I went through the holes with a 1/16" drill just to clear them out. They'll support a 1/16" brass axle. I'm going to turn the wheels on the lathe out of aluminum. The gantry will have resin, laser cut, fabricated styrene and turned metal… a truly multi-media project. I grew the part with it pitched up 45 degree and then rolled 45 degrees. There were lots of supports and only one little corner of one of the bumpers didn't form perfectly. I'm getting pretty good at this stuff. It's nice to be able to predict success. Careful review of the STL image and then watching the slicing animation quickly shows you whether something is amiss. On the STL, if there's a reversed face, it is just not there. On the slicer, it shows up as a black hole. Reversed faces in SU are a light green color vs. white for a correctly oriented face. This is done with the colors and textures turned off.
Once I get the gantry rails fixed, I can measure their span across the entire space and use that to begin fabrication of the gantry girders.


