I don't mind the commenting about the 3D tech. I'm in such a learning mode that any input is greatly appreciated. Today was another day of punch list items. I got the filler strips built and painted. Primed the radial drill press… looks very good. Printed out an entire run of hand wheels, but they're still too fragile and need thickening. I'll check with the Elegoo folks about using other resins with their system. I can't imagine why it wouldn't work if it solidifies at 405nm, but I need to be sure. Making it less brittle would be very helpful. I regrew the Bridgeport and the smaller lathe and both look great although I haven't de-supported them (new word..). I made the name sign for the front of the engine house, and had a visit from my oldest, and now tall, dark, handsome and heading to the University of Illinois Engineering next week. He was camp counselor all summer and was in charge of boating. He did well and has grown up to be a terrific young man.
First the radial. After painting I noticed that open notch up top. I put a hole up through the column to reduce resin volume and may have gone just a wee bit too high. I will patch that with some Bondic. My grandson, who is familiar with 3D printing, was very impressed with what I'm doing. I like to impress my grandson.
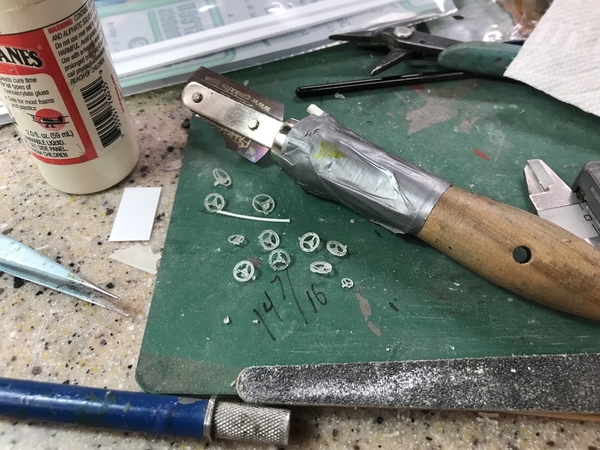
Here's the hand wheel print. I used a light support scheme, but I may try a different approach for another run. I printed these horizontally. I may try angling them for the next trial, after I thicken some of the most fragile.
I grew a lot and it was a good choice since the failure rate was quite high. For the really fragile ones, I resorted to putting Bondic on first and then clipping them out of the structure. I would remove the entire support group first and then, using a black piece of paper to add contrast, carefully clipped the supports from the hand wheel, one at a time.
I painted the strips outside after finishing the gluing job. I then tried them on for size in the engine house. I still have to weather them before permanently gluing them down. I'm either going to use contact cement dots or silicone caulk/adhesive. I don't want to use a brittle cement and it's a highly irregular surface I'm gluing to with both styrene and MDF on wood.
My son's wife's sister's kid (Nephew by marriage) is autistic and had developed a love for air conditioning systems. Don't ask me why, but he's 6 and wants to be an HVAC technician. I got a special request to build on of my engine house units for him. I was told that I would make him a very happy kid. I like to make kids happy since I'm am basically one. So the printer is running downstairs making the main box. I can't almost build them in my sleep. It will take a 24 hour cycle of printing to produce all five parts. We're heading to my son's home in September where my younger granddaughter has the lead role in a adult performance of Matilda. I'll bring the HVAC unit with me.
Rail Scale laser cut the "PENNSYLVANIA & PACIFIC RR MAIN SHOPS" signage for me on self-stick laser board. I didn't want to stick them directly onto the building due to the slight texture to the paint. Instead, I stuck them to a piece of clear styrene through which I could see my graphic as a guide. As it turns out, the letters are bigger than I thought and I had to made another image. The clear styrene sheet was a just a tad too short for the graphic lettering, but then when I laid it out I found that the letters, although taller than my graphic, were narrower. After careful placement and kerning, I got a decent looking sign. I painted it with engine house color and this will be adhered to the engine house using either pressure sensitive adhesive, double sided tape, hot glue, or some other multi-media adhesive. I could even use the 3M 99 high-strength spray adhesive.
I put a straight edge under the lettering to ensure it was in line. I had to print the Corel image out on tiled pages and taped them together at an angle which account for why the right side disappears below the ruler's edge.
Here's the signage before paint. A little note about typography. Notice how when you set type spacing is not fixed. Letters with lots of white space around them are situated closer to other letters. Letters with straight sides are set a bit further apart. and letters like the "V" and "A" are actually nestled together.
I sprayed the lettering and it's now drying well overnight. I will paint the letters themselves a contrasting color, probably black.
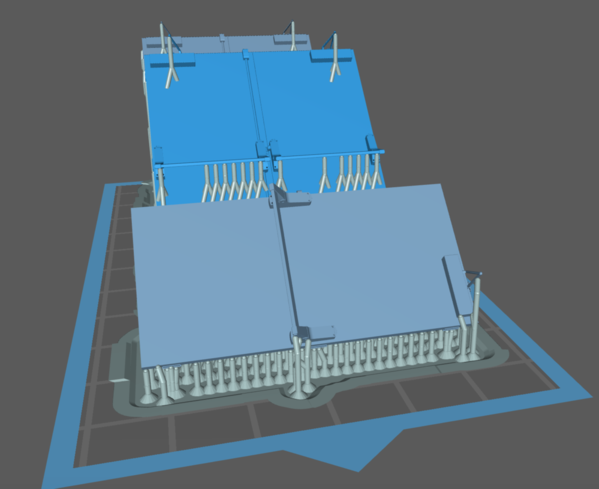
I wanted to add some details to the entry doors. I was going to print some crash bars for the interior. When I went back to my original engine house drawing, and pulled out the doors to look at them, I realized they were complete with all kinds of good hardware, inside and out, including crash bars and closure devices. Therefore, I decided to print the whole deal. I measured my scratchbuilt doors and sized the SketchUp doors to be the same size. Here they are in the slicer. I'll print them tomorrow. All three doors fit on the Machine at once. I fattened some of the parts and went about reversing any reversed faces. There always are. It will be interesting to see how they come out.
I'm also thinking about what kind of exterior lighting is going to be needed. Each train entrance should be lit, plus a light over each entry door. I'm also planning on lighting the sign. I may leave the lettering body color and using up lighting to bring out the relief. I'm going to design and print a nice trim light fixture sized for the little surface mount LEDS.
I'd really like to have the engine house operation by next Thursday when four or five guys come for a visit.


