Seriously, I can't believe all that's gone on for the last 10 days either. My grandson and I worked all weekend on his English project. He needs it for the first day of class which is Tuesday. It had to be a project based on a book he read over the summer. He read "Angela's Ashes", so he wanted to build a replica of their small Limerick, Ireland row house. The scene he was duplicating was their Christmas dinner where all they had was the head of a pig. The house was tiny and the first floor was flooded. We built the house in O'scale since I had some plastic furniture to use. We also made terrific use of the Machine. It really is remarkable! A little over a month ago, I didn't even know such a machine was possible and now I've had it running almost every day.
I also designed and grew the steep staircase. Jack did the floor out of stripped 1/32 balsa.
The house made use of some left over Grandt Line doors and windows, and some brick paper I bought from MicroMark years and years ago. I bought it before I had settled on my methods for doing scratch-built projects. The shingles were the last of my Rusty Stumps lot, but Rail Scale is now marketing them.
I drew the plans on CorelDraw. Jack cut the parts out of 1/8 foam core. I did the exterior work and Jack did all the interior work. He'll pick up the finished house tomorrow.
I continued to refine the Printing Station with the addition of digital timer that will manage the UV Chamber. I've already over-baked two projects after putting them in the chamber and forgetting to get them out. They get brownish and very brittle. I can still use them, but they become much harder to handle. Now I set 10 minutes on the timer and leave it alone.
I've also gotten a line on a flexible resin that when added to the one I now use will impart some impact strength and cut down on the brittle breakage of the finer details.
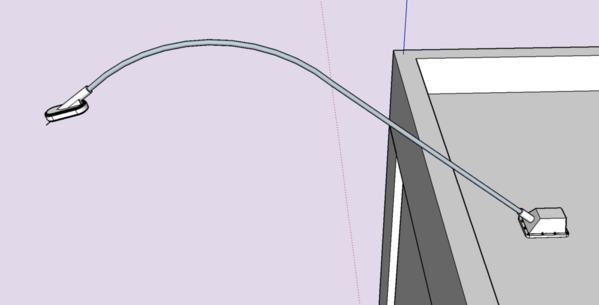
I wanted to add lighting to the engine house and designed a goose neck affair. I wanted to have it fixed to the roof so I could tie the power into the roof system. I grew the base and the head and will use 1/16" aluminum tubing for the pipe. It's the same tubing I used on the Woodbourne Gallery and Nighthawks exterior lights.
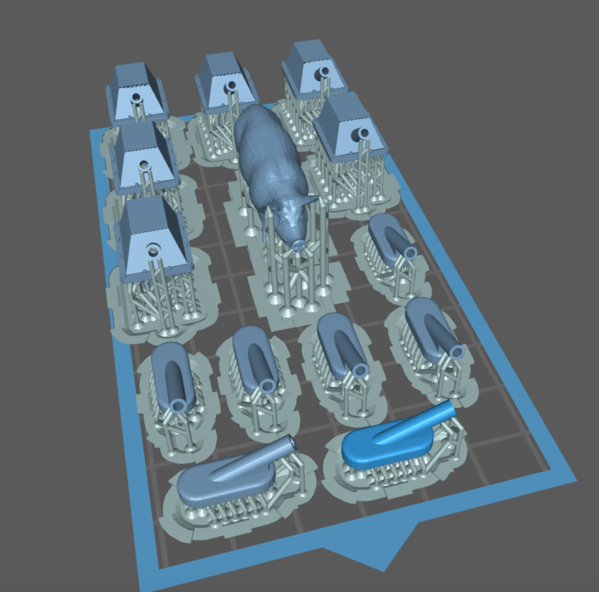
I wanted to be clever. I designed the parts so the all the holes would be grown in. It took three tries. The first I had the head and base on the platen flat and using light support. I also included one pig, since the Machine doesn't care how much stuff is on the layer. It's just an imaging process.
The heads printed okay, but the supports were up inside making cleanup troublesome since that's where the LED is going to nest. The pig came out great, and the bases all broke loose for their supports. They were just a flat blob cemented to the FEP film at the vat's bottom. I thought I was going to have to replace the film since they seemed really attached. After removing and filtering the resin back into its bottle and cleaning up the vat, I attempted to remove the stuck resin and was successful by just gently picking up one corner and the pieces just popped off. There was no apparent damage to the film and the Machine printed successfully two more times.
The second attempt grew nicely by positioning the pieces on the 45. The heads were perfect, but the bases again failed, but this time due to my SketchUp design. I didn't group the center hollow mounting peg (1/4" o.d.) and the pipe holder together. Instead, I drew them together with the housing. The result was a hollow housing with the center lug contacting the bottom surface only. Since a surface has absolutely no thickness, as soon as I removed the supports the lug fell off.
Back to the drawing board. I then grouped the tubing parts. Drew the box around them and grouped that. This time, the box grew as a solid resin piece. The lug was formed perfectly with a hole all the way inside. The pipe tube's hole ended at the front face of the housing, but that's okay since I was able to drill it through to communicate with the lug's hole. I enlarged the pipe hole anyway since at exactly 1/16" the tubing would be a press fit and would break stuff. By going to a #52 drill I have a couple of thou clearance.
Speaking of a couple of thou. One of the tests of a resin printer is how close it produces objects to their intended size. I measured the .250" lug and it came out to .251". That one thou could have been the accuracy of the Chinese digital caliper, or it could just as easily have been the rounding error since 1 divided by 48 is 0.02083 not .021. Either way, it's pretty darn close to perfect reproduction. This is attempt #2. Notice the housing sitting flat on the cutting pad.
Here's the total production of good ones. I had a couple of failures when the tubing cracked due to over-aggressive drilling. I found that it was better to do the drilling with the Dremel. The resin doesn't get hot or melt like thermoplastics. I need five heads and bases for the engine house. All the rest of the heads are going to be good-looking modern LED street lights. More anachronistic mind warps on my railroad. I still have to try and build some using the surface mount LEDs. The chamber is not that large. The magnet wire takes up very little space, but needs to be packaged carefully.
I used a contour of Bondic around the tube exits on the housings and the heads. I may have to use a small burr to clean out the LED chamber to ensure sufficient room for the LEDs and their solder joints.
I also received the two LED power supplies that I am using to power all the new lighting. These are 12VDC, 30 watt units that will power lots of LEDs. The HVAC unit is the one I'm building for my son's nephew. I'm going to make some custom decals that say, "Liam's HVAC Company" or something to that effect.
And finally, I took advantage of a Harbor Freight sale and bought a portable metal cutting band saw and an angle grinder. I really need more equipment to do the plane restoration justice. These tools will reduce my net since I'm not getting paid for tools that will remain mine, but I've wanted a means to cut metal more efficiently for years to prepare parts for turning. I hate using a hand hack saw. I also bought another digital caliper. They were on sale for 10 bucks and it includes two button batteries. They're almost worth price of the caliper. My current one was getting a little worn. I'll keep it for a spare and throw out the one that it replaced. Anybody want an old parallel port HP Laserjet printer? I don't even have a computer that has a parallel port. What the heck is a parallel port anyway? I have vague memories of them. And the box its sitting on is an old Pixma printer that's already at the Louisville electronic disposal facility.
When I first started buying power tools at Harbor Freight I was a little put off by everything being of Chinese manufacture. Now I see that regardless of the brand, including Milwaukee, their stuff is made in China too. So what's the difference. Is my 10 dollar caliper on par with a Starrett. Heck no! But when it wears out I get another for 10. That can go one for quite a while. If I was a professional machinist, I'd probably stick with the Starrett.


