


Post 81 9-28-2022
Repairing Broken Lionel 2025 and 2035 Classification Lights
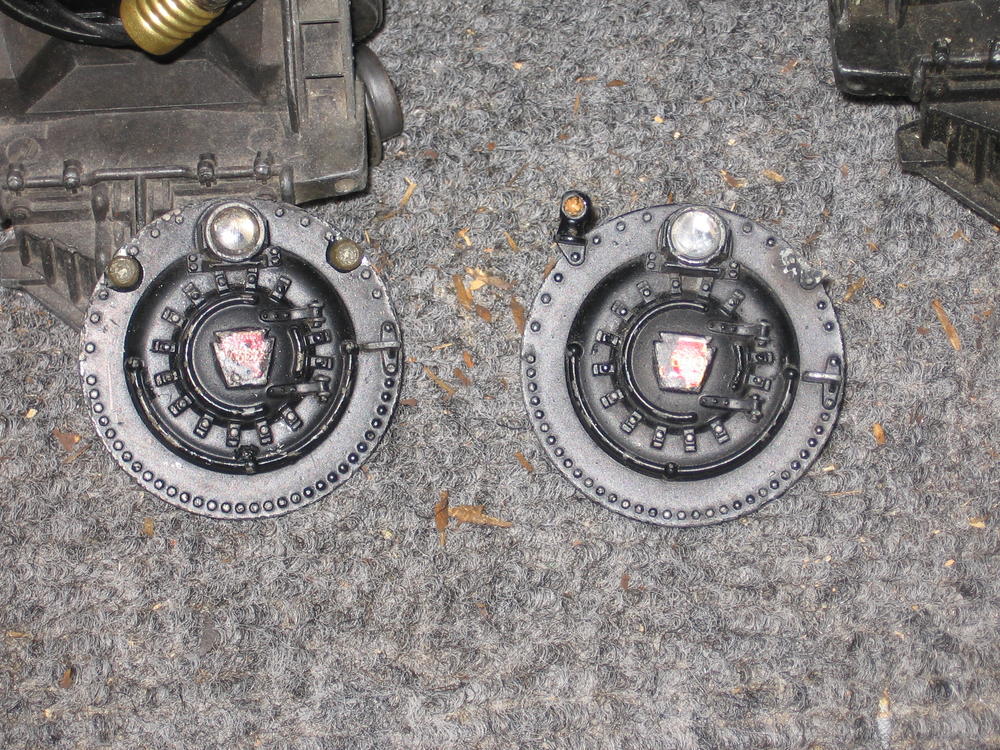
Lionel 2035 boiler fronts (and others in the family) are notorious for breaking off classification (some call them Marker) lights. Five of my used 2035 or 2025 engines had missing classification lights when purchased. At $16 or so, plus $6 to 8 shipping for a new one, this gets out of hand. The picture below shows a Lionel 2065 lighted boiler front (lighted by the head light bulb) on the left, that was used as a model showing the classification lights inside the diameter of the boiler front. The broken Lionel 2035 boiler front is shown on the right.
One had one classification light left and I made a marker light out of styrene spurns and runners (the round plastic sticks that hold the parts from the molding process) from plastic model cars or planes. This will be a very fragile fix, as the classification lights are still sticking out and easy to break off and a picture is below. 
I decided to repair the rest of them by making new classification lights and installing them on the face of the boiler front like the Lionel engines 2065 and 756. The spurn lenght I used was 5/32 inch in diameter. I rounded off a square cut end slightly with a file. I then marked the center of the runner end with a sharp utility knife and use a counter sink drill bit to counter sink a dish for the jewels angled backs. A utility knife or X-acto can also be used. I then cut of the end 1/8 inch back to make the marker light with a razor saw in a shoe box lid to keep from losing it. I made all ten marker lights and scraped off the paint on the boiler face where it was to be glued. I used a file to smooth off the rough area where the old classification light broke off. Epoxy glue was used to glue the classification lights on and to fill any voids where marker light broke off. They were painted with Krylon satin black paint. Green jewels were purchased on eBay from seller "trains7272" who advertised brighter original green jewels and they are brighter than most my other jewels. Jewels were glued in with Pliobond rubber type glue but now I would use E6000 glue.
I know this fix is not like the original and if that is required, buy a replacement. I am an operator and not into selling my trains so this fix works for me, saving money and still have classification lights that are similar to those of some Lionel engines.
Four Lionel 2035s with glued jewels shown below, 3 have face mounted classification lights that are more rugged than the original.

A 2035 in the round house showing brightness of jewels.

Another possible way to replace the broken off classification lights is to make them like the Lionel 2065 boiler front with the lighted classification lights as shown in the first picture, on the left, on the top of this page. One could drill two 1/16 inch diameter holes in the 2035 boiler front where you want the classification lights. Then make a classification light frame like above, then drill a 1/16 inch diameter hole in the center before cutting it off the spurns. Then glue the classification light frames over the 1/16 inch holes in boiler front. You can add some clear styrene rod in the hole.
An alternate method would be to make the classification light frame from Clear plastic spurns. Do not drill a hole, then the outside can be painted semi gloss black.
Now you have a lighted classification light.
I hope this helps others revive boiler fronts with broken classification lights and save a few dollars.
Bonus hint: Here is a way to make replacements for the head light lenses on many Lionel steam locomotives. Find or buy a section of clear styrene plastic rod, the same diameter of the hole for the head light in the boiler front. Place a small piece of sheet metal or heavy tin can in a vise to hold it. Heat the back of scrap of metal with your solder gun or iron until very hot. Hold the rod of clear styrene plastic rod perpendicular to the piece metal and press it against the heated metal until the rod tip mushrooms out slightly (about 1/32 inch). Remove and let cool and then cut off the new headlight lenses with a fine tooth hobby or razor saw. Job done.
Charlie
