Cutting in the garage makes sense. I do a lot of the heavy spray painting there too. That is as long as I remove the cars. I painted a freezer with Appliance paint from a rattle can, but didn't take my Acura out of the garage. I was halfway through when my wife stuck her neck into the garage seeing the fog and said, "Shouldn't you have taken the car out of the garage?" The answer was YES! And she was too late. Even though I had the door wide open the car got a fine overspray all over it. It was an epoxy-bearing paint and was a pain in the butt to get off. It got all over the windshield, which I cleaned off. But during a rain I turned on the wipers. They were still coated with dried paint which then abraded the glass and left radial streaks that are there to this day.
To get the spray off the car, the car wash suggested clay. It's a clay that the car restorers use to put a final polish on the surface. It took hours and lots of elbow grease, but I restored the car back to original shine (except for the windshield.) I learned a lesson that day... the hard way. It's said that good judgement is the result of experience which is the result of bad judgement.
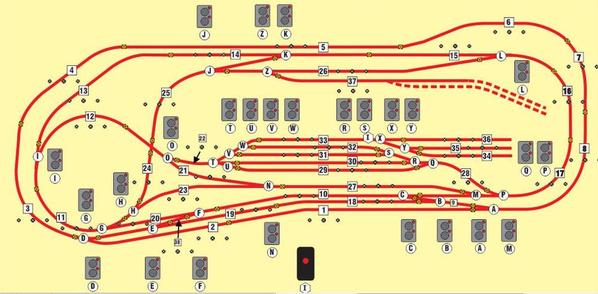
Taking my reader's advice, I redesigned the graphic for the control panel specifically so it can be printed commercially. Since I wouldn't be using masking tape to lay it out, I didn't have to worry about having curves; therefore, I changed the display on RRTrack to a single line, made a screen capture of it and then traced over the image in CorelDraw with a 4mm line. I thought about using a white background, but felt that the spray adhesive may leave a tint that would be objectionable. So I'm using a light yellow which would neutralize the tint (I hope).
I then changed the scheme to place the switch controllers somewhat near the switch images on the track plan. Here's what that now looks like. The dotted line is a future expansion leading to the coal mine tipple. There should be room on the panel for more stuff too.

I think it will be easier to operate the layout when you have to line up 6 or 7 switches to make a move. Let me know what you think. The image I give to Kinkos (or whomever) will not contain the images of the switch controllers, but the small black circles are going to stay. The larger, middle circle is the hole location and size for the DPDT switches for cab control, and the smaller flanking circles are for the lights that indicate which transformer throttle has the track. If I go digital, I will not need all these block switches since DCS doesn't like passing a signal through this many switches, but I will still need them for the yard tracks which need to be de-energized most of the time.
I've also been thinking about another way to get power to the swing gate without running leads all the way around the layout after crossing the middle bridge. I was thinking about getting a set of pickup rollers with the springs and all. Then mounting the roller on the door side and brass contact plates on the jamb side. When the gate rolls closed, the rollers will glide into position and make contact with the two brass power connectors. The microswitch which controls the power relay would also be in this area and would shut power off to the bridge and approaches to both sides far enough away so any train highballing to dead-man's gulch would be de-energized in time to stop the train. Using rollers would give a sliding contact that would be spring-loaded to maintain contact. Should work... right?
Clem, how do you energize your gate?


