@TheRWBYRailfan, In the past I'd considered doing commercial repaints.
I used to do photography including doing 100% of my developing and processing. I never lost my awe for when I opened that film can and saw good printable negatives. Even if you're a stickler for doing things by the book, it's still a chemical process and things can go wrong - usually when you least expect it. I had a friend who did wedding photography. Bought a bulk brick of Kodak film to shoot their wedding and not one single picture came out. He got a defective bulk pack of film. After that, he made sure his film was from different sources. Needless to say, that was one very unhappy couple. They actually went to the trouble to restage parts of the wedding to get good photographs.
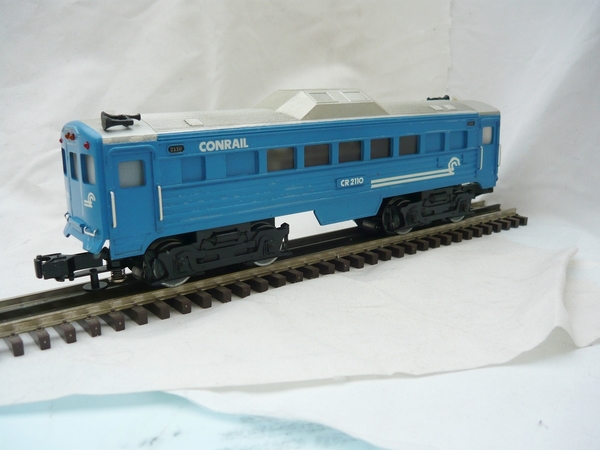
Likewise for repainting, and here's an example of that. This is a RMT RDC Budd Car and everything was going just fine. Until I put on the final coatings of flat spray. Something odd happened to the paint on the left side below the word "Conrail" on the ribs of the lower body. It yellowed a little bit: You can see it in this photo. It's not the lighting, but something odd happened with the paint. Eventually, I'm going to try and fix this. Fortunately there's no decals over the affected area, so maybe some very light sanding and repainting those spots.
Needless to say, sometimes the best made plans go awry. And part of the reason that I repaint either beaters, or very common items that weren't that expensive.
@Choo Choo Charlie, I appreciate your kind words. Much like you, this is a labor of love. If it weren't for having a small layout, I'd have none at all. The smaller types of trains just look better on a small layout. But I happen to like modern road names too, not just Baby Ruth ![]() . Since these cars are affordable and many HO scale decals work just fine, I'm in business.
. Since these cars are affordable and many HO scale decals work just fine, I'm in business.
I've been chopping down the 027 switch for many years. Removing the over-sized base of the turnout opens up so many more possibilities on a small layout.
I started years ago by removing the sheet metal base plate, and then soldering on wires on the underside for electrical conductivity. Problem is that without the baseplate, the plastic is more subject to warping over time.
So now I leave the base plate attached. I use a Dremel with a cut off wheel to cut the upper side plastic part of the turnout, creating something of a path for the next step. Then I use a hacksaw blade to cut through the sheet metal.
Inspired by your painting of your switch tracks (David from Dearborn also did the same thing), I decided to give it a shot. After I did this and put it down on the layout, I decided for me, it looked odd since I use more smaller width ties closer together on my regular track.
So I still cut down the switch tracks, but leave them brown. Which I suppose some might say would also look odd. Ah, the compromises made in 3 rail!
If I was a real purist, I would have gone HO many years ago. I run trains for FUN, not frustration! It's less aggravating to just work with the compromises than to grumble and complain about them all the time. Or to find perfection in what is basically imperfect and letting your imagination do the rest.
For me, that's what the phrase "The magic of Lionel" really means.


