By now, everyone as digested the news that Lionel declared obsolete many electronic boards and removed stock from the parts site, that includes the R2LC and R4LC TMCC/Legacy receiver boards. What do you do now.
Many of the failures of the R2LC/R4LC are actually not that difficult to fix, since the boards are no longer stocked, now's a good time to consider that fact and look at reviving some of the "broken" ones laying around.
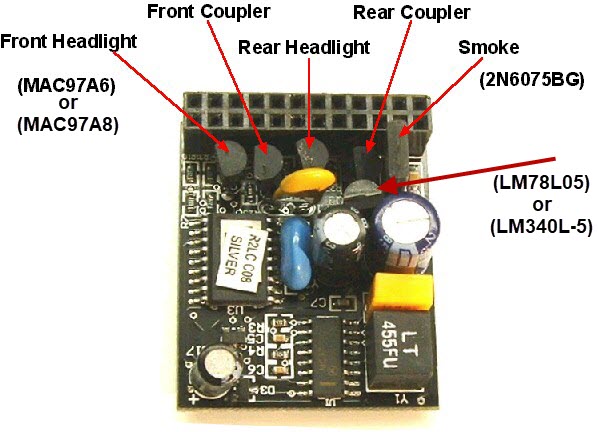
A major source of failures is the five triacs that control the lights, couplers, and smoke. These are not difficult to replace with a decent soldering iron and reasonable soldering skills. The parts are also pretty cheap.
Another less common failure that is similar in complexity to repair is the 5V regulator, again not difficult to replace.
Finally, occasionally the capacitors will be pulled loose by rough handling, the most common one is on the lower left of the graphic below. Those are equally easy to replace.
Below is a graphic that depicts the locations of the afore mentioned parts and the part numbers.
My technique for replacing these is fairly simple.
I first grab the part with needle-nose pliers and carefully flex it back and forth keeping the movement right at the bottom of the part. When the part breaks off, I have the three leads hanging down.
Next, I turn the board over and trim any excess lead on the back side for the parts flush with the board.
Next, I clip a set of forceps on one of the leads and let them hang there with the board in my PanaVise. On the revers side that is facing up, I use a spot of solder on the iron to heat the joint and melt the solder, the lead should fall out from the weight of the forceps, but you can give it a gentle tug if it doesn't.
Do this for all the leads.
Next, waiting for the raised eyebrows and rolling eyes... ![]()
I hold the board in my hand and from the back, carefully heat the hole again until the solder melts. With a quick sharp rap on the bench, I clear the hole. I find this technique works way better than trying to do with with desoldering braid or a solder sucker, both of which I do have.
Make sure there are no solder splashes on either side of the board when you've cleared the hole, and you're ready to install the new part.


