@Sprovo posted:Any advice for measuring the grade and keeping it under 2.8? I can pitch the track up and down on the 10' wall to make up some of the lost height by downsizing the helix if need be. It'll make the first turn at the wall so it'll have a 2.8% grade for as far as I can on the 10' walls.
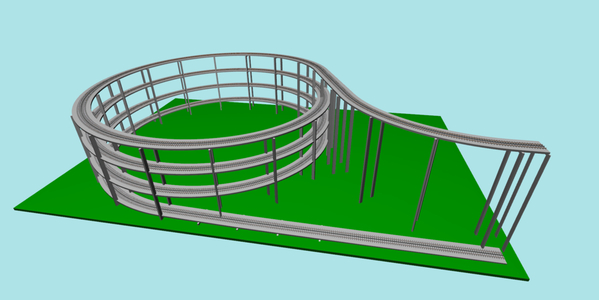
A grade is calculated as rise over run. With a 6.5-foot diameter helix, each circle is 245" around, that's more than 20 feet of run. If it gains 7" in height on each loop, 7 / 245 = .0286 or 2.8%. Personally that's as steep as I would want to go.
It's always possible to reduce the steepness of the grade by achieving the same height over a longer "run." So you could make the helix 8 feet in diameter instead, which would reduce the grade to 2.3%. If your equpiment requires O72 curves, 6.5 feet is about the smallest you can use. Even for smaller equipment, it's best to avoid sharper cuves because longer trains will tend to stringline. One rule you can't break is that the track cannot cross over itself unless there's at least 7" of separation between levels. I'm allowing about a half-inch for the sub-roadbed (wood supporting the track.)
If I'm understanding you, you're asking about putting curves in the corners of your room, and having a "ramp" along the side walls. The track will still have to swing out from the wall as you approach the corners to turn back on itself. My gut instinct is that a circular helix will have the smallest "footprint," leaving more sq ft. in the room for the rest of the layout. It might also be easier to construct. Your yards, sidings, industries, etc. can be dead-level along the 24' walls.
You might be tempted to keep the curves level, and use the straight run to create a "ramp." You have to be careful about transitions from flat to graded track. Often they cause more problems, loss of traction, etc., than the grade itself. So once your train is on the grade, you really want to keep the drag as constant as possible until you top out at the next level. If you make those transitions gradual like you should, you might find that parts of the grade have to be even steeper to achieve the same total increase in height.
I've been using a layout design software called SCARM, which I heartily recommend. I've attached a helix I made for someone else. Including the transition back to the wall, its dimensions are 6.5 x 10 feet. If you also have this software, you're welcome to integrate the .scarm file into your own plans.


