


I wanted to include some fun details in this baggage car interior so it would give the viewer something to look at as it goes by. Normally baggage cars are plain but as you can see from the attached plans this is a Railway Express Agency (REA) star baggage car. The star under the words Railway Express Agency means it has extra amenities inside. To a railroad employee the star meant inside the car was a sink, toilet and work desk that a plain baggage car did not have. In 1999 K-line made this 15" long semi-scale compressed version of the real 85 ft Union Pacific 6327 (originally build for UP in 1962 and retired December 1971). As with my other interior upgrades the Union Pacific plans for this the 85 ft car did not line up my semi-scale K-Line shell. I started by printing the UP plans on an 11 x 17 piece of paper so the floor would be about the same size as my K-Line metal base. Here are the steps if you want to upgrade your Railway Express Agency baggage cars.
Start by removing your existing K-line interior from the shell and laying it next to the plans.

Separate the old K-Line plastic base from the metal frame.

Install two wooden strips to elevate your new floor above the existing power wires that come up from the trucks. The trick is to line up your wooden strips with the factory screw hole locations. Tack down the two wood strips with glue.

To make the new floor use a thin sheet of 1/32” x 3” x 24” basswood. Cut the basswood to the same width as metal K-Line metal base. The new floor can be temporarily glued in place but will eventually permanently mounted using the same exact screws that held your old plastic interior. Draw pencil lines on your basswood floor to mark the locations for the four fish racks.
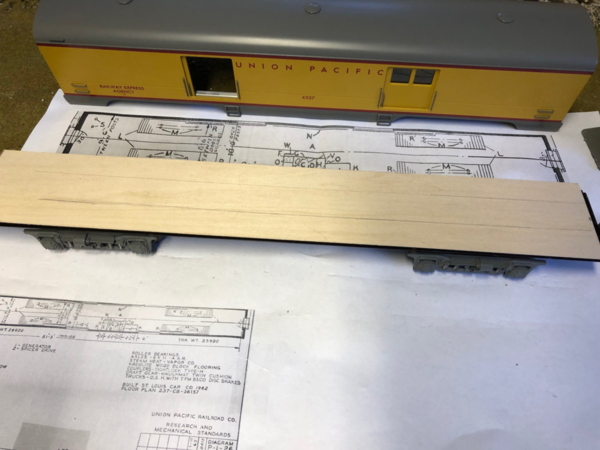
The new floor should be cut slightly shorter at the ends due to the clearance for end caps. Also notice how the tab for your end caps will now fit perfectly under the basswood floor. The power wires for the lights will be routed up through the flooring on the other side of the car.

Okay, back to the fish racks. These fish racks clearly showed on the original UP plans but I had no idea what they were. I looked up the term fish rack and found it means... under floor drainage sections of a car with a removable wood panel sections on top. Apparently, these removable wood panel sections of the car allowed for cleaning of the drain areas below the floor. The name came from the early days before refrigerated box cars. Back then railroads had to put fish on blocks ice for transport across the country. During the journey the ice would start to melt, go through the slots in the wood floor and then down the drains to the tracks below. At the end of the line crews could easy remove the wood panel sections to wash and clean-out the smelly drains. Railroads stopped using blocks of ice when refrigerated box cars took over. But the name fish rack stuck and seems to be used in the railroad industry for any car with an underfloor drain. In this case, fish racks were used in these Union Pacific REA/baggage cars that traveled from Chicago to the West Coast during harsh winters where the packages/baggage might be covered in snow and needed places in the car to defrost. See photo below of a newly delivered REA/Baggage car and notice the removable sections on the floor.

Since my fish racks won't be draining snow covered luggage from Chicago ~ Los Angeles I kept them simple.

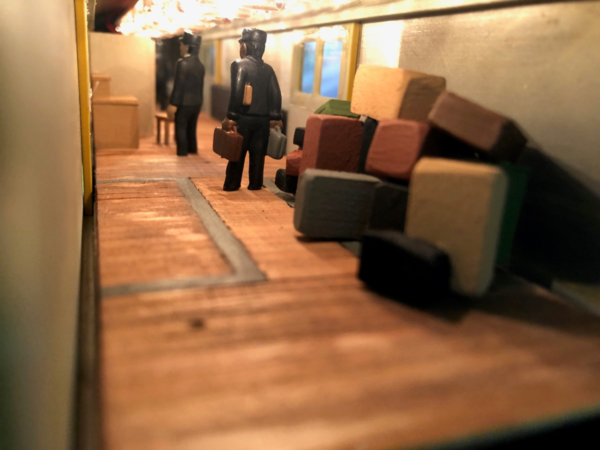
After your fish rack are installed start laying down the horizontal slats for your flooring and putting up the interior walls. On the left side of this photo below you can see where to bring the power wires up through the floor. Make sure these power wires are out of the way of the soon to be installed end cap. Position your bathroom walls, desk and black heater pipe guard to fit inside the blank spaces between the shells sliding doors. Mark your exact door locations with a pencil on your new basswood floor (using the shell as reference). Then arrange your interior items to match your semi scale space.

At this point you can add luggage, figures and any final details. I wanted it to look like the passenger's luggage and REA packages shifted during travel so I made the stacks a little messy.

I relocated the three of the porters from my other K-Line cars into this REA/baggage car. Since the new floor is higher than normal, you will need to trim their feet off. Notice the sliding door on the left side of this photo. When you make the new basswood floor the same size as your existing K-Line metal frame you will have perfect clearance between the new floor and your the sliding door.
I will attach the original UP plans for this car at the end of the post. I hope this write-up with plans helps others who want to upgrade there Union Pacific baggage cars.
Thanks,
To look at the other interior builds in this series click on the links below. They are listed in the order I run them on my layout:
https://ogrforum.ogaugerr.com/...-an-e-8-cab-interior
https://ogrforum.ogaugerr.com/...interior-upgrade-rpo
https://ogrforum.ogaugerr.com/...6327-k4690#lastReply
https://ogrforum.ogaugerr.com/...car-interior-upgrade
https://ogrforum.ogaugerr.com/...enger-car-8003-k4690
https://ogrforum.ogaugerr.com/...lounge-car#lastReply
https://ogrforum.ogaugerr.com/...enger-car-1305-k4690
https://ogrforum.ogaugerr.com/...upgrade-k-line-k4690
https://ogrforum.ogaugerr.com/...upgrade-k-line-k4690
https://ogrforum.ogaugerr.com/...senger-car#lastReply
https://ogrforum.ogaugerr.com/...upgrade-placid-haven
https://ogrforum.ogaugerr.com/...oenix-aluminum-shell
https://ogrforum.ogaugerr.com/...pullman-sleeping-car


