The kids busy with friends, the wife pursuing her own hobbies, and a significant chunk of my honey-do list complete on Saturday (hung a ceiling fan, cleared some downed trees, bathed the dog, plus changed out the sister-in-law’s car battery), equals 6 glorious, guilt free hours working on the layout on Sunday. ![]()
I have flicker free, stabile power to all 3 loops! The outer loop and most of the middle were complete last weekend. I tied up a few things (literally) on loop 2, completed loop 3, and cleaned up some wiring. The sidings are powered off their respective main lines for now. Wiring blocks will be next.
Loop 1
Hot and common bus wires run around the perimeter of the table. Feeders for both hot and common dropped at 9 locations. Spade connectors at the track were crimped to wires with male spade connectors that pushed into "clip on splicers” on the bus wires. This loop felt like it took the longest to complete - probably due in part that it had the most feeds and crimping was tedious. In this pic you can see some blue tracer wire. I had an idea to twist different color tracer wire with the wiring for different loops to help differentiate them under the table.
_________________________________________________
Loop 2
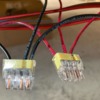
Using push on “wire nuts,” loop 2 went fairly quickly. The track feeders were dropped thru the table. I worked my way around the table, cutting wire to size from feeder to feeder, using the wire nut to connect the run from the previous feeder, the current feeder, and a starting a lead to the next feeder. This was done for both a hot and common.
 _______________________________________
Loop 3
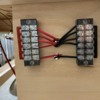
Bus bars, baby! Track feeders dropped from their locations around the layout to a common corner of the table. Wires cut to size and connected to a hot and common bus.
________________________________________________
What did I learn?
Crimping is tedious. Even with the right tools it felt time consuming. And with stranded wire, if the crimp wasn’t positioned just right, it would break leaving a dangling connection that had to be cut, stripped, and crimped again.
The wire nuts were awesome. Since the wires only had to be stripped to push into the connector, the process went quicker. Didn’t need the additional step of threading and crimping an intermediate connection. I wish I had the Wago lever nuts. The Insure connectors I had don’t work well with stranded wire so I used solid wire. The solid wire was definitely more tricky to work with. It was stubborn and took more fiddling to unroll, twist and bend it into position.
Overall I think I liked using the bus bars best. For me it was easier to organize the wires and run them and it looks much neater. It uses more wire but I’m OK with that. Plus, the connections are more secure with fewer breaks.
I picked up a soldering iron that I’m anxious to practice with. I can see the benefits of soldering a feeder wire from the track and running a single, continuous wire directly to the bus bar. Fewer connections, a more durable connection at the track, and in my mind easier to organize.
With the buses and feeders in place, power delivery to the engines and switches has been flawless. I’m so psyched I made it this far.
Next up, setting up block power on the sidings. I have to decide if I’m going to do it with hard wiring and toggle switches or thru LCS.
I also have to decide how much troubleshooting I want to do with some of the switches. There’s the command signal for a couple of them and there are some with incorrect factory wiring that prevents using a direct power feed instead of track power. Now that track power has been sorted out, I’ll see how reliable it is over the next few weeks.
I have most of the LCS modules I need. I’m waiting on the block power module and another ASC2 for the switches. If I jump right into LCS, I can wire the blocks and by pass the switch issues. The switch control should work with the switches that are responding to command control but until the STM1 feedback module is in place it won’t update switch position in LCS. Once I start LCS setup, I’m feeling like it will be all or nothing.
In the mean time, the trains are running! Just in time for my early birthday gift arriving this week … Mr Muffin custom run Erie Legacy Camelback ![]()
All 3 loops running …


