Woods Warehouse is a craftsman model kit by Banta Modelworks that I am building for an OGR Forum friend. I plan to show the construction step-by-step in this thread. The kit is composed of a laser-cut MDF core to be overlaid with laser-cut strip wood siding. The manufacturer describes the kit as enjoyable and quite easy to build. Although assembling the pieces may be easy, the quality of the finished product still depends upon the builder’s patience and experience. Several modifications are planned and will be discussed later on. The model is 8 inches wide and 6 inches deep. These first two pictures show the packaged kit parts, instruction sheets, and parts for initial assembly of the main floor, foundation walls, inner walls, and some of the loading dock parts.

MELGAR

MELGAR_2019_1118_WAREHOUSE_002_KIT_PARTSMELGAR_2019_1118_WAREHOUSE_004_FLOOR_INNER_WALL_PARTS

Attachments

Images (2)
  • MELGAR_2019_1118_WAREHOUSE_002_KIT_PARTS
  • MELGAR_2019_1118_WAREHOUSE_004_FLOOR_INNER_WALL_PARTS
Original Post

Replies sorted oldest to newest

Interesting. Just called The Warehouse on their web site. Unfortunately, and like most vendors of such kits you only get 1 view of the structure - no idea what the other 2 walls look like which might really influence one buying the kit as well as where it might be placed on the layout.  From the parts, I can get a pretty decent feel for what those other walls are going to be on this structure.

Love wood structures and the ability to make them “your own”, as old and weathered as you want, or not at all. Banta makes some nice ones, pretty straightforward, good instructions and end result. With your experience, this will undoubtedly be a really nice build. Looking forward to seeing the modifications. 

I began assembly with the warehouse floor, foundation and inner wall pieces which are made of 1/8-inch-thick laser-cut MDF. This material is pretty stiff and did not seem to require the internal bracing that I usually add to prevent warpage when paint is applied. I also felt that bracing was unnecessary because basswood strips will be applied to the exterior of the walls and will further strengthen them. I drilled two holes in the floor to allow for installation of wires and LEDs to light the interior.  I also added 3/8-inch square basswood strips to the inside top of the gable-end walls that would improve support of the roof, especially if I decide to make it removable for access to the interior lighting. I checked the fit between the four foundation walls and the floor and did some very light cleanup before gluing them together with yellow carpenter’s glue. I then placed the assembly on my flat construction board and placed weights atop the floor to ensure that the assembly dried flat. After the glue dried, I checked the fit between the four inner walls and the floor, again did some slight cleanup, and attached them. The interlocking fit between the floor, foundation pieces and inner walls was so precise that the entire assembly turned out absolutely square.

MELGAR

MELGAR_2019_1122_WAREHOUSE_005_FOUNDATION_FLOOR_INVERTEDMELGAR_2019_1122_WAREHOUSE_006_FOUNDATION_FLOOR_UPRIGHTMELGAR_2019_1122_WAREHOUSE_009_GABLE_ENDSMELGAR_2019_1122_WAREHOUSE_011_INNER_WALLSMELGAR_2019_1122_WAREHOUSE_012_INNER_WALLS

Attachments

Images (5)
  • MELGAR_2019_1122_WAREHOUSE_005_FOUNDATION_FLOOR_INVERTED
  • MELGAR_2019_1122_WAREHOUSE_006_FOUNDATION_FLOOR_UPRIGHT
  • MELGAR_2019_1122_WAREHOUSE_009_GABLE_ENDS
  • MELGAR_2019_1122_WAREHOUSE_011_INNER_WALLS
  • MELGAR_2019_1122_WAREHOUSE_012_INNER_WALLS
MELGAR posted:
Fendermain posted:

I am also interested in your approach. ... Fendermain

I thought about adding the exterior siding to the inner wall pieces before assembling them but decided to put the inner walls together first.

MELGAR

I believe I completed inner walls first.  Everything was quite square.

Fendermain

Mel, I think you will really like Bill's kits.  I have a number of them in both Sn3 and O scale.  His instructions are very well done and the parts go together with a good fit.(at least the ones I've built have)  Like the other's on this thread, I too am looking forward to your build.  I'm interested in following along as you do the construction and also how you modify the kit and paint and weather it.  Thanks for starting this thread, I'm sure it will be a good one.

I reviewed the instructions and began applying the exterior vertical siding boards to the lower part of the right-side wall. The siding is board-by-board. This approach allows each board to be stained individually before assembly, which produces realistic-looking color variations when the boards are unpainted and weathered. This model will have a painted exterior as per preference of recipient, so the color of all the siding boards will be the same and the board-by-board siding won’t have its most visible effect. Instead, it could have been done with less effort by using scribed basswood sheets, but I stayed with what came in the kit and will paint it after applying it to the inner walls. The thin (1/32-inch-thick) siding strips tended to curl when glue was applied and were held flat against the inner walls with a wood block and a weight (heavy section of full-sized rail…) on top until the glue dried. At this point, siding has been applied to the lower two end walls and I’ll be getting back to work on the rear wall.

MELGAR

MELGAR_2019_1126_WAREHOUSE_013_RHS_LOWER_SIDINGMELGAR_2019_1127_WAREHOUSE_014_SIDING_RHS_LOWERMELGAR_2019_1127_WAREHOUSE_015_LHS_LOWER_ALIGNMENTMELGAR_2019_1127_WAREHOUSE_016_LHS_LOWER_ALIGNMENT_&_WEIGHTMELGAR_2019_1127_WAREHOUSE_017_SIDING_LHS_LOWER

Attachments

Images (5)
  • MELGAR_2019_1126_WAREHOUSE_013_RHS_LOWER_SIDING
  • MELGAR_2019_1127_WAREHOUSE_014_SIDING_RHS_LOWER
  • MELGAR_2019_1127_WAREHOUSE_015_LHS_LOWER_ALIGNMENT
  • MELGAR_2019_1127_WAREHOUSE_016_LHS_LOWER_ALIGNMENT_&_WEIGHT
  • MELGAR_2019_1127_WAREHOUSE_017_SIDING_LHS_LOWER

Woods Warehouse Craftsman Kit Build – Post 4

I installed the planked exterior siding on all four walls and also on the loading doors. The siding took me about nine hours.

Provision is being made for interior lighting to be added after the model is finished. The large front and rear loading doors will be movable so that LEDs can be installed through the opened doors, the wires passed through the nearby openings in the floor, and the doors then repositioned. This involves installing framing to provide tracks for the loading doors. The attached photos show the siding, loading doors and some of the door track framing. Construction time to date about sixteen hours.

Next steps will be:

1) Paint the exterior walls gray

2) Paint and install brick foundation

3) Paint and weather loading dock wood, build loading dock

MELGAR

MELGAR_2019_1203_WAREHOUSE_020_SIDING_COMPLETEMELGAR_2019_1203_WAREHOUSE_021_SIDING_COMPLETEMELGAR_2019_1203_WAREHOUSE_023_FRONT_LOADING_DOORMELGAR_2019_1204_WAREHOUSE_025_DOOR_FRAMES_FRONT_VIEWMELGAR_2019_1204_WAREHOUSE_026_DOOR_FRAMES_REAR_VIEW

Attachments

Images (5)
  • MELGAR_2019_1203_WAREHOUSE_020_SIDING_COMPLETE
  • MELGAR_2019_1203_WAREHOUSE_021_SIDING_COMPLETE
  • MELGAR_2019_1203_WAREHOUSE_023_FRONT_LOADING_DOOR
  • MELGAR_2019_1204_WAREHOUSE_025_DOOR_FRAMES_FRONT_VIEW
  • MELGAR_2019_1204_WAREHOUSE_026_DOOR_FRAMES_REAR_VIEW

Woods Warehouse Craftsman Kit Build – Post 5

I painted the exterior walls “Amish Grey” with acrylic craft paint. The model recipient requested some finishing of the warehouse interior, which includes painting the interior walls “sand” and adding scribed wood floors. The plan now is for me to install one or two LEDs on the upper gable-end walls and run the wires through new holes in the floor near those walls. The scribed floors were cut so as to leave narrow slots in which the loading doors can slide and were also cut into two pieces to simplify installation. They were glued to the sub-floor and held flat and in place by heavy weights until the glue dried. Baseboards were added around the edges of the floor.

Next steps will be:

1) Paint and install brick foundation

2) Paint and weather loading dock wood, build loading dock

MELGAR

MELGAR_2019_1206_WAREHOUSE_027_PAINT_EXTERIOR_INTERIORMELGAR_2019_1206_WAREHOUSE_029_PAINT_EXTERIOR_INTERIORMELGAR_2019_1206_WAREHOUSE_031_FLOORS_SCRIBEDMELGAR_2019_1206_WAREHOUSE_034_FLOORS_BASEBORDSMELGAR_2019_1206_WAREHOUSE_035_FLOORS_BASEBOARDS

Attachments

Images (5)
  • MELGAR_2019_1206_WAREHOUSE_027_PAINT_EXTERIOR_INTERIOR
  • MELGAR_2019_1206_WAREHOUSE_029_PAINT_EXTERIOR_INTERIOR
  • MELGAR_2019_1206_WAREHOUSE_031_FLOORS_SCRIBED
  • MELGAR_2019_1206_WAREHOUSE_034_FLOORS_BASEBORDS
  • MELGAR_2019_1206_WAREHOUSE_035_FLOORS_BASEBOARDS
Last edited by MELGAR

Looks good Mel. The build is progressing nicely. I like the step by step, thank you. I wondered if you could go into some deeper detail when installing the lighting. I’m curious how you will run them, and where and how you’ll attach the wires and lights. Also, what brand/types of lights will you use? I’m going to add lights to some of my structures and could benefit from some experienced direction. 


Thanks,

Andy

Steamfan77 posted:

Looks good Mel. The build is progressing nicely. I like the step by step, thank you. I wondered if you could go into some deeper detail when installing the lighting. I’m curious how you will run them, and where and how you’ll attach the wires and lights. Also, what brand/types of lights will you use? I’m going to add lights to some of my structures and could benefit from some experienced direction.

Thanks,

Andy

Andy,

Thanks. Will cover the lighting in detail when I get to it.

MELGAR

I've enjoyed the small Banta kit I've been building and found they are of great quality.  I look forward to seeing your approach as well as it may fix a couple points I am stuck on...

I've found the board by board construction time consuming but rewarding and more realistic looking than scribed.  I have weathered and stained the boards before cutting them to size to fit the building and try to pick some variety in coloring.  It helps that I have a model cutoff saw that I can quickly cut long boards to size which has been a real time saver.

Last edited by EmpireBuilderDave
EmpireBuilderDave posted:

I've found the board by board construction time consuming but rewarding and more realistic looking than scribed.  I have weathered and stained the boards before cutting them to size to fit the building and try to pick some variety in coloring.  It helps that I have a model cutoff saw that I can quickly cut long boards to size which has been a real time saver.

Interesting that you mentioned this. I think that painting the siding (as was specified for this model), instead of staining and weathering, negates the effect of the board-by-board siding. So, I haven't yet decided on whether to use scribed wood or the kit-supplied board-by-board for the loading dock. I think the scribed wood may look better than the board-by-board. For me, the extra time required for hand-cutting and staining the individual boards doesn't matter. I will do whatever looks best to me.

MELGAR

Woods Warehouse Craftsman Kit Build – Post 6

I cut strips of Plastruct 1:48 rough brick (plastic) for the foundation and painted them “mineral red.” I plan to let the paint cure for several days before sealing the strips with “dullcoat.” To create the appearance of mortar lines between the bricks, I plan to mix lightweight spackle, apply it to the foundation pieces, and quickly wipe the excess away with a paper towel. While the paint is curing, I have been working on the loading dock. First, I cut, stained and glued the seven support legs that mount against the foundation under the rear of the dock. I stained these parts with a mixture of alcohol and India ink to give them a weathered appearance. The next step was to assemble the legs and cross-pieces that go under the front of the dock. The kit includes a template that facilitates the cutting and assembly of the front legs by holding them flat and in position while attaching the long horizontal boards which connect them. I placed my aluminum ruler and a weight atop the assembly to keep it perfectly flat while the glue dried. Then, I glued the completed front dock leg assembly to the structure and placed the weight atop the dock until that glue dried. Keeping things flat during assembly ensures that the finished structure will be square and fit together properly. The front leg assembly had very little surface area where glue could be applied to attach it to the dock itself, so its attachment was fragile. Therefore, I added bracing behind the legs and under the dock which is not visible when viewed from outside the structure. The loading dock will be completed by attaching the deck planking on top of the piece that extends forward from the front wall. I had cataract surgery in my left eye today and am scheduled to have the right eye done next week, so my modeling work may be on the back burner for a while.

Next steps will be:

1) Stain and attach deck planking

2) Mortar and attach brick foundation pieces

3) Assemble windows, window frames and glazing. Attach to model.

MELGAR

MELGAR_2019_1208_WAREHOUSE_036_FOUNDATION_BRICKSMELGAR_2019_1208_WAREHOUSE_037_LOADING_DOCK_INNER_LEGSMELGAR_2019_1209_WAREHOUSE_038_ASSEMBLE_LOADING_DOCK_FRONT_LEGSMELGAR_2019_1209_WAREHOUSE_039_LOADING_DOCK_TEMPLATE_LEGSMELGAR_2019_1209_WAREHOUSE_040_LOADING_DOCKMELGAR_2019_1209_WAREHOUSE_041_LOADING_DOCKMELGAR_2019_1209_WAREHOUSE_042_LOADING_DOCK

Attachments

Images (7)
  • MELGAR_2019_1208_WAREHOUSE_036_FOUNDATION_BRICKS
  • MELGAR_2019_1208_WAREHOUSE_037_LOADING_DOCK_INNER_LEGS
  • MELGAR_2019_1209_WAREHOUSE_038_ASSEMBLE_LOADING_DOCK_FRONT_LEGS
  • MELGAR_2019_1209_WAREHOUSE_039_LOADING_DOCK_TEMPLATE_LEGS
  • MELGAR_2019_1209_WAREHOUSE_040_LOADING_DOCK
  • MELGAR_2019_1209_WAREHOUSE_041_LOADING_DOCK
  • MELGAR_2019_1209_WAREHOUSE_042_LOADING_DOCK

Woods Warehouse Craftsman Kit Build – Post 7

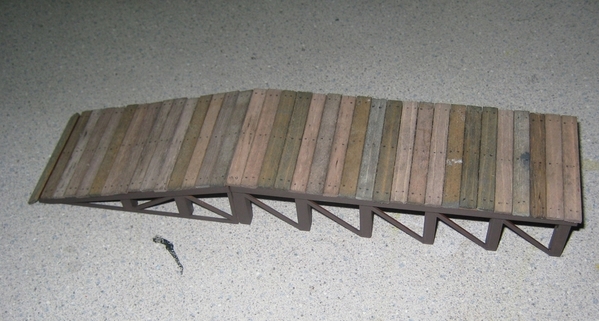
I cut the 1/32-inch-thick planking strips to length, stained them with a mixture of India ink and alcohol to create a weathered appearance, and glued them the across the loading dock in three groups. Slightly different lengths were required in front of the walls and loading door.

Next step will be:

1) Paint and assemble doors, windows, glazing, frames and attach to model.

MELGAR

MELGAR_2019_1213_WAREHOUSE_044_DOCK_PLANKINGMELGAR_2019_1216_WAREHOUSE_046_DOCK_PLANKINGMELGAR_2019_1220_WAREHOSE_047_DOCK_PLANKING

Attachments

Images (3)
  • MELGAR_2019_1213_WAREHOUSE_044_DOCK_PLANKING
  • MELGAR_2019_1216_WAREHOUSE_046_DOCK_PLANKING
  • MELGAR_2019_1220_WAREHOSE_047_DOCK_PLANKING

Woods Warehouse Craftsman Kit Build – Post 8

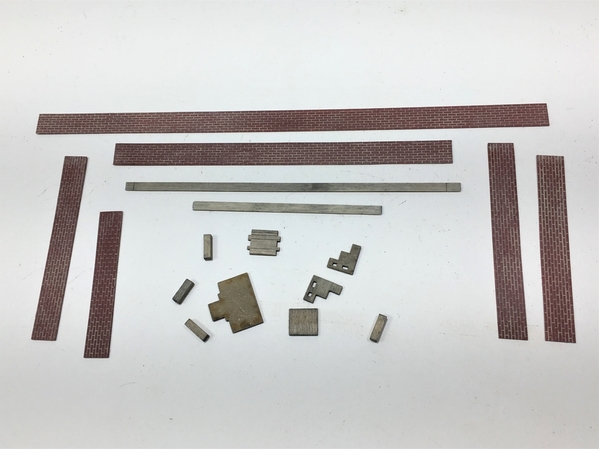
I worked on the model for about four hours on Saturday and made pretty good progress. First, I used Woodland Scenics acrylic “concrete” paint to make the mortar lines on the brick foundation strips. I had painted these “mineral red” about 12 days ago, so the paint was well cured. I applied a heavy coat of “concrete” paint to one strip at a time, let it dry for about a minute, and gently wiped away the excess paint with a paper towel. I should mention at the outset that the brick foundation is a modification. The kit instructions describe the foundation as being painted to look like concrete. I wanted an older look.

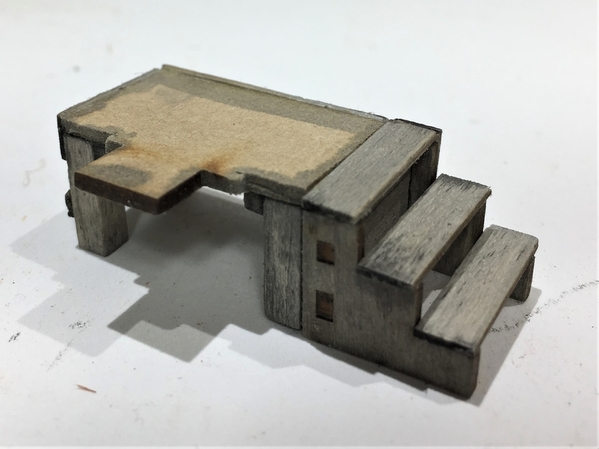
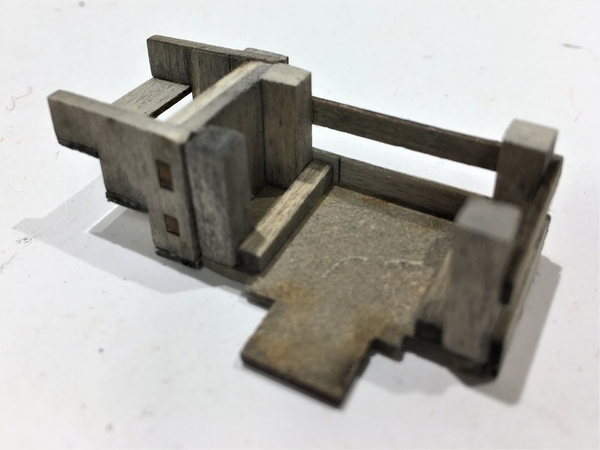
While the mortar paint was drying, I prepared the initial basswood pieces for the side-entry porch and stairs. This involved some accurate cutting and filing of the legs and stair treads, and checking to see that the parts would fit properly into the side doorway opening with the platform level when installed on the model. I then stained the pieces with a mixture of alcohol and India ink and assembled the stairs and porch separately, being careful to keep everything square and flat on the work surface. When the glue dried, I put the stairs and porch together. I also applied extra bracing on the underside of the porch to support the legs, and then added the external (horizontal) bracing.
MELGAR_2019_1221_WAREHOUSE_048_MORTARED_BRICK_PORCH_PARTSMELGAR_2019_1221_WAREHOUSE_049_PORCHMELGAR_2019_1221_WAREHOUSE_051_PORCHMELGAR_2019_1221_WAREHOUSE_052_PORCH

Next, I drilled two holes in the floor through which the wires for the LEDs will pass.

Before the porch could be attached to the building, I had to glue the brick foundation strips onto the sides and the rear. I trimmed each strip to the exact length required, with the two side strips overlapping the ends of the rear strip. I installed the rear strip first, using styrene plastic cement from a tube. This forms a very strong bond between the basswood at the base of the model and the plastic brick strip. While the cement was drying, I clamped the strips tightly against the basswood to get a strong bond.
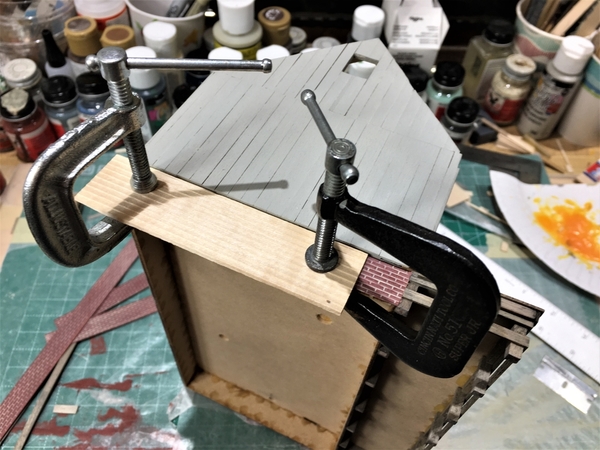
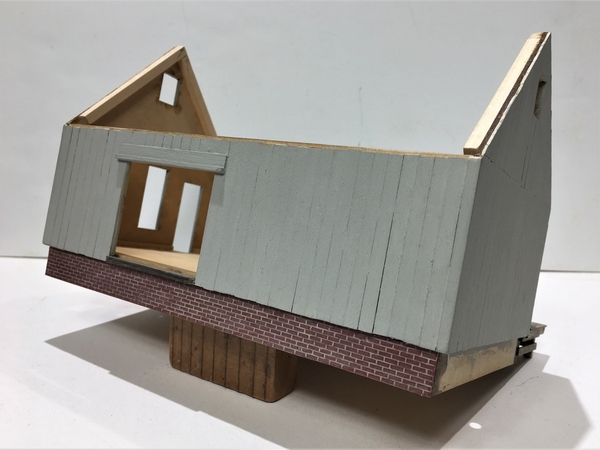
MELGAR_2019_1221_WAREHOUSE_060A_3RD_BRICK_FOUNDATION_SIDEMELGAR_2019_1221_WAREHOUSE_060B_TWO_BRICK_FOUNDATION_SIDES

The last picture in this sequence shows the brick foundation with the porch ready to be attached to the side of the building. The porch planking will be installed after the porch is in place.
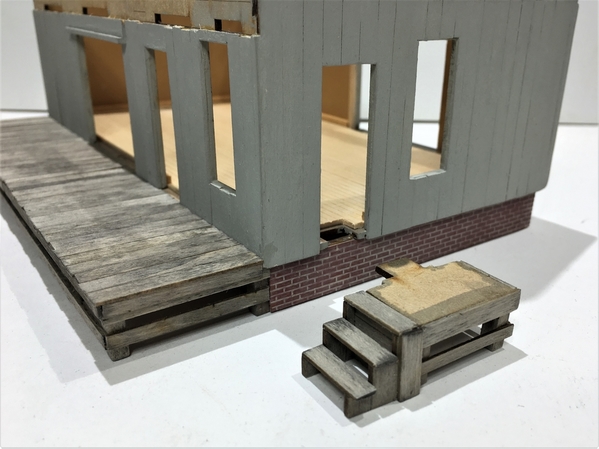
MELGAR_2019_1221_WAREHOUSE_060C_FOUNDATION_PORCH

Next steps will be:

1) Attach porch to building, complete flooring inside door, install porch planking

2) Paint and assemble doors, windows, glazing, frames and attach to model

Photos by:

MELGAR

Attachments

Images (7)
  • MELGAR_2019_1221_WAREHOUSE_048_MORTARED_BRICK_PORCH_PARTS
  • MELGAR_2019_1221_WAREHOUSE_049_PORCH
  • MELGAR_2019_1221_WAREHOUSE_051_PORCH
  • MELGAR_2019_1221_WAREHOUSE_052_PORCH
  • MELGAR_2019_1221_WAREHOUSE_060A_3RD_BRICK_FOUNDATION_SIDE
  • MELGAR_2019_1221_WAREHOUSE_060B_TWO_BRICK_FOUNDATION_SIDES
  • MELGAR_2019_1221_WAREHOUSE_060C_FOUNDATION_PORCH

Add Reply

Post

OGR Publishing, Inc., 1310 Eastside Centre Ct, Suite 6, Mountain Home, AR 72653
800-980-OGRR (6477)
www.ogaugerr.com

×
×
×
×
Link copied to your clipboard.
×
×