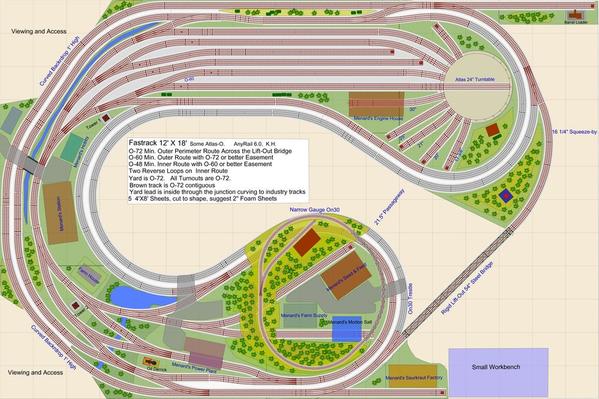
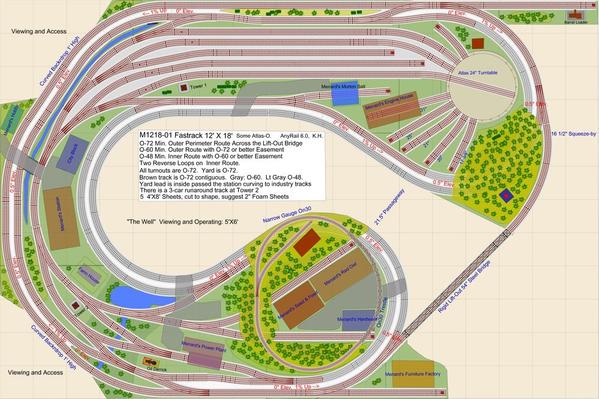
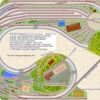
This latest includes a 3-car run-around in the industry area. This allows a bit of a switching puzzle: a challenge when pulling a short mixed-freight (about 7 cars) leaving the yard and around the inner loop a couple of times, and then pulling back onto the yard lead/industry serving track: removing the empties, consolidating the empties, serving the industries, and then leaving with the empties with the loco at the head end to go back around the inner-track a couple of times, and then pulling back into the yard.
Ken,
Very nice layout! I love the way you have tried so many options, tested and then worked through the issues sharing along the way. I have been toying with thoughts on how to combine an assortment of O, 072, and how to integrate a lot of HO track versus letting it sit or giving it away. I have an ON30 Bachman Climax and log cars that I want to build a sawmill from scratch and letting the climax be the worker. You have spurred a plethora of thoughts. I thank you very much for sharing.
BAMBAM in OKC
Thanks BamBam. Yeah, the Bachmann On30 trains are very impressive! In fact, after getting a couple of sets and locos, I shared my enthusiasm with my Brother who is in Denver (I am between Atlanta and Chattanooga) who has been modeling in "N", he built a layout for his buddy who runs an amusement center in Denver for display and for kids to run (when he is there to supervise). He is now building his third On30 layout!
I added a mountain and tunnel on the right end of the layout, connecting two hills previously planned. I think that it will add drama as the trains enter/leave the tunnel as viewed from the left end of the inside access area. And the wide curves on the O-72 loop will look cool against a rock wall, and will be one of the first focal points as visitors enter the layout.
Attachments
Wow, Interesting and busy layout plan. Thanks for posting.
Attachments
Man that layout just makes my heart go pitter patter. LOL Very, Very nice!
It looks like an interesting plan!
My only criticism is that it seems a little overloaded with turnouts--it might be worth a look to see if you can eliminate some of them and still get the operation and traffic flow you want, particularly with those runaround tracks. Make every turnout work for a living and earn its keep.
Just my $.02
Jeff C
What software was this made with.
I really like this layout. I wonder how much I would lose trying to shrink it to 12 x 14
Joker, this was designed with AnyRail, which is free to play with but for a large layout requires the license.
Shrink to 12 X 14: I am sure it could be done. You might have to accept some O-36 to make it fit, but I would do that as a last resort. Swap out some of the O-72 turnouts for O-60. Perhaps if the middle yard-lead track were eliminated, and the station (which is large) were eliminated, it would work. Of course the yard length would be shortened.
It would be easier if you can live without the access corridor on the left of the plan, then the project becomes easier.
Thanks BamBam and Jeff!
Looking at the turnouts, each is there for a specific feature. Turnouts are expensive - especially the Fastrack Command Control turnouts that I want to use (so I can switch them from my Legacy handheld).
We could save two turnouts by eliminating the 3-car runaround in the industry area. Save one by converting the powerplant siding to a spur. Two turnouts could be saved by eliminating the industries coming of the outer main line. Two turnouts eliminated by dropping the O-72 loop with removable steel bridge. That sort of thing... Each turnout removed also drops a feature.
I have about half the O72 turnouts needed, but they need to be upgraded to command control with the available kit. Then I will have to purchase the rest with a second mortgate on the house![]() .
.
Joker: I worked on an 11X17 version with Atlas O. Using O-45 and O-54 curves. It fits in 11X17 and still has the O-72 perimeter route with the bridge. If you want it, I can post it with the AnyRail file. I imagine the version with Atlas O could be compressed more. Also using tighter turnouts than the O-72 in the above plan.
if you could post it that would be great. See what I can do and still keep the 0-72 loop.
Here is the 11X17 plan with Atlas O track, with O-45 and O-54 minimums, and the O-72 route across the steel bridge. The AnyRail file is attached. I will be interested to see what you can do with it, please post!
I used three of the curved turnouts O-72/O-54 which helped save space, and are kind of cool.
Attachments
Ken-Oscale posted:Here is the 11X17 plan with Atlas O track, with O-45 and O-54 minimums, and the O-72 route across the steel bridge. The AnyRail file is attached. I will be interested to see what you can do with it, please post!
I used three of the curved turnouts O-72/O-54 which helped save space, and are kind of cool.
So the outter loop is 072.
Right George, the outer loop along the perimeter is all O72 minimum. You can kind of eyeball the curvature and compare the more gradual O72. The outer looping route is O54 minimum in a couple of places, but the parts of that route that are O72 are along the walls and across the bridge. I was able to bypass the less-than-O72 trackage with the O72-perimeter route. There are even some wider curves mixed in the perimeter-O72. So the O72-perimeter loop with bridge exclude parts of the O54 outer looping route. The sections of track that are both part of the perimeter-O72 loop and also the O54 looping outer-route are all O72 minimum.
You can see the difference on my 12X18 Fastrack layout above, everything that is brown track is O-72. The gray trackage is less than O-72. The equivalent sections of track limit the curvature on the Atlas version to less than O-72.
Having the additional route across the bridge that is O-72 doesn't allow for more trains to run at the same time, but it allows for O-72 locos on the layout, which otherwise would not have anywhere to run. I don't have any locos requiring O-72 at present, but you never know what might strike my fancy in the future.
Here is my latest version. The plan has matured to the point where changes are now small and minor, and I am quite happy with it. This version has a minor change in the angle where the O-72 route to the bridge on the far right, which led to each yard track being lengthened by about 2", and the turntable "whisker" tracks about 1.5 inches. Small changes, but still an improvement that did not compromise the aisle widths and access.
I have three possible locations for this, my "retirement layout": a garage bay; a "teen room" that can be re-purposed after my youngest goes off to college this fall (which is 11.5 X 19.5); and a new addition underneath a remodeled deck at the back of the house.
The far-left outside route has O-96 curves.
Attachments
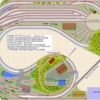
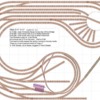
I am considering adding small elevation changes with 1% grades in order to make the scenery more interesting. To this point, all track has been on the tabletop at 0" elevation. I just returned from a trip to Denver where I took the train to Glenwood Springs through and over the "front range" of the Rockies. I realized that railroads climb gentle grades until they must pierce the mountains with tunnels. So this change below, includes 1% grades approaching and into the two tunnel areas on the double-track main lines, for an elevation of 0.5" (not much), perhaps enough to make the layout more interesting visually and for running trains. Also 0.5" elevation for the double-track mains near the station at the far left. So the main lines meet the lower levels at 0" elevation, and then climb up and then back down three times as the route is traversed. Elevations and grades are in RED.
What do you think? Is this worth doing - the visual effect vs the hassles?
Attachments
I was considering doing that on the design that I had talked about on my topic. I wanted to do two levels and you gave me some great advice with some other contributing as well. My thought was to have the second level 9 to 10 inches high, then to have the bottom level up about an inch so that I could do a dip or such to give some look of uneven ground or something like that, or even keep the track up but make the ground sink in spots. There is some track by me where the ground overall drops off about 8-10 feet gradually and the rails and bed are built up. Eventually they do have a bridge because the drop off becomes greater that 20-30 feet.
Thanks Dave. I also am planning for a shallow depression around the pond and its stream at the bottom of the layout, perhaps 1/2 inch scooped out of the foam base.
 This is the bridge I was talking about. Both sides have gradual drops in the surrounding land except for this larger dip. The ground on the right side of the picture comes back up for the overall elevation whereas the left side of the picture it is tapered sort of downhill in the background. This was one of the things I was originally thinking about on mine, but I am unsure if I would have a spot(but best to keep on the back burner) for it until I get some work done in the program. Always loved this bridge.
Attachments
subtle grade changes will make it more realistic. I wish I thought of that before I slapped a sheet of plywood down and nailed track to it.
I see what you mean Dave, that is an interesting effect. I have a place where the road climbs up to go over the tracks, perhaps it should go underneath. I will think about that.
terrain shaping is interesting. Forum member texas train wanted an approximation of his "as built" large layout. he has elevation changes from -4" to +16" in a 24' x 28'. However most of the grades are 1.9% or less.
Look at some of the 3D's and actual photos at the end.
So, you are about 1/2 of the size and have the restrictions of the track plan.
Does Anyrail have a 3D view? it looks to me like the outer edge runs could be at O, the yard and TT area at +4 and the city/industry area at +2.
That would keep the grades at ~2% and give a more dramatic view over the road bridges.
Can you select large sections of track and elevate all them equally - like add 4" or add 2" for what if's?
My point is that 1/2" changes aren't enough for the work required.
Oops. The switches off of the main in the Southwest and the switch to the spur in the Northeast are pinning down the transition. Oh well...
You have electronically nailed your track down. I suppose terrain shaping needs to be part of the Givens at the beginning.
Ken-Oscale posted:I see what you mean Dave, that is an interesting effect. I have a place where the road climbs up to go over the tracks, perhaps it should go underneath. I will think about that.
Yeah, I myself had never thought about the height differences in any layout I have set up, not even in my HO days. Sure I had the elevated trestle, but on a sheet of plywood it looks blah. I had made a mountain using a couple blocks of wood, a piece of balsa plyboard(I think it was) and crumpled paper painted white to simulate snow. It was amazing, I think I was 14 at the time.
I appreciate your thoughts Dave and Carl. One of my limitations would seem to be the type of construction - 2" thick 4'X8' foam for table tops. However, I could put all track on risers to allow terrain below track level. 2" high Woodland Scenics risers would be convenient and easy. I could use more of the 2" foam sheets for large areas like the yard that are on the same level. Something to consider, and I would not need grades to provide a terrain height difference.
Ken-Oscale posted:I appreciate your thoughts Dave and Carl. One of my limitations would seem to be the type of construction - 2" thick 4'X8' foam for table tops. However, I could put all track on risers to allow terrain below track level. 2" high Woodland Scenics risers would be convenient and easy. I could use more of the 2" foam sheets for large areas like the yard that are on the same level. Something to consider, and I would not need grades to provide a terrain height difference.
Ken,
I didn't know that this would sit on 2" foam. So, carving out the foam under the track for the road is feasible. Just do some shaping for the area around the road leaving the tracks at the 2" top of foam.
So,
I just messed around to create that area. O" height from center in to the two outside tracks at 2". Road underneath.
Attachments
Thanks Joe! Good suggestion on a TV in the room, make it more of a "man cave", with a mini-fridge under the layout.
I agree on the one area that is a long reach, the center of the yard which is about 3.5 feet. I have a short stepladder that I can use - climb up a step or two and lean out over the layout with my gut against the top steps. This works, but not comfortable for a long period, but certainly enough to plant trees or re-rail cars.
Man oh man, absolutely amazing layout. Nice job!
Thanks BamBam, I appreciate your comments. Its been a fun project to design this layout, and I appreciate the help and suggestions of the forum community - the layout is much improved and refined as a result!
I returned to this layout: I dropped-in an Atlas #5 cross-over to replace an O-72 crossover at the top of the plan. And I smoothed out a section that was O-81 just beneath the power plant with Atlas flex track for an even more gradual transition. And finally I updated some of the building images to more details building pics. And I put some trains on the tracks![]() .
.
This layout plan remains my retirement plan goal, but not for a couple years. I have one intermediate layout to build first, and a couple more years of work.
Attachments
Attachments
After reviewing Dave and Carl's discussion about raising the outside two tracks to the left in order to have a road (and a stream) dive underneath the tracks for a cool scenic look, I came up with this version. The tracks climb at 3% to 2.25" elevation, with the road dropping 1/4" down underneath the tracks.
This will partially hide the hobby shop on the other side of the mainlines, but this will be a nice touch. 3% grade is steeper than I would normally want for this kind of plan, but always trade-offs.
Attachments
Very nice, I have a plan very close to this, but like some of your ideas better. Would it be possible to export to another format besides AnyRail? I use SCARM and can't import that file. I'm having a hard time lining this up to the plan I have been redoing. I started with a different plan and half way through the build, thinking of redoing it to fit the basement better.
AnyRail exports to a variety of image formats, a pdf, a variety of 3D formats (usefulness I have not explored), and then to TrainPlayer and to JMRI - a format for PanelPro control. So it would seem that there are no useful formats for converting to SCARM or some other layout program. And of course the other direction is also true, SCARM and other layout programs don't export to AnyRail either.
If there is a particular portion of the layout that is giving trouble, I might be able to provide some detailed help, let me know. Though mostly FasTrack, there is some Atlas mixed in as noted, which might be throwing you off. -Ken
Hi Ken,
Thanks for the reply. I think the upper left curve is where I'm having issues (Similarly lower left curve). In my plan, I used all o-72 curves, but it looks like you put some straight in there and maybe some larger curves? If you export to PDF, does it print the track pieces on each piece? If not, maybe just any more detail on the curve pieces on the upper left, then maybe I'd get it.
Thanks again,
-Mike
Yes, a mixture of curvature. I work hard to avoid many of the short straight sections (that might be an easier way to close a curve).
I also try to have the broader-diameter sections at the beginning and end of a curvature (acting as easements), but as you can see, in this case it just was not possible to do this and make tracks line-up and connect within the tight tolerances that I prefer (3/32").
Attachments
OIC, this is great. I didn't realize you were using o-96 curves on the o-72 loop, that makes so much more sense. Thanks again!
I'm excited to get re-started, but it'll be a while, we are thinking about finishing our basement next year sometime, then I'd want to redo my train table. Always a process I guess.
-Mike
A couple weeks ago the wife offered (out of the blue) that I could build a small structure at the end of the drive dedicated to a train layout: 12x20 or 12x24. Isn't she great! Perhaps I will do that after I retire (perhaps two years) and if my health holds-up allowing a big project. We shall see.
Otherwise, I have a room in the basement that is almost 12 by almost 20 that I could take over, with its own bathroom and access to the pool. And then I have a number of other layout options I could work on, including my hanging layout that is 6'x12' over my Mustang in the garage (layout is un-sceniced and currently not operable). Right now, with work and questionable health, I am not making much progress in actually building anything, just doing the occasional track plan. And enjoying the Forum.
It sounds like you have many options and ideas. I love playing around with plans too and coming up with ideas. Some seem quite expensive, but so much fun. I pray that your health doesn't get in the way of everything you want to do.
My son (2nd grade), brother, and I love working on the trains together, such a fun hobby. It is fun to see so many people at train shows, just went to one over the weekend. I hope the hobby continues to stick around with technology trying to get in the way of hobbies.


