
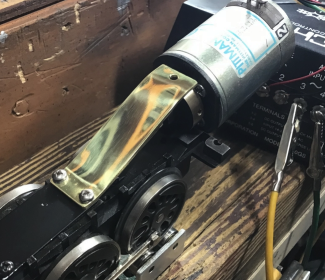
In my further attempt to level the playing field and get caught up, today’s task is to get as many Pulmor chassis swapped over to their new Pittman motors as possible….so today, we’ll venture out into the big shop to see what actually takes place, the tools I’ll use, the process to do the rough cuts, and the refinement to finally precision fit the Pittman…….Dennis’s 18056 (763) Hudson & Dave’s 18009 Mohawk are first up to bat,….naturally, we begin by stripping the Pulmor and all the electronics to prepare for cutting,….note as I take these locomotives apart, I’m looking at how well the chassis spins, back lash in the gear boxes, dried up nasty grease, and whatever else may need attention as we proceed for a smooth operating locomotive,……We need to cut off the Pulmor mount to make way for the Pittman, I’ve fabricated a sheet metal backer to protect the wheels as we begin the process,..4D8C1FD1-D96E-4FA5-A757-D76151AF487AF08C6E98-2C31-48B2-9FB1-2939DAC809DD9A727FE3-FB2B-4516-8BEC-48CDEB2D8FBA307A29A1-ECA8-41E1-A75B-5E3D5565519CB05DB9F3-0B54-4CB9-A0F8-7A37563A80F75AEB29B5-66D9-4A48-952E-3D410BD4CC99C41E0001-389D-4360-BB7B-4800F3B616861CBCF8F9-CE71-4743-91B9-120554C127E825714152-DAE5-4374-9AED-FD15D81509C26078FFD0-1CC1-49A9-AEE5-F8D288F97F8A83993763-4583-4C4A-9139-2C6BFD5652FDE1AD6D66-CE7A-46ED-B829-9F87436E529E5460C75B-01AE-424D-B7C9-849EF995CEEA…..we start with a cut off tool ( buckeye) then proceed with roloc grinders, and carbide bit tools to erase the remains of the mount,…the pics you’re seeing are of all the rough initial cuts, we’ll refine these cuts and square everything up with files, belt sander, a good old fashioned square, and an angle finder to set the pitch we’ll need for the new motor mount,…..stay tuned, enjoy the pics, and the process, I’ll update hopefully throughout the weekend,…

Pat

Attachments

Images (13)
  • 4D8C1FD1-D96E-4FA5-A757-D76151AF487A
  • F08C6E98-2C31-48B2-9FB1-2939DAC809DD
  • 9A727FE3-FB2B-4516-8BEC-48CDEB2D8FBA
  • 307A29A1-ECA8-41E1-A75B-5E3D5565519C
  • B05DB9F3-0B54-4CB9-A0F8-7A37563A80F7
  • 5AEB29B5-66D9-4A48-952E-3D410BD4CC99
  • C41E0001-389D-4360-BB7B-4800F3B61686
  • 1CBCF8F9-CE71-4743-91B9-120554C127E8
  • 25714152-DAE5-4374-9AED-FD15D81509C2
  • 6078FFD0-1CC1-49A9-AEE5-F8D288F97F8A
  • 83993763-4583-4C4A-9139-2C6BFD5652FD
  • E1AD6D66-CE7A-46ED-B829-9F87436E529E
  • 5460C75B-01AE-424D-B7C9-849EF995CEEA
Last edited by harmonyards
Original Post

Replies sorted oldest to newest

That mount looks great Pat.

What connects to the shaft, can you use the original driveshaft?

John, I was using the dog bone and coupler approach, until I discovered these RC car driveshafts in solid steel, with steel universals,….further making these swaps bulletproof,…..I did a write several months back when I discovered these driveshafts were available in 4mm ID, ….kinda makes it a no brainer,…the only thing I “upgrade “ on these driveshafts is to tap the set screw holes from 1.5mm to  a healthier 4-40 set screw,…..these shafts are available in a dizzying array of lengths,….very smooth shafts ….

Pat 9EDA660A-DDC7-4A9C-A228-E0DDD2CA73B2

Attachments

Images (1)
  • 9EDA660A-DDC7-4A9C-A228-E0DDD2CA73B2

Those are much nicer than the dogbones, nice upgrade!

I was impressed when they showed up, kinda had my doubts about the quality, but for what we’re doing, they’ll outlast all of us,…as mentioned, the only thing I didn’t like was the super tiny set screws they supplied, easy enough to just jam a 4-40 tap in there and oversize them…..😉

Pat

@leapinlarry posted:

I love this mini series, Tales from the Harmon Shops”, it’s a fun to read analysis of how to really upgrade our steamers with a Pittman motor and a very reliable steel drive shaft, therefore giving new life, new power for these fun to run trains. Thank you Pat, Happy Railroading Everyone

Larry, won’t be long till you see the shops first hand …..no??….you’ll get the 4 cent tour,…( we’re always shy a penny here and there ) 🤣🤣🤣

Pat

..

@harmonyards posted:

Dave’s 18009 Mohawk now sports a fancy new mount for the Pittman motor,..after machining the parts, the back end of the chassis gets treated in a blackening bath for that factory look. When I’m  done installing the Pittman in Dave’s Mohawk, it’s off to Alex M for further upgrades,…..

Pat 4DB0A24E-8AAE-4C8E-91DE-CDF9C3A6B048B6D13934-BAA7-4546-BC2A-1391B60685C30C17CC40-4C22-4A69-B68C-E9DA7B899E7C

Woohoo! Sorry, been a busy day for me this weekend so far. Ran around just afternoon, messaged Pat as a smiled at this thread showing up, went to the store, picked up some good stuff to eat, and just got an even more busy afternoon. No train stuff happened unfortunately, but seasoning of pork chops. Finished eating a bit ago, enjoying a Guinness while watching yesterday's preseason Steelers game. I happy I waited to read this until now.

It's great to see all the work that is going on, and Pat's workbench. Sort of reminds me of my late Uncle Eddie's shop were any number of things would be worked on, motors and such, but no trains.

You know what, speaking of Uncle Eddie, I feel that Pat, Alex, and others that do all these fantastic pieces of work probably have the same type of work like my uncle where some of the parts the were in originally in, somehow get set to the side and the engine works better. Yeah, I know that sounds somewhat silly because that is what is happening in most if not all of these projects, but my uncle would take things apart, and when it was put back together he had leftover parts. He'd operate whatever it was and it worked better. He told me that on two occasions, when was an old car he had where he had taken the engine apart, the other was my first car though that wasn't fully ripped apart, just something removed.

I can't wait to see more(sorry if I'm rambling, just so excited).

@leapinlarry posted:

Yes Pat,  I have the money ready ( 4 cents) for the upcoming visit  to  your part of the USA  in September, and it will be a September to remember. I’ll be in touch with your shops next week. It’s going to be a lot of fun. I look forward to seeing your fabulous layout.  Thank you very much. Happy Railroading Everyone

Sounds good Larry, we’re looking forward to seeing you and Ms.Sue, having a good meal and running some trains,….😁😁😁

Pat

@RSJB18 posted:

Love to watch a master at work!

Pat- Would a PWCC B-6 0-6-0 be worthy of an upgrade? I'm thinking about swapping the electronics for the Third Rail ERR stuff. I can handle the wiring work ( I think) but I don't have all the goodies to do the mechanical. She's a sweet engine but the AC motor is somewhat of a non-starter.

2018-12-08 08.11.40

That’s too funny, my good buddy Lou ( Lou1985 ) and I were just talking about swapping one of these out,….we’d have to go to an 8000 series Pittman, due to the limited room, but it can be done,…..but first, I need to get caught up on what’s already here,…..you can get a hold of me anytime via profile and we can begin the brainstorming process whenever you’d like,…

Pat

@harmonyards posted:

That’s too funny, my good buddy Lou ( Lou1985 ) and I were just talking about swapping one of these out,….we’d have to go to an 8000 series Pittman, due to the limited room, but it can be done,…..but first, I need to get caught up on what’s already here,…..you can get a hold of me anytime via profile and we can begin the brainstorming process whenever you’d like,…

Pat

No rush.... just daydreaming......

@LLKJR posted:

When I saw the pictures of the air tools and the frame removal, my first thought was, “I hope this guy knows what he is doing.”

Yes, you do!

Great job!

Larry

Thanks Larry,…I wouldn’t dream of doing this on somebody else’s stuff unless I was confident….I’ve done this on dozens of my own, and dozens for other folks,…but believe me, ….many many years ago when I did my first one, after I made the first cut,..my thought was “ what have I done!.” but, I spent the time perfecting the job, and engineering the install to a science, and that first one I built,  now has well over 1000 hours of run time on it,….and still is one of the smoothest running machines in the arsenal,…😉

Pat

@harmonyards posted:

Thanks Larry,…I wouldn’t dream of doing this on somebody else’s stuff unless I was confident….I’ve done this on dozens of my own, and dozens for other folks,…but believe me, ….many many years ago when I did my first one, after I made the first cut,..my thought was “ what have I done!.” but, I spent the time perfecting the job, and engineering the install to a science, and that first one I built,  now has well over 1000 hours of run time on it,….and still is one of the smoothest running machines in the arsenal,…😉

Pat

👍👍

I have rudimentary skills with lathes and metalwork that I have learned working on my classic cars, but it would take some effort to master the finite precision your doing on these units Pat. 

Now if you want a drill bit flushed out to 20", a home wood burning stove fabricated and welded or a house framed, I have those skills.

Just out of curiosity, are these sort of upgrades feasible on K-Line's scale Hudson and Berkshire? I hear their motors are sort-of underpowered and prone to conking out under heavy loads. I have one of each (bought new when they first came out), and while I haven't even gotten around to running them, it's something to keep in mind for the future.

(but in the meantime, if they ever get their turn on the "test-track" in stock form, I'll configure lightweight, easy-rolling trains for them since I already have stump-pullers that can handle as many cars as the loop will allow).

---PCJ

@RailRide posted:

Just out of curiosity, are these sort of upgrades feasible on K-Line's scale Hudson and Berkshire? I hear their motors are sort-of underpowered and prone to conking out under heavy loads. I have one of each (bought new when they first came out), and while I haven't even gotten around to running them, it's something to keep in mind for the future.

(but in the meantime, if they ever get their turn on the "test-track" in stock form, I'll configure lightweight, easy-rolling trains for them since I already have stump-pullers that can handle as many cars as the loop will allow).

---PCJ

Yes, I do the Kline scale Hudsons and scale Berkshires as well,…

Pat 77094ABC-9B01-41E8-9995-3C74D386F59F30D75713-1FD9-45C9-8F1E-6CB2BC95F336

Attachments

Images (2)
  • 77094ABC-9B01-41E8-9995-3C74D386F59F
  • 30D75713-1FD9-45C9-8F1E-6CB2BC95F336
@RailRide posted:

Just out of curiosity, are these sort of upgrades feasible on K-Line's scale Hudson and Berkshire? I hear their motors are sort-of underpowered and prone to conking out under heavy loads. I have one of each (bought new when they first came out), and while I haven't even gotten around to running them, it's something to keep in mind for the future.

(but in the meantime, if they ever get their turn on the "test-track" in stock form, I'll configure lightweight, easy-rolling trains for them since I already have stump-pullers that can handle as many cars as the loop will allow).

---PCJ

I've done the swap on a K-Line Berkshire: K-Line/Lionel/MTH Berkshire hybrid | O Gauge Railroading On Line Forum (ogaugerr.com)

You need the entire chassis from the Lionel Legacy version from 7-8 years ago. Literally everything else from the K-line chassis bolts onto the Lionel chassis (rods, valve hanger, cylinders, pilot, trucks, etc) so you just need the chassis and worm shaft from Lionel. There is no provision for the puffer smoke unit from K-Line in the Lionel chassis, so switching to fan smoke is required. Pete @Norton was the first to notice the similarities between the chassis. Pat @harmonyards was able to set up a 9433 Pittman to fit the chassis. It's an involved swap but mostly bolt in.

@harmonyards posted:

Dave’s Mohawk now sports a Pittman driveline, it’s about ready to head to Alex M. after reassembly and some road testing …..testing on the rollers is super smooth,…we’ve set up Alex with this nifty bracket for him to mount GRJ’s chuff sensor, and a good place to route wires away from the spinning flywheel,…

Pat 1900D54D-DEAD-492C-B619-EA6162099F97E27D239C-AE2C-4394-9810-85A7EC608537

Wow, awesome Pat.

@harmonyards posted:

we’ve set up Alex with this nifty bracket for him to mount GRJ’s chuff sensor, and a good place to route wires away from the spinning flywheel,…

Since the Chuff-Generator has to have the sensor facing the flywheel, I'm having trouble seeing how this works for mounting it.  Perhaps you can explain what's intended here.

Attachments

Images (1)
  • mceclip0

Since the Chuff-Generator has to have the sensor facing the flywheel, I'm having trouble seeing how this works for mounting it.  Perhaps you can explain what's intended here.

There’s plenty of “gap” between the bracket and the flywheel,……he can mount your sensor  on the underside of this bracket, so the sensor is facing the flywheel, and bend the bracket as needed for the sensor clearance ,……easy peasy,….I’ve done it on these models a bunch where roof top clearance is a premium …..

Pat

Add Reply

Post

OGR Publishing, Inc., 1310 Eastside Centre Ct, Suite 6, Mountain Home, AR 72653
800-980-OGRR (6477)
www.ogaugerr.com

×
×
×
×
Link copied to your clipboard.
×
×