
   I acquire a basket case Lobaugh Berkshire.  Since this kit was produce more that 70 years ago it has never been completed.  Many owners have done awful things to it.  It was covered in enough solder to build a dozen locomotives.  Later someone tried to epoxy the tender together with predicable results (It was applied with the philosophy that If too much epoxy didn’t work more should do the trick). Half inch-thick blobs of solder and epoxy were used to attach the air tanks and the feed water heater.  The mechanism could not rotate a full revolution and after examining the gear box (no gear wear) this locomotive has never run.  Add thick grease and grime on every surface and missing parts and we’re got a very challenging restoration project. 

  The first thing to do was disassemble everything.  Each part had to have solder and epoxy removed and then a thorough cleaning

   The first step was to blind the center drivers and make new steel tires for the first and 4th axel.  There were many issues to resolve (driver quartering, crank pins that were too short, axel slots too tight, and crank pin covers that took the play between the crank pins and the side rods).  The photo below shows the reassembled mechanism with the new tire on the first axel.

The cylinders are already primed.  Someone had ground the sides of the cylinders down below the level of the cylinder caps to remove voids in the casting.  Bondo was used to add the thickness back to its correct level. 0.005 soft sheet brass was glued over the Bondo and then the cylinders were primed.  

   The engine had been dropped at some point and the pilot was cracked.  A new precision scale pilot soldered in its place

The original motor was a universal motor and wanted a DC motor.  I used an old 9000 series Pittman I bought on Ebay


The front and rear trucks were rebuilt with new 3 rail wheelsets.  Some of the sand casting had "soft" details.  They were cleaned up and additions details were added.


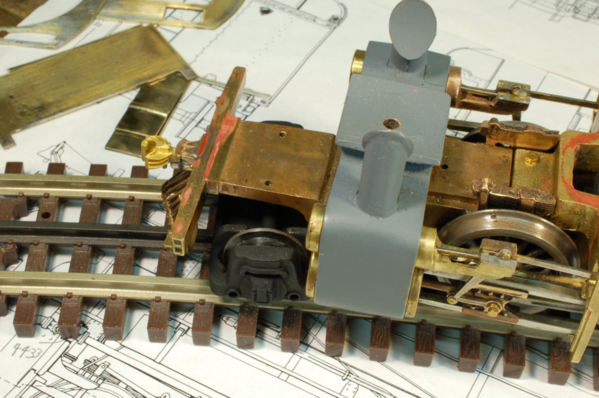
The mechanism has been bench tested and rotates smoothly now (This was a lot of work).  Below the mechanism is shown on a section of 072 track.  The only significant modification was to move the front truck pivot point forward 1/8" to clear the cylinders.  I also had to move the new pilot forward 1/8" to accommodate the truck.  I don't feel that this is a compromise since the drawing of this locomotive in MR show that the distance from the cylinder front to the pilot was nearly 1/8" short on the model.


That's it for now.  I will start on the boiler and cab next

Attachments

Images (10)
  • mceclip0
  • mceclip1
  • mceclip2
  • mceclip3
  • mceclip4
  • mceclip5
  • mceclip6
  • mceclip7
  • mceclip8
  • mceclip9
Original Post

Replies sorted oldest to newest

Be sure the mesh is correct.  The Lobaugh gears are very smooth and will last forever if your mechanism rolls free, and the mesh is correct.

The newer NWSL gearboxes have plastic cases, instead of glass-filled plastic, and need some rework to function at all.  I think it was a #D drill with wrapped sandpaper that re-formed the area that clamps the axle bearings.

New owners are very nice folks, but there are a few things that are not the same.

Lobaugh gears came with several ratios- you could have fast and coasting, or slow and steady.

If I didn’t already have eight Lobaugh Berks, it would kill me to see those drivers get blinded.  I am much more relaxed now.  Have fun!  Don’t use a torch on the tender.

I ran the Berk on the Angel's Gate HiRailers layout today.  No derailments and the Berk is a very smooth runner.  This is first time since this kit was manufactured 70 years ago that it has actually run on a layout.  The boiler has been cleaned of its solder and epoxy and is mounted to the frame.

I've got an old tender frame with an ERR driver board on it that I use for testing my projects.  

Next is soldering the cab back together and mounting it to the boiler.

Attachments

Images (2)
  • mceclip0
  • mceclip1

This seems like the ideal place to show you my Berks.  I note that nobody has responded for the better part of a day, so I am sure I won't be boring anybody.  

Here is a 3-rail Lobaugh Berk - converted with a Williams Mike mechanism.   These mechanisms ought to be a dime a dozen; when the price goes above $300, I am dumping mine.  Nice, but not quite up to standards.  I did no boiler work; hence the crooked air pump.  But a nice Berk anyway!Lobaugh Williams 012

Attachments

Images (1)
  • Lobaugh Williams 012
bob2 posted:

This seems like the ideal place to show you my Berks.  I note that nobody has responded for the better part of a day, so I am sure I won't be boring anybody.  

Here is a 3-rail Lobaugh Berk - converted with a Williams Mike mechanism.   These mechanisms ought to be a dime a dozen; when the price goes above $300, I am dumping mine.  Nice, but not quite up to standards.  I did no boiler work; hence the crooked air pump.  But a nice Berk anyway!Lobaugh Williams 012

You know, "bob2", you are so funny: you often write stuff like "I am sure I won't be boring anybody" when you are one of the great builders of O scale engines ( as you would say..."opinion" ) and have a fabulous collection of models that I'm sure a lot of us never get to see, at least in person...

FWIW, I am never "bored" by what you show. 

Mark in Oregon

bob2 posted:

This seems like the ideal place to show you my Berks.  I note that nobody has responded for the better part of a day, so I am sure I won't be boring anybody.  

Here is a 3-rail Lobaugh Berk - converted with a Williams Mike mechanism.   These mechanisms ought to be a dime a dozen; when the price goes above $300, I am dumping mine.  Nice, but not quite up to standards.  I did no boiler work; hence the crooked air pump.  But a nice Berk anyway!Lobaugh Williams 012

I'm trying to deal with the idea that you have *anything* 3-rail in your collection. Makes my head hurt.
Having said that, the idea of using a Williams Mike mechanism sounds pretty cool. I'd be interested in an exposition of how you accomplished this. E.g. what did you do for a tail beam? I have a Berk languishing in my do-do box...
Regarding Dave's conversion. For him, the idea is the challenge, in particular, developing the technique to machine driver tires. Perhaps Dave will also show how he upgraded the clunky smokebox front.


No - that 3-rail Berk was done for a fellow forum member.  My remuneration was getting to keep the Lobaugh mechanism.  The Berk mech makes a perfect SP Mikado frame!

I forget what we did for the tail beam.  As you know, most 3-rail steamers cannot have a tail beam or full size cylinders.  It is a problem due to the "O72" expectations.

I do have a 3-rail model.  See the tinplate forum expose' on Lionel 227 switchers.

No NKP, but I do have a C&O Berk.

I have to admit - a lot more interest here in my work than on the 2-rail forums.  I have somewhere in the neighborhood of 30 completely scratchbuilt steam models around here, and enjoy posting photos of them.  I consider these Berks as kit-built, even though that haystack tender is scratch.

I did not start until I was 44 - but then, I was always a late bloomer.  Model #1 was a steel boilered MM-2, an SP "Back-up Malley" (Mallet).

Thanks for your interest.  I will be following this interesting Berk conversion.

Very cool! I have a Sunset N&W J from ~1980 that I am 3 railing. As far as assembly goes, it's complete and gorgeous, but I'm working on blinding the middle two drivers. I'm also making small modifications to the model as Sunset missed a few things here and there and also included details from various batches of the J. Great work you've done that inspires me to keep going on my project!

Wow, talk about good timing!

I just received in the mail a pack of older "O Gauge Railroading" magazines.

The earliest issue is Run #112, from August 1990. On page 26 is a 2 page spread by one Bob Turner, titled "2-Rail Locomotives And 3-Rail Track". The photo at the bottom of page 26 is captioned "This Lobaugh Berkshire has been converted to run on 3-rail Gargraves track". 

Bob, do you still have this model, and if so, how about a picture? 

Mark in Oregon

No - as I recall, I just mounted the roller and off it went.  My 3-rail track is Gargraves, with 60" radius (O-120) and no switches.  At the time, I had the unmodified 700 cars and a scale flanged, but not 2-railed 763 Hudson.

I think the easy way to 3-rail an early Sunset J would be to find a Williams J and marry the two.  Sell the 2-rail child and keep the 3-rail.

bob2 posted:

No - as I recall, I just mounted the roller and off it went.  My 3-rail track is Gargraves, with 60" radius (O-120) and no switches.  At the time, I had the unmodified 700 cars and a scale flanged, but not 2-railed 763 Hudson.

I think the easy way to 3-rail an early Sunset J would be to find a Williams J and marry the two.  Sell the 2-rail child and keep the 3-rail.

I'd like to keep the 2 rail flanges. Also a lot cheaper than buying another engine. 

True.  Consider just sanding the flanges off.  Be careful where the abrasive dust goes - you might be able to mount the mechanism upside down, arrange some masking tape barriers, and simply bring a rotating sanding drum to bear.

I two-railed a Lionel B6 that way - cut off the tires, then mounted the running mechanism on my milling machine table, put a sanding drum in the headstock, and presto - ready for scale tires both sides.  I normally use a lathe, but was worried about 75 year old zamac drivers.

The original boiler front is a sand casting and details are lacking

I put the casting in a lathe and turned off most of the details.  Nut bolt washer casting were used to replace the "bumps" on the edge of the boiler front.  Lost wax boiler dogs, bell bracket and hinges were added.  

The red Bondo filler was used to fill in some of the rough spots in the sand casting that were too deep to turn off with the lathe.  I now need to make a head light bracket.

  The cab is occupying most of my time now and its giving me fits.  The front wall of the cab does not match the boiler contour very well.  I will make a card board template of the with the correct shape and then cut a new sheet brass front that fits better. 

Attachments

Images (3)
  • mceclip0
  • mceclip1
  • mceclip2
Dave AGHR posted:

The original boiler front is a sand casting and details are lacking

I put the casting in a lathe and turned off most of the details.  Nut bolt washer casting were used to replace the "bumps" on the edge of the boiler front.  Lost wax boiler dogs, bell bracket and hinges were added.  

The red Bondo filler was used to fill in some of the rough spots in the sand casting that were too deep to turn off with the lathe.  I now need to make a head light bracket.

  The cab is occupying most of my time now and its giving me fits.  The front wall of the cab does not match the boiler contour very well.  I will make a card board template of the with the correct shape and then cut a new sheet brass front that fits better. 

Ok, Silly question time. Are the NBW Brass or Plastic castings? IF brass where did you acquire them?

seaboardm2 posted:

I have a question for you.These locomotives you built do you have operating headlight and smoke units?And how many boxcars can the pull?Where I live in n.c.The local t.v. station had a show called carolina camera.When I was a kid.One man had built model trains from scratch.He had a double header pulling a hundred car freight.

Id bet with the good sized Pittman motor, and a boiler weight, that berk will be a real stump puller...….of course track radius and grades factor the tractive effort of any model, but again Id bet it could pull a long, long train on straight and level track with generous curves.....lets hear what Dave has to say on this matter, that's just my two cents!

Last edited by harmonyards
harmonyards posted:
seaboardm2 posted:

I have a question for you.These locomotives you built do you have operating headlight and smoke units?And how many boxcars can the pull?Where I live in n.c.The local t.v. station had a show called carolina camera.When I was a kid.One man had built model trains from scratch.He had a double header pulling a hundred car freight.

Id bet with the good sized Pittman motor, and a boiler weight, that berk will be a real stump puller...….of course track radius and grades factor the tractive effort of any model, but again Id bet it could pull a long, long train on straight and level track with generous curves.....lets hear what Dave has to say on this matter, that's just my two cents!

Here is my mth rail king C&O berkshire pulling 41 boxcars.And here one of my mth railking mountain type pulling freight.

I haven't tested the Berk to see how many cars it can pull.  I don't have the tender assembled yet.  Brass boilers usually don't add much weight to a model.  The Lobaugh boiler is 1/16 thick which is much more than most brass models but its still not that heavy.  The mechanism however is very heavy.  The locomotive frame is made from a single piece of sand cast bronze.  Add solid bronze  cylinders, cast iron drivers, 1/4" steel axles, a 3" long 9000 series Pittman and this mechanism is very heavy.  Given the weight of the mechanism I won't need to add a boiler weight. 

Bob Turner has 8 Berks.  Perhaps he's tested his with a long string of cars.  Bob?

Add Reply

Post

OGR Publishing, Inc., 1310 Eastside Centre Ct, Suite 6, Mountain Home, AR 72653
800-980-OGRR (6477)
www.ogaugerr.com

×
×
×
×
Link copied to your clipboard.
×
×