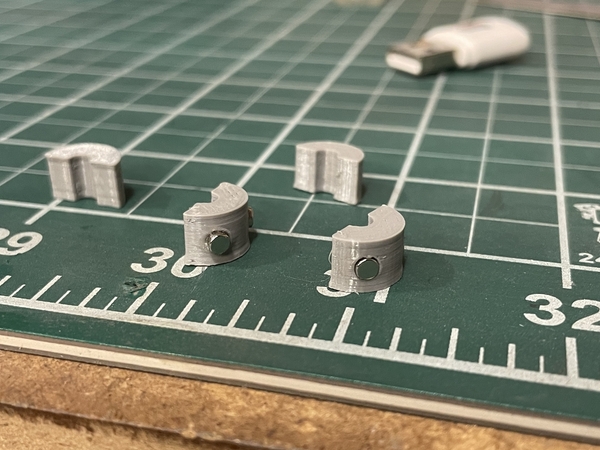
I have finally gotten around to getting my first 3D FDM printer, a Creality Ender 3 Pro. I really wanted to create simple parts, mostly adapter plates and other items that would be mostly used for my engine and rolling stock projects. Things like Kadee adapters, pickup roller mounts, etc. that would help make my projects more consistent. One item I thought would be useful in the future would be an axle mounted magnetic chuff generator. I built this one in two halves and made it so I could embed perfectly spaced 3mm magnets that a reed switch could pick up for chuff input to my RS boards. This was made for a 4mm axle but could be easily adjusted for any size. The outer diameter could be adjusted for internal clearance or to aid the reed switch pickup. This was meant for a locomotive axle so I can get 4 chuffs synched to crosshead/crankpin position (I am obsessed sorry) but could be also used on a tender axle by only populating two spots 180 degrees out. On an axle with a lot of lateral slop, the width of the cam could be adjusted and the magnet inserts could be changed to host square or rectangular mini magnets.

I was very anxious to try this little project as I thought it would be a great way to break in my new printer. I doodled up the design in Tinkercad and used the Creality slicer software to make the gcode. I had a few rough shots before playing with the bed height, nozzle temp and brim support. The bed height and brim support helped get the Z axis height correct. If you notice the first attempts were kinda squashed (middle pic). I also embedded the magnets a bit deeper in Tinkercad. If anyone's interested, I can put up the .stl file or share it on Tinkercad.

Youtube tutorials on Tinkercad modeling and the Ender setup were of immense help.

I am almost overjoyed with the possibilities. I have another 3RS brass steam project on deck (another 3rd Rail Q2 has found its way to me) so I will definitely be using this quite a bit in the near future.

58DFFD9F-85AF-4A0C-9403-29FAA4BD2A829D4CC304-E40C-433B-AC93-6CE72816A6694233F6B0-73CB-47B1-B797-FF6CC4C37162

Attachments

Images (3)
  • 58DFFD9F-85AF-4A0C-9403-29FAA4BD2A82
  • 9D4CC304-E40C-433B-AC93-6CE72816A669
  • 4233F6B0-73CB-47B1-B797-FF6CC4C37162
Last edited by Norm Charbonneau
Original Post

Replies sorted oldest to newest

I have yet to try it so it could be a total fail at this point. The idea is to adjust the reed switch position so as not to pick up a false chuff like you’d do with any other setup. Magnet spacing could be adjusted with tweaking the outer diameter of the cam. The other option is to use a Hall effect sensor. I’m always charmed by how well reed switches work.

Making the part itself was a great way to play with Tinkercad and to get the printer set up. Lots of stuff to play with and discover.

Smaller magnets, Hall effect sensors, 3D printed parts that take 10 minutes to produce, there’s nothing insurmountable here. I have been collecting reed switches in different sizes for a while now. I suppose one could print 4 lobe cams for microswitches too.

Do you have a 3D printer? I can post the .stl and you can give it a try as I’m not sure when I will get to. This part was just to do the initial printer setup and prove out the cad to real part pipeline.

Last edited by Norm Charbonneau

Norm, before I decided that optical sensors were easier and was still using reed switches I discovered that the magnet did not need to pass by the glass envelope with the reeds but that the leads were steel and a magnet passing by a lead could close the reeds.  I am not sure if this is the case on all reed switches but it was on all I ever bought.  I did all sorts of shaping of the leads to adjust the timing of the closure of the reeds from bending them into a U to twisting them into a spiral or even an L shape . These configurations allow for a very sharp rise and fall of the magnetic field. One configuration I liked was the L where the magnets circular path was tangent to one leg of the L and you cut the length of the leg to adjust the duration of the closure.  The reed switches can even be anthwartship between two wheels on an axle with magnets passing by both leads.          j

Do you have a 3D printer? I can post the .stl and you can give it a try as I’m not sure when I will get to. This part was just to do the initial printer setup and prove out the cad to real part pipeline.

I don't have a 3D printer, I've been avoiding that as another giant time sink that I can't afford to get involved in!   Besides, I happen to have a product that I use for the task, the Chuff-Generator.

John, I like your board but quit using it because I kept getting inconsistent chuff rates. It just wasn’t worth the hassle and cost after awhile, sorry.

In any case I think you guys have sort of missed the point of this first exercise. I needed a first part to run through to completion to test the setup of the printer and to see what a simple design might look like once brought to fruition. I consider it a success even if the part serves as nothing more than a magnet holder. This will be one of many parts I plan on using for my DIY projects.

@BillYo414 posted:

Are those stock magnets that come with an upgrade kit? Or could you use smaller magnets if you needed to?

I think this is a great idea for a print though. No doubt about that.

There are quite a few different magnets out there nowadays. The ones I used here are pretty close to what you’d find in an ERR kit. The cams could be tweaked very quickly to host any size or shape available.

There are quite a few different magnets out there nowadays. The ones I used here are pretty close to what you’d find in an ERR kit. The cams could be tweaked very quickly to host any size or shape available.

I really like the idea of making a holder like this. It would almost be like the old magnets on the axles of older 3rd rail models like the Mercury and Santa Fe Texas.

I have also had this idea. Similar to Norm I have printed mine, but instead of using magnets I am using them with a cherry switch. I had my buddy print them up in resin.


unknownDA5186EB-8B5F-4D44-807E-5180719D9738

I may try something like this for my older Lionels like my J1a that had the nylon two-lobe cam. The nice thing about these parts is that you could adjust them to synch the exhaust with crankpin angle.

John, I like your board but quit using it because I kept getting inconsistent chuff rates. It just wasn’t worth the hassle and cost after awhile, sorry.

WOW, I don't know how that happens.  As long as the tach sensor spacing is right, the chuff rates should be rock steady.  No need to be sorry, if it doesn't work for you, then it's clearly not worth the money.

Sid, I am on a side quest to get all my engines to a proper synched 4 chuffs whenever they come into the shop for maintenance. I’m hoping these 3D parts will help. I made the decision to get a printer after making my last scrap styrene Kadee drawbar on the 5011 Class project. I want better looking parts even if they won’t be seen. Lots of other stuff to make too - roller mounts, truck bolsters, board mounts, speaker adapters and maybe even housings. Watching the first print materialize got me pretty stoked!

There are quite a few different magnets out there nowadays. The ones I used here are pretty close to what you’d find in an ERR kit. The cams could be tweaked very quickly to host any size or shape available.

I have used McMaster Carr to get some pretty tiny magnets for holding doors closed. I was just curious if the ones you have are stock in case you needed to go smaller because of space restraints.

Sid, I am on a side quest to get all my engines to a proper synched 4 chuffs whenever they come into the shop for maintenance. I’m hoping these 3D parts will help. I made the decision to get a printer after making my last scrap styrene Kadee drawbar on the 5011 Class project. I want better looking parts even if they won’t be seen. Lots of other stuff to make too - roller mounts, truck bolsters, board mounts, speaker adapters and maybe even housings. Watching the first print materialize got me pretty stoked!

Yeah Bruk has been printing shields for the boards we use for a while and the smoke unit funnels as well. I look forward to using 3D printing more as well. I'm working on printing a full tank engine as well. Lots of things can be done with a printer.

Add Reply

Post

OGR Publishing, Inc., 1310 Eastside Centre Ct, Suite 6, Mountain Home, AR 72653
800-980-OGRR (6477)
www.ogaugerr.com

×
×
×
×
Link copied to your clipboard.
×
×