That looks nice, good job and great idea on the felt, We had used white for our little christmas layout. Nick
jjmagoo:
My layout was built for my 6 year old daughter and 1 year old son. The money is a very real concern and you can rapidly sink a small fortune on even a fairly compact layout. One thing I like about my layout is that I was able to build it in stages. I started with a basic Santa's Flyer starter set. From there I added the figure 8 expansion set. The next phase was to add the big O72 curves on the left, the X45 cross and the two remote switches. The individual pieces are pretty affordable. The switches are especially expensive and they were the only two parts I wound up buying on e-Bay. I got lucky and won both from the same seller which saved on shipping. Even then it was only ~$20 cheaper than my local train store. The final phase was the elevated return loop. Nice part here is that I could use manual switches which are MUCH cheaper. The lower switch is right at the side of the track and the top switch while out of reach doesn't really need to be activated since it's on a return loop.
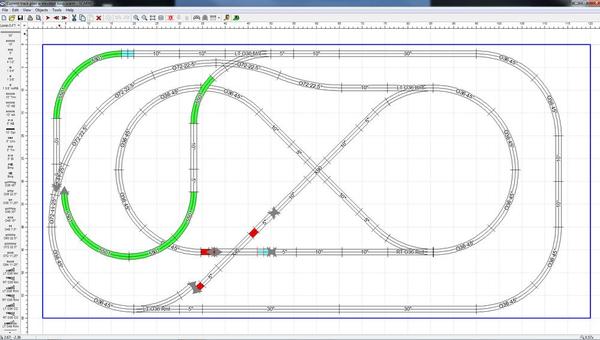
Below I've pasted an updated track plan. The red pieces are 1 3/4", blue are 1 3/8" and green are the O31 curves. It doesn't match up in SCAR but does in real life. This weekend I threw out the felt and laid down a layer of green paint I found on the left over paint shelf at Home Despot for $4. Reasonably grass like and I'll add some proper turf cover in due time. I also finally found some Structolite. None of the big box stores in Seattle carry it but the local gravel store did. Bonus is they were able to sell me a 10 pound mini bag for $5. I also drilled holes and routed all the wires under the table. Next up is applying Structolite and FusionFiber to the remaining pink foam mountains and making more wood trestles.
Attachments
Going to work on my version.. this weekend . Tomorrow if we get snowed in.
I will post some pictures once I figure out how to do that!
The ideas in this thread with the foot print I have, have given me a definite plan.
Thanks to all who have contributed.
Well after getting 36" of snow on Friday night and the city still in a travel lock down.
I went to work on the layout.
Thanks to everyone here.
I have the outer loop 17' x 4' and the inner reversing loop done off the crossover.
I decided to go with a elevated return loop similar to SeattleSup.
ran a couple test and looks good.
Looks like I can have sidings for 6 trains. 4 freight and 2 passengers.
working from home tomorrow so back downstairs for a little while.
I'm running this off 2 power drops now but have placed about 6 terminal tracks around both loops and will add at least one to the elevated return.
better to have more than not enough I guess.
bptbill
dblackw;
Look 3 posts up from yours, Scarm list of parts is there.
Scarm is a free layout software you can download.
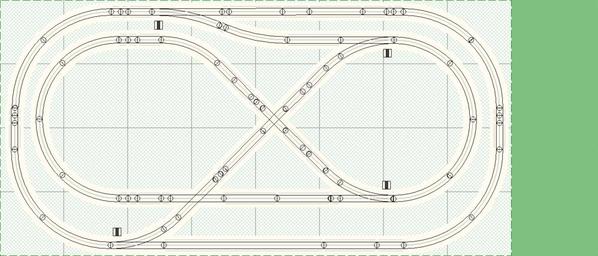
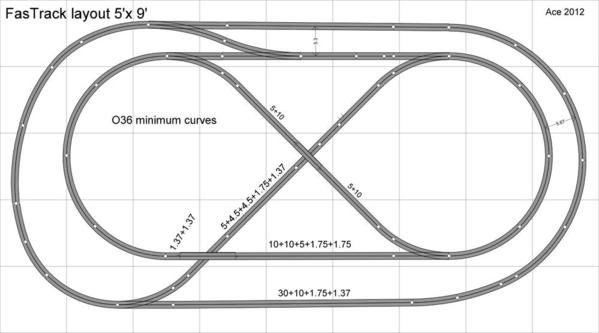
Russell, I think that parts list is for the 5x10 modified version of this. I've been trying to reproduce the 4x8 version he wants in RR-Track, but I haven't quite been successful yet, things aren't lining up the way they do in the photo.
Neat layout!!!
Just making sure...the inner loop is the O 36 curved, not the O 31, as Mike mentioned? Thanks for responding!!!
So an update on the layout that got this thread going. Since getting into this hobby I've learned a lot and had many, ahem, learning moments. From my original layout I ditched the elevated reversing loop and instead dropped the elevated track and connected it to the O72 curve in the upper left corner. I then made a second O31 reverse loop and connected it to the first reverse loop to create a second independent track. It's been fun but there have been a number of issue. The first I discovered when I bought by first big locomotive - a MTH SD45. It's several inches longer than my other locomotives and I discovered a host of clearance problems the hard way! Also the second elevated loop is almost comically short. Finally, I'm regretting using FasTrack for a variety of reasons and want my next layout to use Atlas track.
Taking all this into account I wrote up the following list of demands:
1) Need to be able to run two full size locomotives simultaneously. That might start in conventional mode but eventually I'll go DCS.
2) A switching yard to build trains and also store excess rolling stock.
3) Reversing loops because watching trains run in one direction gets old, especially on a small layout.
4) Room for my operating accessories.
5) Have all visible track be Atlas O but also make use of my existing FasTrack, especially the switches.
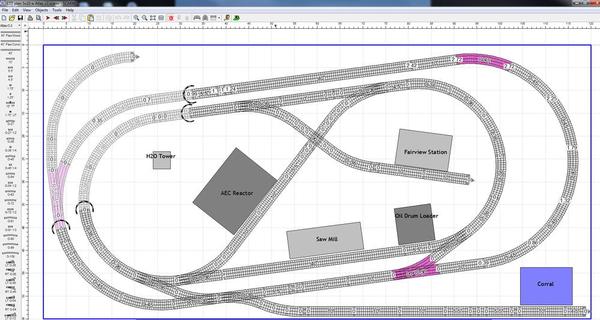
Simple, right? After a LOT of playing around in SCARM I decided to build a reversing loop and yard under my layout. I'll have to sit down to see the yard but that's OK. Trains will then ascend up a ramp in back and pop out of a tunnel onto the main layout which is nothing more than two concentric loops. I angled them a bit to give clearance for the ramp and also to break up the symmetry a bit. I do have a decent length storage spur up top and a shorter spur in the middle. The 90 degree crossover was the key to getting everything to fit. The ramp was the tricky part. I wanted at least 6.5" of overhead space in the yard to clear my tallest car. I also had to account for 2" of pink foam, .75" of plywood and 2" of benchwork. That's a total drop of 11.25". By looping around the front and bending towards the back I was able to keep the grade to just under 4%. I know that's on the steep side but I rarely pull more than 5 cars so I'm not too worried. There will also be a safety barrier at the corners should a piece of rolling stock detach and go hurtling down the ramp. Here are some pics of the current layout and my proposed new plan.
Attachments
Wow! That is an amazing twisting turning crossing plan!
Yeah, I like to think of it as a 20 foot garage plan in a 10 foot living room. ![]()
The double crossover and O72 turns going through the left corner tunnel behind the sawmill make for a longer route so you don't feel like you're seeing the same train run around in a tiny circle. The reverse loop also keeps things interesting. Biggest problem right now is no yard for switching so I'm always having to pull extra cars off a shelf and also no ability to run two trains at once. The upper loop is comically too short. It was a case of "just because you can doesn't mean you should".
Sorry for any delay. Haven't been on here in awhile due to other priorities. The parts breakdown for the 4x8 version in Fastrack is on page 1 of this post, as well as the plan with the pieces labeled.
Bill - I have attached the rrtrack file for the component listing.
Attachments
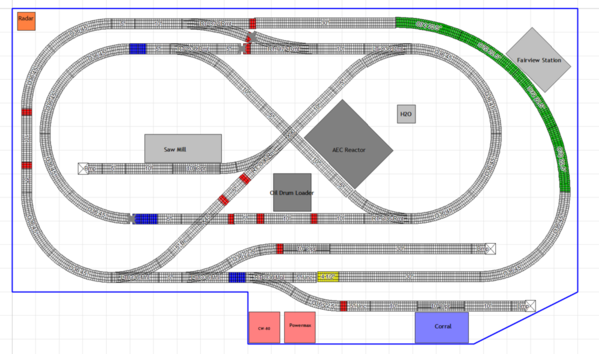
Here's my layout in SCARM. I've color coded the critical sections to make it easier to understand:
RED= 1 3/8" (on the sidings these are to create blocks, on the O72 switches these are the special no/half roadbed pieces that come with the switches)
BLUE= 1 3/4"
YELLOW= 4 1/2"
GREEN=O72
Everything else is O36 curves and 5", 10" and 30" straights. Switches are all O36 except the two O72 switches that create the top crossover.
One thing to keep in mind with SCARM and FasTrack is that SCARM doesn't reflect the true width of FasTrack. In SCARM the FasTrack shows only the width at the ties (2.25") rather than the true width to the edge of the roadbed (3.35"). I think this is why things don't always link up neatly in SCARM.
Attachments
Great plans here for my nephews first layout ..Thanks
Great plans here for my nephews first layout ..Thanks
Here's my layout in SCARM. I've color coded the critical sections to make it easier to understand:
RED= 1 3/8" (on the sidings these are to create blocks, on the O72 switches these are the special no/half roadbed pieces that come with the switches)
BLUE= 1 3/4"
YELLOW= 4 1/2"
GREEN=O72
Everything else is O36 curves and 5", 10" and 30" straights. Switches are all O36 except the two O72 switches that create the top crossover.
One thing to keep in mind with SCARM and FasTrack is that SCARM doesn't reflect the true width of FasTrack. In SCARM the FasTrack shows only the width at the ties (2.25") rather than the true width to the edge of the roadbed (3.35"). I think this is why things don't always link up neatly in SCARM.
Excellent small layout plan with ability to run 2 independent trains at same time. I showed it to my neighbor and he's going for it. But he says he is having problem with blowing the plan up to make list of needed track it blurs. I sent him your track list, maybe it will help. Again, great plan with lots of potential.
Any chance you would post the actual SCARM file for us to play with?
I've attached the SCARM file. Enjoy!
Attachments


