
Finally finished putting together the layout I plan to mount on a board for my kids. I'm limited to 5'x10' and I wanted to have room for a couple of tunnels, operating accessories and be able to have the train reverse direction to keep the kids from getting bored too quickly. I think this plan hits all of my goals and best part is that I only had to buy two switches to pull it off (shocking how expensive they are!) As time and budget allow I could expand it to include an additional outer loop (2nd pic, addition in gray) and expand it again to allow two train operation (3rd pic, addition in blue). Once I have it mounted I plan to put tunnels in the upper left corner covering the top 3 O72 curves and the 3 O36 curves on the inner figure 8. The tunnels will form a plateau for adding a small town scene. Controller and switches will go in the lower left corner.


These drawings were done in SCARM. According to SCARM several connections don't link up but FasTrack seems to have some pretty good wiggle room and it went together quite easily and hasn't come apart after a few hours of use (and definitely won't once screwed down to a board). 


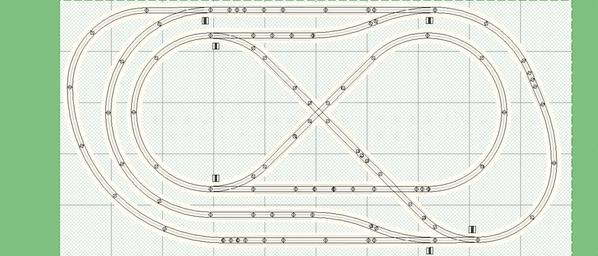
The color coding is:

Orange: O36 curves

Red: O72 curves

Yellow: 10" straight

Blue: 5" straight

Pink: 1 3/4" straight

Green: 1 3/8" straight


Track plan

Track plan phase 1 expansion

Track plan phase 2 expansion

Attachments

Images (3)
  • Track plan
  • Track plan phase 1 expansion
  • Track plan phase 2 expansion
Original Post

Replies sorted oldest to newest

I like it, at least the final iteration. I've got a 6x11 table done and I'm going to see how this translates to RealTrax. The table is the first section of an 11x11 table, but since it's for a temporary layout, I'm looking for ways to be satisfied with just this first section. If RealTrax doesn't fit, I'll play with ScaleTrax, what I really want to use because of the flextrack. My slightly larger size should allow for adding some sidings or a small storage yard too.

Ace:


Yep, I pretty much tried to copy your plan but in FasTrack. Had to tweak it since there are no FasTrack O54 curves and the spacing around the 45 crossing can be fiddly - lots of trial and error and it never does link up in the SCARM program I used. What I loved about your plan is that you can reverse the direction of the trains with only two switches. Adds a lot of variety to the plan at a fairly low cost. Nice thing about FasTrack switches is you can run the train through them when they're in the wrong position and it won't derail so my kids can just set the trains running and not have to worry about switches. No way this would fit 4x8 in FasTrack, at least not without swapping out all my O36 curves for the new O31s which would be pricey.

Originally Posted by Mike Donahue:
Using the new 031 curves on the inside, it is possible to build a Fastrack version in 4x8.


4x8 Fastrack OGR Ace

This base layout and the various alternative iterations are great for a small space.  Adding a connection to the top of the inside loops to complete the oval in these, would allow one to run 2 unattended trains for display purposes or when you just want to watch a couple of trains run.

You guys have really gone to town with this plan. I've fit in the crossover for easy two-train operation like SeattleSUP showed earlier with O36 minimum curves, but this version is 5'x 9', a foot shorter.


5x9-folded loops-3

I just noticed today that my AnyRail software has updated to include the new O31 FasTrack curves.

Attachments

Images (1)
  • 5x9-folded loops-3
Last edited by Ace

It's such a great plan because it has a lot of variety without needing a lot of expensive switches in its most basic form but can then be expanded to include sidings or two train operations as your budget allows. Not too many designs allow for that. I also like using the O72 and O36 curves - I think if you used all curves of the same radius it would be a little too symmetrical/monotonous looking. I plan to put tunnels and a plateau over the upper left O72 and O36 curves. Coming down off the plateau between the two curves will be a river so I can put a small bridge where the bottom 10" straight section is. I only added those two 10" sections because I had them left over.

Thanks for this post. I have been looking for something like this for my 4'X19'

footprint..

Between Ace's curve easments and my already on order 31" fasttrack curves. I think I can be happy building something incorporating Mike Donahue's 4x8 as a center piece.

If some one would publish a track listing for the 4x8 I would be greatful

Thanks Again   

Ironside,

The layout was secured to the walls with simple 2 1/2" drywall screws. I built the frame of the layout out of 1 x 4's, and screwed another 1 x 4 ledger to the 3 walls to support the layout. I think I set the layout at a kid-friendly 24" high, to allow my nieces to reach the back side of the layout (I built 2 pop-out sections to allow them to access the back areas).


Geno

After endless fiddling with SCARM I finally settled on a design and have built it out. I decided to add an elevated return loop on top of the tunnels to add some interest. It's a 4% grade which definitely requires some attention when coming down off the plateau though my 6 year old daughter hasn't derailed it yet (knock on wood). It's a fun layout with lots of variety but only two remote switches and two manual switches (the switch for the elevated loop is manual). Now on to landscaping....


2013-01-18 17.23.18

2013-01-18 17.22.38

Attachments

Images (2)
  • 2013-01-18 17.23.18
  • 2013-01-18 17.22.38
Originally Posted by Mike Donahue:

I have attached the track listing for the 4x8 version. Hope this helps.

Just came up from cellar from working on this.

Nice too see it back on page one again!


Mike if your still viewing the post..


Having a little problem figuring out 1.375 vs 1.75 and 4.5 vs 5" straights on the cross over center piece(31" Curve ends not 36 but 3  36" curves to the 90degree crossing along with the 45 degree crossing) Outside will be OK I am modifying it slightly.

Thanks for all your help on this


Bill


Last edited by bptBill
Originally Posted by SeattleSUP:
Because I just can't stop fiddling with it, I tweaked the design a little more to give two fully independent loops and two decent sized sidings, all in a 5'x10' FastTrack space.
Track plan expanded w sidings

I was thinking of using this layout for my son train. I got him the polar express for christmas with oval track but like to expand it for him. I was wondering if you could post parts list for this setup. I was also thinking of getting him another train that has better sound but if that is DCS can I run that on same track as the polar express

I've attached a color coded picture so you can see discern the 1 3/8" (yellow) and 1 3/4" sections (pink). The rest is pretty well labeled. Not all sections link up in the SCARM software I used but they connected just fine on my table. 


I actually wound up not going with this set-up. My daughter wanted an elevated section instead of sidings so I went with the second layout which uses the new O31 curves for the upper return loop. Both plans are nice because they allow the trains to change direction so you're not just watching it go in a clockwise oval over and over and over again. The elevated loop plan I built is also nice because it only requires to remote switches. The remaining two are manual - one is right at the front of the layout and the one on the elevated loop is on a return loop so it really doesn't matter what direction it's switched to. 

Track plan w siding

Track plan elev loop

Attachments

Images (2)
  • Track plan w siding
  • Track plan elev loop

Here's the parts list for the bottom plan with the elevation:
16 10" straight sections

15 O36 curves

1 Remote O36 left switch 

1 Remote O36 right switch 

1 Manual O36 left switch

1 Manual O36 right switch

1 90 degree cross

1 45 degree cross

8 5" straight sections

4 1 3/4" straight sections

6 O72 curves

3 30" straights

3 1 3/8" straights

7 O31 curves


Track plan elev loop

Attachments

Images (1)
  • Track plan elev loop

Pretty slick. I really like it. You get a lot of run in a smallish space with some switching fun. It also fit something I wanted in a small layout, an incline to 2nd level with return loop.


I have a thread with a few ideas for a smallish corner layout and two 5x9 layouts. Looks like space will be too tight for the L's but I have expanded the one 5x9 to 6x10 and it will go in a murphy bed style fold up!

Originally Posted by SeattleSUP:

After endless fiddling with SCARM I finally settled on a design and have built it out. I decided to add an elevated return loop on top of the tunnels to add some interest. It's a 4% grade which definitely requires some attention when coming down off the plateau though my 6 year old daughter hasn't derailed it yet (knock on wood). It's a fun layout with lots of variety but only two remote switches and two manual switches (the switch for the elevated loop is manual). Now on to landscaping....


2013-01-18 17.22.38

Looks awesome!  I came across your thread and think I might just have to snag some of your ideas for my upcoming garage layout.  I see a Santa's Flyer  Just got that exact set for my 4 y/o daughter this past Christmas.  


What is the green 'carpet' covering your table?  I can't quite make it out from the pic.  Does it work well with damping some of the fastrack noise?


Oh and about the Santa's Flyer, if yours has trouble with making smoke let me know.  Mine wasn't working at all, so I opened it up and went through a couple of steps to get it going.  Works about as good as can be expect now, perhaps even better!

The green carpet is nothing more than felt purchased at a fabric store. Dirt cheap and not too bad looking. Don't know if it helped the noise or not. My table is built on a 2x6 frame with 1x4 cross supports every 18 inches. The top is 1/2" OSB secured to the table every 12" with wood screws. The underside of the table is used for storage and that also helps keep the sound from resonating too much. It's noisy but not unduly so. I'm just about done carving/rounding out the mountains using a surform which is perfect for the job. 


I also had issues with the Santa Flyer loco but was able to get it working after following some tips I saw posted.

Hello, I really love the ideas you fellas have figured out. I am planning a layout for my 6 year old and 4 year old. My goal is to keep the interest without taking out a second mortgage. I know switches cost some $$$ so I am looking at the layout with a minimum of switches. I also like the idea of having some sort of elevation change. The only problem I have is with every idea that is diagramed the more confused I get. Just want to know how much I should look to be spending to get a good quality layout? Thanks! Awesome site!!!

jjmagoo:


My layout was built for my 6 year old daughter and 1 year old son. The money is a very real concern and you can rapidly sink a small fortune on even a fairly compact layout. One thing I like about my layout is that I was able to build it in stages. I started with a basic Santa's Flyer starter set. From there I added the figure 8 expansion set. The next phase was to add the big O72 curves on the left, the X45 cross and the two remote switches. The individual pieces are pretty affordable. The switches are especially expensive and they were the only two parts I wound up buying on e-Bay. I got lucky and won both from the same seller which saved on shipping. Even then it was only ~$20 cheaper than my local train store. The final phase was the elevated return loop. Nice part here is that I could use manual switches which are MUCH cheaper. The lower switch is right at the side of the track and the top switch while out of reach doesn't really need to be activated since it's on a return loop. 


Below I've pasted an updated track plan. The red pieces are 1 3/4", blue are 1 3/8" and green are the O31 curves. It doesn't match up in SCAR but does in real life. This weekend I threw out the felt and laid down a layer of green paint I found on the left over paint shelf at Home Despot for $4. Reasonably grass like and I'll add some proper turf cover in due time. I also finally found some Structolite. None of the big box stores in Seattle carry it but the local gravel store did. Bonus is they were able to sell me a 10 pound mini bag for $5. I also drilled holes and routed all the wires under the table. Next up is applying Structolite and FusionFiber to the remaining pink foam mountains and making more wood trestles.

Track plan

Parts list

2013-02-03 19.44.43

Attachments

Images (3)
  • Track plan
  • Parts list
  • 2013-02-03 19.44.43

Well after getting 36" of snow on Friday night and the city still in a travel lock down.

I went to work on the layout.

Thanks to everyone here.

I have the outer loop 17' x 4' and the inner reversing loop done off the crossover.

I decided to go with a elevated return loop similar to SeattleSup.

ran a couple test and looks good.

Looks like I can have sidings for 6 trains. 4 freight and 2 passengers.

working from home tomorrow so back downstairs for a little while.

I'm running this off 2 power drops now but have placed about 6 terminal tracks around both loops and will add at least one to the elevated return.

better to have more than not enough I guess.

bptbill 

So an update on the layout that got this thread going. Since getting into this hobby I've learned a lot and had many, ahem, learning moments. From my original layout I ditched the elevated reversing loop and instead dropped the elevated track and connected it to the O72 curve in the upper left corner. I then made a second O31 reverse loop and connected it to the first reverse loop to create a second independent track. It's been fun but there have been a number of issue. The first I discovered when I bought by first big locomotive - a MTH SD45. It's several inches longer than my other locomotives and I discovered a host of clearance problems the hard way! Also the second elevated loop is almost comically short. Finally, I'm regretting using FasTrack for a variety of reasons and want my next layout to use Atlas track. 


Taking all this into account I wrote up the following list of demands:

1) Need to be able to run two full size locomotives simultaneously. That might start in conventional mode but eventually I'll go DCS. 

2) A switching yard to build trains and also store excess rolling stock. 

3) Reversing loops because watching trains run in one direction gets old, especially on a small layout.

4) Room for my operating accessories. 

5) Have all visible track be Atlas O but also make use of my existing FasTrack, especially the switches. 


Simple, right? After a LOT of playing around in SCARM I decided to build a reversing loop and yard under my layout. I'll have to sit down to see the yard but that's OK. Trains will then ascend up a ramp in back and pop out of a tunnel onto the main layout which is nothing more than two concentric loops. I angled them a bit to give clearance for the ramp and also to break up the symmetry a bit. I do have a decent length storage spur up top and a shorter spur in the middle. The 90 degree crossover was the key to getting everything to fit. The ramp was the tricky part. I wanted at least 6.5" of overhead space in the yard to clear my tallest car. I also had to account for 2" of pink foam, .75" of plywood and 2" of benchwork. That's a total drop of 11.25". By looping around the front and bending towards the back I was able to keep the grade to just under 4%. I know that's on the steep side but I rarely pull more than 5 cars so I'm not too worried. There will also be a safety barrier at the corners should a piece of rolling stock detach and go hurtling down the ramp. Here are some pics of the current layout and my proposed new plan. 


photo 1

photo 2

new plan upper level

new plan lower level

Attachments

Images (4)
  • Current layout
  • Current layout
  • Upper level in Atlas O
  • Lower level in FasTrack

Yeah, I like to think of it as a 20 foot garage plan in a 10 foot living room.


The double crossover and O72 turns going through the left corner tunnel behind the sawmill make for a longer route so you don't feel like you're seeing the same train run around in a tiny circle. The reverse loop also keeps things interesting. Biggest problem right now is no yard for switching so I'm always having to pull extra cars off a shelf and also no ability to run two trains at once. The upper loop is comically too short. It was a case of "just because you can doesn't mean you should". 

Mike this layout is freakin awesome!! And exactly what I'm looking for!! But I've been trying to replicate it in AnyRail 5 and the pieces I'm using from your image (the ones I can see the numbers for, I had to guess/approximate the rest) aren't working. I get the outer loop in place properly (or so I think) but then the crossing piece (6-12051) on the inner loop doesn't fit with the right incoming side. I've spent hours trying to figure it out and it isn't working/connecting to the rest of the layout. Can you please post the more detailed list of pieces and/or detailed description of the pieces used in each place? I'd appreciate it a TON!!!!! :-) 
 
 
Originally Posted by Mike Donahue:

Bill- I have attached the labeled plan. Hope this helps.

4x8 Fastrack OGR Ace


It doesn't link up correctly but does work in real life. FasTrack has a bit of wiggle room to it. There is a small gap where the track bends a bit but not enough to cause problems. The sequence of track I have between the outer loop to the center 90 degree crossing is:
Left O36 switch
1/4 O36 curve
5" straight
crossover
1 3/8" straight
5" straight
1 3/8" straight
10" straight (or right O36 switch)
90 degree crossing
 
To connect the back/top to the inner loop I used a O72 switch. I relaid my track recently and added a second O72 switch to connect the loops as well as a O36 right switch to the upper left of the figure 8 so as to connect the top of the 8 and thus create a second loop allowing for 2 train operations.
 
Originally Posted by SF Vertical:
Mike this layout is freakin awesome!! And exactly what I'm looking for!! But I've been trying to replicate it in AnyRail 5 and the pieces I'm using from your image (the ones I can see the numbers for, I had to guess/approximate the rest) aren't working. I get the outer loop in place properly (or so I think) but then the crossing piece (6-12051) on the inner loop doesn't fit with the right incoming side. I've spent hours trying to figure it out and it isn't working/connecting to the rest of the layout. Can you please post the more detailed list of pieces and/or detailed description of the pieces used in each place? I'd appreciate it a TON!!!!! :-) 
 
 
Originally Posted by Mike Donahue:

Bill- I have attached the labeled plan. Hope this helps.

4x8 Fastrack OGR Ace


Here's my layout in SCARM. I've color coded the critical sections to make it easier to understand:

RED= 1 3/8" (on the sidings these are to create blocks, on the O72 switches these are the special no/half roadbed pieces that come with the switches)

BLUE= 1 3/4"

YELLOW= 4 1/2"

GREEN=O72 


Everything else is O36 curves and 5", 10" and 30" straights. Switches are all O36 except the two O72 switches that create the top crossover. 


One thing to keep in mind with SCARM and FasTrack is that SCARM doesn't reflect the true width of FasTrack. In SCARM the FasTrack shows only the width at the ties (2.25") rather than the true width to the edge of the roadbed (3.35"). I think this is why things don't always link up neatly in SCARM. 


Screenshot 2014-03-10 20.51.53

Attachments

Images (1)
  • 5x10 two loop FasTrack layout
Nice thing about this layout is it lends itself very nicely to being developed in stages as your budget allows. I started out with nothing more than a Lionel starter set and grew it into this in several stages. I started with an inner loop, then a second unconnected outer loop, then a figure 8, then a figure 8 with switches, then another switch and crossover to the outer loop, then O72 switches at the top and finally the sidings at the front.  
 
Originally Posted by Nessmuck:

Great plans here for my nephews first layout ..Thanks


Originally Posted by SeattleSUP:

Here's my layout in SCARM. I've color coded the critical sections to make it easier to understand:

RED= 1 3/8" (on the sidings these are to create blocks, on the O72 switches these are the special no/half roadbed pieces that come with the switches)

BLUE= 1 3/4"

YELLOW= 4 1/2"

GREEN=O72 


Everything else is O36 curves and 5", 10" and 30" straights. Switches are all O36 except the two O72 switches that create the top crossover. 


One thing to keep in mind with SCARM and FasTrack is that SCARM doesn't reflect the true width of FasTrack. In SCARM the FasTrack shows only the width at the ties (2.25") rather than the true width to the edge of the roadbed (3.35"). I think this is why things don't always link up neatly in SCARM. 


Screenshot 2014-03-10 20.51.53

Excellent small layout plan with ability to run 2 independent trains at same time. I showed it to my neighbor and he's going for it. But he says he is having problem with blowing the plan up to make list of needed track it blurs. I sent him your track list, maybe it will help. Again, great plan with lots of potential.

Yes, I've been using the part list for sooo long trying to get it to work, but I can't seem to do it on AnyRail 5. If it works in real life I'll take your word for it (with a TON of appreciation) and order all the track asap. but do either of you guys have the SCARM or AnyRail file that shows which pieces go where?
 
That would be SOOO great!!
 
R
 
 
Originally Posted by SeattleSUP:
It doesn't link up correctly but does work in real life. FasTrack has a bit of wiggle room to it. There is a small gap where the track bends a bit but not enough to cause problems. The sequence of track I have between the outer loop to the center 90 degree crossing is:
Left O36 switch
1/4 O36 curve
5" straight
crossover
1 3/8" straight
5" straight
1 3/8" straight
10" straight (or right O36 switch)
90 degree crossing
 
To connect the back/top to the inner loop I used a O72 switch. I relaid my track recently and added a second O72 switch to connect the loops as well as a O36 right switch to the upper left of the figure 8 so as to connect the top of the 8 and thus create a second loop allowing for 2 train operations.
 
Originally Posted by SF Vertical:
Mike this layout is freakin awesome!! And exactly what I'm looking for!! But I've been trying to replicate it in AnyRail 5 and the pieces I'm using from your image (the ones I can see the numbers for, I had to guess/approximate the rest) aren't working. I get the outer loop in place properly (or so I think) but then the crossing piece (6-12051) on the inner loop doesn't fit with the right incoming side. I've spent hours trying to figure it out and it isn't working/connecting to the rest of the layout. Can you please post the more detailed list of pieces and/or detailed description of the pieces used in each place? I'd appreciate it a TON!!!!! :-) 
 
 
Originally Posted by Mike Donahue:

Bill- I have attached the labeled plan. Hope this helps.

4x8 Fastrack OGR Ace


Post
The Track Planning and Layout Design Forum is sponsored by

AN OGR FORUM CHARTER SPONSOR

OGR Publishing, Inc., 1310 Eastside Centre Ct, Suite 6, Mountain Home, AR 72653
800-980-OGRR (6477)
www.ogaugerr.com

×
×
×
×
Link copied to your clipboard.
×
×